Pages

19.12.06

We've Been Doin' Bold Today!

This comment came from a cheery chap on his way back from an ICT skills session one morning. I was sure he must have been doing more than this but he was insistant, that bold was what he had been doing.

Word processing and desktop publishing, units can be integrated in really interesting and exciting ways within Literacy Sessions to encourage engagement with texts at a whole text and word level. A unit I have just carried out with a group of year 3 children really fired them up, and helped them explore poems in more depth. We all began with the same acrostic, Rainbow by David Whitehead. I typed out the poem using MS Word, and then copied the file as a template to each student's folder.

We began the session by sharing and exploring the poem on the Interactive Whiteboard. I began by embolding and changing the colour of the initial letters of each line, to match those of a rainbow. The students quickly spotted how each line began with a letter in the word rainbow, and that rainbow was spelt out down the left of the poem. We discussed how by highlighting letters and words we could alter their appearance, shape colour and size using the formatting tools on the tool bar, and at their workstations the children were asked to recolour the word rainbow wherever it appeared throughout the text. As the session unfolded we began to extend this, and to consider how we might change the font style, colour, shape or size to help the words on the page reflect their meanings, and how we might make verbs look like their actions, eg arching, growing or fading. The children really enjoyed experimenting and playing with the text in this way.

During the following sessions, the wordprocessed text was revisited, and ideas children had used were shared. This is one of the joys of a network and access to an IWB, all ongoing work is accessible for sharing and evaluation by a wider audience. The completed texts were copied and pasted to Microsoft Publisher, where it became part of a designed poetry book page. The students searched the clipart gallery and inserted images to reflect the content of the poem. These were dragged around and placed to suit their ideas. Sometimes as page backgrounds, and sometimes as illustrations. Working with the poem in this way really challenged their comprehension skills, as well as engaging them in learning those ICT skills necesary to complete their project, and which I had set out to teach and consolidate. We have published our acrostics as a class book, and despite beginning with the same file each poem is far from identical. The different text styles, graphic elements and spacial qualities of each page make all individual, and in themselves are discussion points about how visual resources can be used to create and change the meanings we present.

The children went on to play a limerick game, applying the skills they had acquired in these tasks to design and make their own poetry pages. The poetry books we made, the text file we began and reference for the source of our Limerick game are presented within the Year 3 Community pages of our School Website.

18.12.06

Repeating Patterns

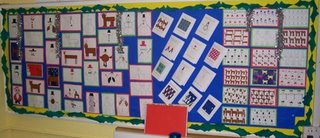
This is a unit of work we have developedwith our year 4 students over a number of years now, and one which they really enjoy. It is an innovation on the QCA Repeating Patterns unit. Over the course of Autumn Term 2, students gradually build up elements to design christmas wrapping paper, beginning with simple "wire frame" type motifs, working towards bringing design elements together by copying and pasting, to create repeating patterns and designs, before finally experimenting with background colours.


This is a really nice exercise also for practicing what I like to call "cascade saving." This involves saving different versions or drafts of the same file, using the save as function. Changing the background colour only of the file, the students repeatedly save different drafts to review and evaluate later, choosing favourite designs or outcomes for the final project which is to include their design within a desk top published Christmas card. Check out the year four gallery in our school website if you would like to follow the process yourself or would like to see the available design resources we shared to begin the project.

17.12.06

Seating Plans and Logging On: Classroom Management Strategies for the Online Classroom (Part 1)


When you enter the ICT suite with your students, do you get bombarded with the question Can I work with so and so today? Or find yourself faced with the aftermath of mass login, where children have forgotten what to do next. As a classroom teacher I know that establishing routines and consolidating these is essential, and so have a set of Network Room routines to help me organise and manage teaching and learning within this oft times seemingly chaotic environment.

Routine Number One:
I have a seating plan for the suite. Children are organised into pairs, and since literacy is still an essential part of many ICT activities, each pair has a more able reader. All our workstations are numbered, little laminated cards are attached to the tops of the monitors. In addition each numbered card also has a clipart image inserted. This way younger children can identify their machine with the train, aeroplane or elephant on it as well as by workstation number. The addition of the clipart image is something I borrowed from foundation colleagues, who usually label coat hooks and lockers with a child's first name and a picture, to enable their emergent readers to identify which hook or locker is theirs.

Sometimes a partner is away from school, and children ask if they can work with someone else. My answer to this question is always no, as the children have the rare opportunity to have access to fly a machine solo. This also means I can monitor or evaluate what they know and that they are doing, and not sitting back. I offer this reason to the students, though organisationally there is also a good reason for this, as it reduces confusion when their partners return, about who they are working with and this also reduces confusion about files and work that is ongoing. Allocating machines, also means that if there are network problems, we can always save files locally to be copied back to network folders later, and there are fewer problems in finding a student's file.

Routine Two.
On entry to the suite, we have a two minute log in challenge. Children go to their machine and log on straight away before coming together for the lesson proper so to speak. Once their workstation has begun to load, we come together as a class in the shared space at the front of the online classroom, network room or ICT suite however you refer to this space, ready to begin the lesson. I have also begun to encourage children who get back to the shared space first, to log on the teacher machine attached to the IWB in our classroom's shared space using their class log in, this has encouraged children to increase the pace of the challenge activity, and means we have access to everyones files for sharing, either at the end of the session or during the introduction. The activities for the day are introduced through a shared session, and then children go in pairs to their allocated workstations. I have found this really beneficial, as the time lapse between going to stations and then logging on, particularly in the case of some of my younger students means they have forgotten what they must do next, and which software tool they are going to use. In the early stages of a unit of work and sometimes with younger students I also, go through the log in routine and then an additional load software stage as two separate activities within the shared session, before the teaching activity is introduced. In this way the students are developing independence in locating tools, and the idea of getting set up, before we begin using the software environment as a learning environment.

Routine Three: Ending the Session
To some it may be considered a bit of a waste of time to tidy up between every session, but I strongly disagree with this viewpoint, and believe that one of the key elements in developing independence as a learner, is the ability to organise your own learning space. Tidying up is not about leaving a lovely looking room, to me, it is about organising yourself and time spent teaching and consolidating this as part of classroom routines early on in a year has enormous benefits later. In the ICT suite or Online Classroom this is perhaps even more important because we share the expensive tools to be found here with other students and colleagues in the school. It is about establishing respect for the resources available to us. There is nothing more annoying, frustrating or disheartening for colleagues and students alike to have to clear space, and tidy up before they can begin work. It is also diruptive to established routines with your class. If we consider Online classrooms as different to our own, we are in danger of seeing ICT as a time to play on the computer and not a time to learn new skills to help us in our own classroom learning. So Endeth the sermon, and climbing down from my soap box!... at the end of every session, All Users in our Suite are required to
  1. Close down all programs
  2. Log off their machine
  3. Clear away any tools they have been using in addition to the computer, eg paper and pencils, text books, or small dry wipe boards and pens.
  4. Recycle scrap paper
  5. Tuck in chairs or stools
  6. Turn off monitors
  7. Return to the suite's shared space for review and discussion

It is time consuming in the early stages, but many of my students now remind and go through my routines with me at the end of a session. They are repetitions of their own, with the addition of putting the digital projector on standby. We are role models for our students, but as learners we too can forget sometimes (usually on purpose I hope), it helps the students develop a shared sense of responsibility for ours and their learning, and the tools available if we encourage this type of intervention and support from them.

Projector bulbs are very expensive consumable items, and their lifetime can be extended by turning them off when not in use. Schools are preparations for life beyond, and many of the routines above are essential prerequisites of using ICT in the workplace. Logging off, is in the real world a network security and data protection issue, as well as good network practice.

16.12.06

Chain Stories


How do you use email with students to teach and consolidate vital skills such as Send, forward and reply. I have been using think.com with my older students this term (year 5 and 6) and wanted them to use email, as part of the program we were working on. In this environment I used two methods based on a paper based game I used to play regularly in class called "consequences." The idea of the original game was to introduce a character, fold the paper over and hide the name, and then add another, fold the paper over, and add an action, then a response, followed by another response and end with a consequence. On unfolding the paper a really bizarre story plot would unfold, and I would encourage students to develop this plot idea during writing sessions, oral storytelling or storyboarding.

Using the think environment the idea of a "chain story" evolved, firstly as a game we might play using email. A student would write the beginning of a story and then send it onto a friend to continue. They would reread the opening and add one or two sentences before forwarding it on to another friend and so on, the finished story arriving back at the start for editing, revision and publication to their think spaces. Organisationally this proved to be a challenge. It strikes me however that this could be a useful activity to carry out away from the PC, and could easily be developed as a small group collaborative writing activity within the classroom itself, using pencil and paper methods, before moving the idea into the world of email.

NOTE TO SELF: Activity might be more effectively organised by grouping students and encouraging them to story write within a given group chain, students working through the list in order. Originating student may need to resend the story around the list again or choose to complete and publish the story they recieve themselves.

Think.com is a fantastic environment to work with students in, it provides web space and individual e mail accounts for each student. Each student has a potential webspace of 10 pages, and six items to a page. Widgets are provided within the environment to enable them to add discussion boards, brainstorms and surveys which encourage others to interact with them in their think spaces. They can upload text, and pictures too, among other media types, so writing in this environment has massive multimodal potential.

I recently added a development of the chain story idea to my own think space. Using a discussion board. I began a chain story, to encourage students to add to the discussion board, the next stages in a story. Watch this space to see what happens next. It is a bizarre way to write a story as rather than beginning at the top of the page and moving down, it begins at the end of the page and is read backwards. Check out think for yourselves. A fantastic resource for encouraging collaborative work that I will be coming back to in this blog over and over I am sure.

Learning Trees


Self and Peer assessment are useful tools in the ICT Suite. I wondered how I might develop this for display, and make mine and the students ideas and learning more visible and transparent. I decided on the idea of a learning tree, as this would symbolically represent how our ideas and learning were growing over the course of the term.

The learning tree idea, evolved from something I had previously used in my classroom. On the wall I put up a tree trunk made from cut and shaped pieces of sugar paper. For every year group in the school we chose a different colour paper. These were cut into leaf shapes. In the early shapes I placed learning targets for each year group, and mounted these on the empty branches of the tree. Throughout the unit of work I shared these targets and reviewed them with the students at the end of lessons through the plenaries. As each unit of work developed we shared what we had learned, and added these to the tree as leaves of different colours. The students were keen to share their learning and to have it diplayed for all to see. It also motivated them to share their skills with me as they emerged through the tasks they were doing. So popular was this with the students I was frequently reminded of the tree, when time ran out and the plenary was to slip. Here is our learning tree from term 1. Maybe you might like to try this with your students, not necessarily in the ICT suite, my students loved the tree in their classroom too.

Navigating and Saving Files To A Network

Like most schools our ICT Infrastructure includes use of a network , using log ins and passwords to enable students to access their particular drive spaces.

This was a problematic process for some of my students, for a number of reasons. As a school we had established a system of class log ins, rather than individual students drive spaces. This means that children share a drive space per class, and in addition I inherited a system, where drive spaces were allocated to year groups, rather than classes, and so as classes changed every year so did their log ins. The first thing I did was to change this protocol, enabling the log ins and therefore drive spaces to move with each class, as they progress through the school. Recycling drive spaces used by Year 6 students in their final year, for use by the new year 1 students in the new academic year. This has had immediate benefits, in developing use of the network for children this year since they were already able to log in.

In addition to this however experience told me that students once logged in frequently had difficulty in finding their personal folders, and in organising their work. As a staff we also had difficulties due to the previous network protocol in managing assessment, since students work would be distributed about the network according to which class they had been in in previous years. My solution to this has been to create a common home drive structure fo each class. This may seem complex, and potentially long drawn out but was actually easier than it sounds ...
Honestly. The benifits far out weigh the work that went into this anyway. Using the pictorial representation of a folder most children from year 2, and all from year 3 to year 6 are now able to find their home drive and personal folder, and to save and open files from these. We also now have a potential individual portfolio of evidence for each child from their current year to the end of the primary stage, through the introduction of "cascade Saving" to these. where children have been taught to save drafts with original file names and numbers to represent the save time, and draft version of the file. This hopefully will enable review of progression through tasks and units of work.


Creating the Folder Structure
Step One:

Create a new folder called class home drive structure. Inside this Create one new folder called student_1. Inside this create one year group folder called year_one, and inside this create 6 new folders named for each term or half term. Return to student folder, and copy and paste this 6 times renaming each for the year groups who use your network, ie yr_1, Yr_2 etc.
Return to the drive structure folder and copy and paste each folder, renaming as student_2, student_3 etc. I made 36 folders in all.

Step Two:
Carry out a google search for "icons," choose images you like or that you think will appeal to the students you work with. Mine were Sesame Street, Disney and other cartoon characters. I created an "icons" folder in the shared documents folder on my computer, and then copied the icons I had chosen to this folder.

Step Three:
Open the Class home drive structure folder, and with each student folder you made, left click and then click properties. Now click on the customize tab and then the change icon button. Next browse for the icon folder you made, and choose the picture you would like to be shown for the folder, and click ok until you return to the folder view. Repeat this process for each folder, using a different icon for each.

Step Four:
Copy your Icons Folder and Class home Drive Structure to a portable storage device, eg a floppy disc or a flash drive, for transportation to school. In school log on as each class individually, use select all to copy the folders inside the home drive folder, to the class shared space. Copy the icon folder to the shared documents folder on the computer's c:\ drive. Copying the icons folder is a laborious task, and the longest part of this solution, as this has to be done on each individual machine.

Alternative to the above, would be to ask your technician or managed service provider to do this. They should not have any difficulties, in achieveing this on your behalf.

Once the drive structures and Icons were in place, during an ICT session each child was asked to choose their image, and the folder was renamed for them. There is something about this process which has enabled and supported the learning of how to save and open files. So far this term it has been perhaps the most successful implementation I have made, since it cuts down on the support needed even for some of my special needs students to work with network drive spaces. My research work seems to reflect that repetitive action is one of the means by which we learn and aquire new ICT skills, perhaps the repetition of a standardised saving and opening process has been key to the success of this implimentation.

Photo Filtre and Screen Printing


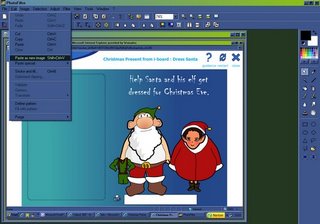
What a fantastic tool the currently freeware graphics package photofitre is. Have been working this week with children in years 5 and 6 on an email project within our learning community tool Think.com. I set the challenge of sending a christmas greeting to the world. Children needed to either find a suitable seasonal image or use a range of online tools to create an image for their greeting, and then either upload to their think space or email it as an attachment to me for upload to the school website.
The big problem with many online tools is that they are flash or java script based, and saving the final image they produce is not always possible. (This can be frustrating for the students and their teachers alike.) SO! I introduced the screen capture function in windows.

Did you know that by pressing the printscreen button on the keyboard, what ever is visible on the screen is copied to the PCs clipboard. Opening Photofiltre, and then using the paste as new image tool then places the entire contents of the screen as a new image which can then be edited and manipulated. The area of the larger image that the students want to keep can then be selected and then cropped to include only the pieces they need, or want to keep. The image can also be resized and then saved in a web friendly format, eg gif or jpg. What I also found interesting is that unlike many of it's more complex counterparts its fill and drawing tools work without the use of selection tools and as a result the students enjoyed recolouring parts of the image they had made, and adding text, before saving and uploading or sending them to me as e mail attachments.

I also used this method last week to capture images made by Year 1 students, which I saved and then included in a desk top publishing package to produce their christmas cards this year.

Note to Self:
Could also be useful to anyone looking in, who is thinking about how to capture or collect evidence of onscreen learning or activity, in an environment such as a web based task, where the outcomes are not savable, and where a colour printer is not readily available, or where you wish to add annotations of your own, and children's comments. Some of the final product oucomes can be seen on our school website Christmas Pages .

Top Tip:
Print Screen captures can be pasted directly into almost any document, I find it useful however to begin with a graphics package as I usually do not need everything in the image produced. Also the images made can be saved and used again, in skills consolidation displays etc. The possibilities are endless.