Pages

27.5.08

From Probot to LOGO: Some previous posts in action

I have put together this photo montage for the time being to share some of the activities my students have engaged in while using Probots and MSWLOGO this term. Even though presented here in an ICT context, references placed towards the end of this post highlight a number of areas from the Primary Framework for Mathematics with which the children engaged, through the using and applying strand, and which draw into focus the cross curricular potential of work such as this to help children make links between areas of learning.


The file is progressive and begins with the children using the probot to create skeletons around which they made and then decorated their own floor compasses. From here working in groups the students used their floor compasses to learn about compass direction, predicting outcomes from given inputs, eg if I am facing east, and make a 1/4 turn east what direction will I be facing? This required them to know and use the numerical values for rotation sizes, or to calculate these using halving and doubling strategies. Within the problems set we also replaced fractions of a turn with the number of degrees, and the directions of a rotation with clockwise/anticlockwise, and right/left. The children went on from this to make up challenge questions for their friends in other groups.

In the next series of activities the children made mazes using strips of paper. Working initially with right angles, some children chose to extend the activity to include 45 degree turns. The children used their knowledge that a Probot step was 1 cm to help them measure the distances the probot would need to move, and estimation to predict and test the size of turn they would need to make at each point in order to navigate the maze. After step by step planning the children were asked to input procedures, that would take the turtle from one end of the maze to the other without stopping.

The final photographs in the series represent a session in the ICT suite where children used MSW LOGO for the first time. The students were given a prepared treasure map which they loaded into the LOGO workspace, before we discussed as a class and decided the route around the island we would take, or the order in which we would visit particular landmarks. Transferring the floor based experiences of the students to the screen was not difficult, and after only a brief introduction to the commands and how these should be input, they worked very successfully and independently, to resolve many of the issues they encountered. In the plenary to this session the children were asked what they would like to do in the next session, and suggested that they would like to have a blank treasure map, that they could add landmarks to themselves, they could then ask their friends to journey around their island following a route they had prepared.

This series of activities, as well as the obvious ICT and Geographical links, offered opportunities for the students to engage practically with the following strands and related objectives from the Primary Framework for Mathematics

Measuring
  • Know the relationships between.., metres and centimetres..., choose and use appropriate units to estimate, measure and record measurements
  • Read, to the nearest division and half-division, scales that are numbered or partially numbered; use the information to measure and draw to a suitable degree of accuracy
Understanding Shape
  • Read and record the vocabulary of position, direction and movement, using the four compass directions to describe movement about a grid
  • Use a set-square to draw right angles and to identify right angles in 2-D shapes; compare angles with a right angle; recognise that a straight line is equivalent to two right angles
Counting and Understanding Number
  • Read and write proper fractions, interpreting the denominator as the parts of a whole and the numerator as the number of parts; identify and estimate fractions of shapes;
While using and applying their knowledge and understanding of these areas in the context of problems and puzzles.

Many of the activities here are drawn from or build on previous posts that can be found within the control category to the left of the page.

26.5.08

Explanatory Texts From a Multimodal Starting Point

As a class this term we have been reading the Amanda Mitchison Biography "Who was... ? Isambard Kingdom Brunel." The story even though a challenge in places has fascinated the students. The book has proven to be a fantastic stimulus for discussion about the "great man of Iron" but when combined with web based images and tools has also stimulated high quality talk for writing in support of mechanism based explanatory texts .

Of Worms and Men..

The tunnelling shield invented by Brunel's father, appeared in the opening chapter of the biography and was a great starting point for discussion, one which began with Marc Brunel's observing ship worms at Chatham Docks, before inspiring his idea to dig tunnels through a process of removing spoil, inching men forward in a protective shell and lining with bricks the space behind them as they work. This principle is still employed in modern tunneling, and the enormous tunnel boring machines we see today work on a similar basis. The use of modern control technologies, machine automation of processes, global positioning and monitoring and sensing technologies may have improved navigational accuracy, speeded up the process, but it is no less dangerous today than in the past, spoil still must be removed and the machinery maintained, driven and programs planned, miners still scurry around in the spaces between the tool and the tunnel, lining it as the machine edges forward. The system has advanced, but even as the technology charges on, the principles of its evolution and in many ways its operation remain similar to those originated in Brunel's time. A need is identified, available designs and tools explored affordances exploited to identify possible solutions, before adaptations or innovations are made on these to create a product that either meets our needs, or carries us forward into the unknown. As we have read Brunel's story together I have tried to be mindful of this in the discussions we have had, not only talking about the great man's life and works, but also exploring the similarities between old and new technologies. Not only is this a valuable place to be in terms of historical investigation, comparing past and present, but an essential process based conversation to have in light of a DT curriculum in the England that requires students to engage as designers and makers through Investigation Dissassembly and Evaluation Processes, and an ICT curriculum that requires a similar set of processes to evolve beyond the skills based aspects of the curriculum in developing ideas and exploring the impact of ICT on everyday life.

In terms of Literacy development the formal use of terms relating to "cause and effect" are not common place in the talk that we use or encounter. The written genre of explanation requires us to write from an impersonal perspective and to use "Causal Connectives" such as "this causes, " "as a result," and so on. Taking an impersonal view of the action we are describing can be a real challenge, I remember myself writing science experiments up for the first time at secondary school and being reminded constantly that I needed to use impersonal pronouns while I tried to explain the process as if I wasn't involved. In essence this made the difference between my report being an explanatory text and a set of instructions or a recount. In talking about diagrams such as the tunnelling shield I began the process of modelling the language structures the students needed to hear, that would help them rehearse the written work they would use later. Recording these on the diagrams we explored as a flow chart.

Eg
Men standing in the shield dug out the soil and rock, which was thrown to the ground.
Labourers loaded the spoil into barrows, that were used to carry it out of the tunnel.
As the shield moved forward, the tunnel was lined with bricks, this helped support the roof... and so on.

As the students became more familiar with the sound of the genre, we began to collect some of the words and phrases we were using to display on our word wall.

Converging Technologies

For the last couple of weeks we have been using our literacy sessions to extend our experiences of writing explanatory texts while exploring how some of the technologies that enabled Brunel's visions to emerge worked. We focussed on steam engines and Steam Locomotives technologies Brunel did not invent but was keen to adapt and exploit in his endeavours. To explore the principles behind turning up and down movements into rotary movement to drive ships such as the great Eastern and Western we explored how stationary pumping engines worked. "North Star" one of the first locomotives to run on the Great Western Railway was built at Robert Stephenson's works in Newcastle, and as we had found some amazing material online about Stephenson's Rocket we decided to use this as a model to help us find out about how Brunel's locomotives worked.

Multimodal Starting Points Using Talk to Promote Writing

Within this unit although using some written texts initially to support how the features of an explanatory text are presented and work, most of our activity involved making and using models, and exploring video presentations and animations to help the talk for writing process. During the first week we used videos from Espresso, to share visual and audio descriptions of the processes involved in powering a Bolton and Watt Stationary Beam Engine. We used these video texts to scaffold and rehearse verbal explanations of how the engine worked. As a class we made cardboard models, including linkages and a background diagram of the engine to help us create the link between our talk and the writing we would later engage in. As the children worked with these they were encouraged to talk about share and rehearse with their partners their growing understanding of how these machines worked, gradually being encouraged to expand and present their oral explanations to include a range of sentence openers from our word wall and to begin including the causal connectives they would need to use in their written captions for presentation later in the week. The children were very excitied by the quality of the modelled outcomes they produced, but I was also really impressed by the quality of written outcome produced.

The second week, of activity involved the students in expanding the process previously worked on by creating a similar model of Stephenson's Rocket. We began with the image below left, before the students began creating their own background diagrams similar to that on the right. The students were given a cut out drive wheel to begin with, and the large wheel space at the front drawn in as their starting point. While discussing the source image we also identified that this drive wheel would be where our mechanism would be added to the diagram later in order to give a sense of scale to their drawings.

To support the sessions as the week progressed we used this nice Flash animation from the BBC website as our stimulus for talking for writing. It helped us decide what the mechanism we needed would look like, and to pick out the four key processes we would include. The Steps in our explanation would be

1) Firing up the engine (how the water was heated)
2) Water turning to steam (why the water was heated)
3) Steam forces down the Piston (what the steam was for)
4) The drive shaft turns the wheel (the outcome of all this effort)

On completion of the diagram and mechanism the children were encouraged to explain the process orally to partners and rehearse the captions they would add.
They were challenged to use a variety of sentence openers interestingly several of the students used time connectives they had collected in previous writing session and units to do this. Among the success criteria for the activity was also the need to use the causal connectives we had collected link action with outcome in their model as they described them. I have been really excited by the quality of the children's work. I haven't any photographs of the outcomes from this activity yet, but will include an example or two later. Combining multimodal text use, talk for writing and animated mechanisms however did have a dramatic effect on the way the students finally presented their outcomes. Linking the use of DT to model the process not only gave context to scaffold talk for writing but beyond the DT and literacy based experiences gained from this series of activities, the students were also helped to make links between this and their science work on forces using magnets and springs, and to apply language developed here in their ICT unit on control as we explored how input brings about output.

Image Credits:
Tunnelling Shield from Wikipaedia
Stephenson's Rocket Cutaway From BBC
Student work and outcomes SDMills
5.5.08

Using Textease to make Hide and Reveal Tools

I am commited to a multiple tool approach to working with ICTs and keen to explore as many tools as possible, when writing or developing classroom activities for students rather than simply promoting and sticking with the ones I am most familiar. I feel it is important to be mindful that any one tool rarely meets the identified learning outcomes or the processes we want to use the tools for, either in resource development or with the students during projects. Following my interview with James for the Podium Podcast during half term, I was forwarded some Textease files to play with, they didn't quite fit the bill in terms of the resources I was working on but did excite me in terms of how they and the environment could be used to develop resources and model and make pictograms with students.

There are a number of available tools that can be used to create pictograms as tally charts. Tools such as Interactive-resources' Maths Pack 2 include flash based ITPs that enable class tally charts and pictograms to be made, by dragging or clicking to reveal images. These can be used to support discussion and preparation for students to engage with other data handling processes. IWB Notebooks too can be made, drawing axes using the line tools, then stacks of images created for drag and drop, using the clipart gallery and clone tools to create more personalised pictogram as tally surveys.

The method used to create the pictogram files with Textease, allows a hybridisation of the two process, using the hyperlink tool in the software to create an onclick event. That is to say, to create a file that when spaces within the chart are clicked or pressed, reveal an image or object.

So How do we do this?

The first step in creating a pictogram file is to decide what your survey will be about, and then to collect and import images that will represent and support the data collection process. These images can either be selected from the extensive clip bank provided by the software, or imported from outside the tool.

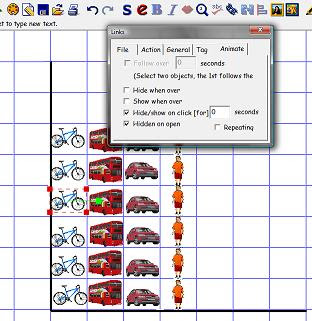
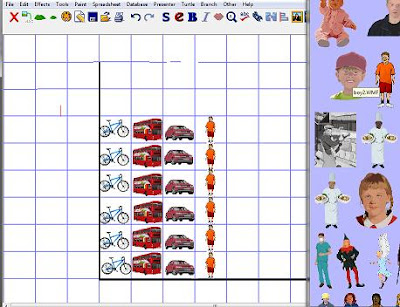
To create my pictogram I began by inserting one of each image I wanted to use, resizing each one to scale to the chart space I was using. With the images in place and resized I selected, then copied them, pasting repeatedly until I had the number of images I wanted to use in each area of the chart. Next I arranged the images in columns as shown in this image.


Unfotunately at the moment there is no quick way to carry out the following step, which is to create the onclick effect, so each image must have the effect applied individually.

Adding the Onclick Effect

1) Click to select the image (object) you want to hide and reveal on click.
2) Select the hyperlink button from the tool bar
3) Click the animate tag
4) Click in the "hide/show on click," and "hidden on open" tick boxes
5) Click close

Clicking off the object, the next time it is clicked, it disapears. Clicking on the object again, or rather the space where it should be, reveals it or makes it appear.

Now saving the file and closing it, when opened again it presents the viewer with an empty set of axis, and clicking in the spaces reveals the images hidden there. This tool can now be used with the class to collect data, on our journey to school today as a personalised ITP.

However if your school has a network or site license for the suite of tools, the file can also be shared with students to work on themselves. By placing a copy of the file in a shared folder on the network, students can open softease, and the file to work on themselves; customise it based on their own surveys, perhaps by visiting other classes, or the one developed by the class. They could add personalised titles and axis labels, and "save the file as", to personal spaces to maintain the original template.

As you can see the process of creating the file is fairly straightforward so students could also be helped or shown how to make their own and not ticking or unticking the "hidden on open" box, the survey data can be maintained, for use in other work. The outcomes of activities using this tool can also be saved directly or printed out, without the need to copy the screen to another software environment, which is neccesary when using ITPs such as those mentioned earlier. Providing template files with onclick reveal means this activity would be ideal for use with younger students making pictograms, where the charts can be generated quickly, and the focus of Data Handling activity, that of solving problems and asking and answering questions reache with increased pace. Thanks to Doug and James for sharing this technique with me. I hope the post has done it justice.

2.5.08

Which of the Web's Birthdays Will You Celebrate?

Thanks to Andrea Dunn, for posting a link to this very accesible BBC article about the origins and birth of the World Wide Web. 15 years old this week (again)? A Hippo Birdie 2 ewes!