Great video from Sophos Labs and a very Enthusiastic sounding fella Graham Clulely. How to choose a strong Password. Thinking this might be a nice tool to support discussion during our introductory Phase Three sessions.
27.7.11
Phonic Games and Zondle
 |
| From Zondle Newbie, to.. Big Smiles! |
I am going to spend most of this post making a topic using Phase 1 and 2 phoneme/grapheme groups. I have made a number of resources already to support work with this cluster, both with students and as support material and template files to share with colleagues. So forgive me as I play, think through a few aspects I want to share back at school and a few thoughts around CPD that might be needed to utilise this tool set or how they might be embedded not just as web based resources but also within classroom and IWB supported sessions.
Delving into the Quiz Builder
This morning I decided to investigate the more tab in the quiz builder tool, having watched some of the excellent video tutorials recommended by @ wayneholmes. Amid the tools mentioned in the videos was "Zondle Builder," a tool that I thought Foundation and KS1 colleagues might find particularly exciting. Zondle Builder currently in Beta, is a filtering tool to help quickly build phonic games and resources from an already populated database. In the Builder, wordlists are organised initially, under these scheme headings as the first filter option, Jolly Phonics, Letters and Sounds, and High Frequency Words (Dear Zondle would it be possible to include a filter for the so called "tricky words?"). This is the first time saver being able to identify with existing phonic programs in common use. Items can be further filtered within each scheme by Phase (letters and Sounds), Word Set (High Frequency Words and Jolly Phonics). So in two clicks I have been able to refine items very quickly,with further focus possible by refining word sets through other more specific filters, eg consonant and vowel sequencing. Once filtered down to the specific word groups required, further tightening of the selection is possible by deselecting words from presented lists that I can exclude from my final quiz list.
On Getting Lost, and Learning from my Mistakes
I have to admit to getting a bit lost while trying to find the "Zondle Builder," but this was more to do with my "IKEA Man overzealousness" than Zondle itself... Yet another if only... indeed if only I had rewatched the video, or waited another 30 seconds, the mist would have been cleared away. Anyway, time wasn't wasted indeed I spent time exploring the contents of the more tab and created my first phonics quiz and games, in the process identifying a developmental task and key process I will need to revisit with colleagues, namely recording and saving audio for upload. Anyway on with the post.
Here is my first game Phonic game SATPIN Quick Sand Bunny.
This was created using an item from the more tab, the "Phonics- drag the letters to create graphemes that make up a word" question type

Entering each word was achieved a phoneme at a time, selecting and clicking the phoneme keyboard (1), dragging the grapheme I needed from those listed in blue (2), before sequencing these on the "hangman type" space (3) by drag and drop. On completing each word pressing the save question link added it to the quiz. By repeating this process I created the word list for my quiz in between 10 and 15 minutes. On returning to my topics, I was able to click on my quiz and select the game I wanted to use.
Sharing My Game
To share my game here I clicked the "embed this game in your site" link in the top right of the game window. There is a great video from Zondle explaining the process here. However for class/school bloggers or VLE users rather than creating a web page, you will need to create the post or add a page element to house your game first. After copying the code from the site as in the video, returning to your blog space or page element, you will need to view the page's HTML source. Tools to do this are usually provided as a button option on the tool bar or as in blogger a tab. With the HTML source/editor visible click into the text box, right click and select paste or holding down the control key and pressing the V key should paste the code where you chose to put it.
All VLEs and Blogging platforms are slightly different, so explanations here as within the video beyond the generic is difficult. A little playing and mouse hovering will be necessary, perhaps even a delve into the help files might be useful in enabling you to find the tools you need.
Zondle Builder a Real Jewel
 Moving on then it transpires that what I missed earlier was the floating "Zondle Builder" Button that appeared after I had clicked the More Tab.
Not quite as observant or sharp as I used to be maybe!
Anyway clicking the Zondle Builder opens a page offering a 3 step process to making your phnonic or spelling game question.
In Step 1: Select your quiestion type (how you would like the students to engage with your words.)
In Step 2: Use the filters to find and narrow down the word groups you would like to use and generate your word list.

Having explored the interface and with familiarity this was really quick to achieve. From this again a number of games are now available to be played and shared. As a treat for following my wittering this far, here is one of the game generated from the list above.
Variety is the Spice of Life
Thinking about using these activities, I can't see myself simply wanting to embed these phonic zondles in a web page, blog post or VLE and hoping the students will want to visit them. As games they will stand alone for consolidation and practice, but would be even even more effective used as integral parts of Phonic sessions.
I had my word list prepared and in class will no doubt have a range of activities and tasks to use with the students. Some of these will be whole class, small group or individual tasks. Some will be practial, physical and because we are talking about sounds... heavily based in speaking and listening. The tasks could involve physical objects, use of worksheets, the use of look and say with flash cards but having a particular personal vent towards embedding and using ICTs, I would also include the use of "multimodal" tasks, using dry wipe whiteboards as we work as a class around our IWB. These activities would include
- Phonic photosets and slideshows using images from the web, to represent words and phonemes.
- Odd one out shows using powerpoint slides and photograph, or present my phonemes in a variety of font styles to encourage recognition of the letter shape in a variety of forms.
- Rub and reveal and white on white activities having students predict which of our words letters will appear. How do we know?
- Using a set of "flash based" editable dice set up in my Notebook, to randomly generate graphemes, challenging students to spell words using them before collecting ideas sounding them out and reading these through using sound buttons.
25.7.11
Create Your Own embeddable Games and Interactivities Support and Consolidate Learning
Well half an hour has passed and I have made a start on my first 100 and odd games to use in the DTP Unit next term. Well, I haven't personally made a ton of games but I have finally logged into my Zondle account for a play, and yes in less than 30 minutes input a few trial questions, before the site using my quiz created a selection of games that I can embed into or link to from my VLE.
These games are based on use of Microsoft Publisher, the tool we will be using but could be edited to make them more generic, or developed around any topic or theme I am working on from across the subject base of the curriculum. I do need to give some more thought to the questions I have created as they were quite rushed, but I am able because I own the underlying quiz to go back and edit these. Once I am happy with the quiz I am able to share my games with others in the Zondle Community too, so if you register and log in, there are a growing number of games already in existence.
The First Game here Zondles R Us presents my topic quesions in a straight forward quiz format.
... while this game Fish Nosh, challenges the students to engage with the quiz while being rewarded with the opportunity to earn extra points within a platform game type environment.
I still need to work on my quiz, and will probably add a few more questions to challenge my players as my planning progresses allowing more opportunities for game play. What is great however is the possibility down the road to use these activities alongside other embeddables as plenary and homework follow ups to help develop and consolidate of vocabulary, key concepts and ideas from within the units of work my students engage with.
Additionally, two other tools I have used alot are jigsaw puzzles created at Jigsaw Planet and Wordsearches made at The Ultimate Wordsearch Maker. The students have not only enjoyed using the embedables I have created at these sites, but also creating their own topic based versions, which we have shared by email, and through shared spaces within the VLE. Here are two examples I created and also on a DTP theme.
Jigsaw: Click to open jigsaw in same window.
 48
48 
Wordsearch: Click on the first and last letter in each word you find.
I am looking forward to sharing Zondle with colleagues at school and exploring the how or wheher we can use it aongside I Am Learning a games based learning platform we have subscribed to use next year to support homework. I have already shared wordsearch maker and jigsaw planet with a number of colleagues who have enjoyed using these to create material for use with their students.
Note To Self
Wonder if Zondle could be used with students to help support and develop validation processes during research and Independent Enquiry. Having worked with exemplar Zondles, students could be challenged individually or in pairs to research and create quizes around particular topics or themes using the multiple choice, true false or free text formats. They would need to validate and check the accuracy of their answers before these could be used.. Something to ponder... A pebble in the pond.
These games are based on use of Microsoft Publisher, the tool we will be using but could be edited to make them more generic, or developed around any topic or theme I am working on from across the subject base of the curriculum. I do need to give some more thought to the questions I have created as they were quite rushed, but I am able because I own the underlying quiz to go back and edit these. Once I am happy with the quiz I am able to share my games with others in the Zondle Community too, so if you register and log in, there are a growing number of games already in existence.
The First Game here Zondles R Us presents my topic quesions in a straight forward quiz format.
... while this game Fish Nosh, challenges the students to engage with the quiz while being rewarded with the opportunity to earn extra points within a platform game type environment.
I still need to work on my quiz, and will probably add a few more questions to challenge my players as my planning progresses allowing more opportunities for game play. What is great however is the possibility down the road to use these activities alongside other embeddables as plenary and homework follow ups to help develop and consolidate of vocabulary, key concepts and ideas from within the units of work my students engage with.
Additionally, two other tools I have used alot are jigsaw puzzles created at Jigsaw Planet and Wordsearches made at The Ultimate Wordsearch Maker. The students have not only enjoyed using the embedables I have created at these sites, but also creating their own topic based versions, which we have shared by email, and through shared spaces within the VLE. Here are two examples I created and also on a DTP theme.
Jigsaw: Click to open jigsaw in same window.
Wordsearch: Click on the first and last letter in each word you find.
I am looking forward to sharing Zondle with colleagues at school and exploring the how or wheher we can use it aongside I Am Learning a games based learning platform we have subscribed to use next year to support homework. I have already shared wordsearch maker and jigsaw planet with a number of colleagues who have enjoyed using these to create material for use with their students.
Note To Self
Wonder if Zondle could be used with students to help support and develop validation processes during research and Independent Enquiry. Having worked with exemplar Zondles, students could be challenged individually or in pairs to research and create quizes around particular topics or themes using the multiple choice, true false or free text formats. They would need to validate and check the accuracy of their answers before these could be used.. Something to ponder... A pebble in the pond.
24.7.11
Google Forms, Calc, Bar Charts and Excel: Data Handling Gets Creative
In the process of doing housekeeping on the PC and at my blog, I have come across a number of partially completed posts waiting for an audience. So to work, this post outlines a series of activities I used with students in Phase 2 while introducing Spreadsheets for data handling last April.
Communal Data Collection Using Google Docs
 The unit began in class using our Asus netbooks and a Google form I had prepared entitled " A Few of Our Favourite Things." The form was set up as an online questionaire, with free entry text boxes. The students accessed the web and followed a prepared link from the VLE to the data entry form. In pairs the students were encouraged to talk about and then respond individually to a collection of questions around the subject of our favourite things, such as what is your favourite colour/song/football team/subject at school? Completing the form and pressing submit, automatically updated a Google spreadsheet, that was displayed on screen. The live data collection was a real draw, as they watched each other's data arrive and the spreadsheet update in real time. Pace in this part of the session was generated by the sense of urgency to submit their information and see it appear before others. We knew how many students were in class, and so the size of the sample we expected to see. We could check quickly that everyone had submitted their data by counting the number of rows completed, before closing the "poll" and exporting the data sheets for use table top based activities. When all the data was in the spreadsheet was exported and saved as a pdf file, this was then printed and distributed to groups of students to use as the basis for tallying and data entry.
 As a primary teacher, I am familiar with the amount of time that can be taken up with student data collection, as individual students navigate the room, collecting responses by tally. I like the idea that using this method a range of data was collected relatively quickly, and as a communal act was then available to all following submission. One of our key questions before engaging with our data sets, must be has everyone responded. Placing the google spreadsheet centrally to the IWB, the students could see the sheet being updated as data came in, since the form had been set up so all fields were compulsory, no one could submit until they had completed each field, and then simply counting or tallying the number of respondants visible we could identify who we were waiting for. Having a range of data available allowed us to use real information in our initial skills teaching activities, and then for students themselves to select from data sets they were interested in to develop their own individual data sets for further exploration.
Rerepresenting our Samples as Frequency Tables
With the downloaded "spreadsheets" distributed to pairs of students, we worked together on our Netbooks as I modelled, using a projected image of the screen how to create a frequence table using Open Office's Calc spreadsheet. We did this using the same data set.... Our Favourite colours. The students were shown how to enter text labels in one column, elimnating duplicates as they went, before in the parallel column counting/tallying and recording the frequency of voters for each colour. These tables were then given a group constructed title, and the cells into which data had been entered were adjsuted for fit, and then formatted with borders. Each student pair then saved their file.
Next the students were asked to choose two data sets from those on the spreadsheet printout and to create frequency tables for these independently, saving their work periodically so the data would not be lost.
From Frequency Tables to Pictorial Representation
With our data enterd to the Spreadsheet and the tables formatted, we moved on together using the data set we had set up together as our starting point. Using the chart wizard students were guided through the creation of a bar chart. As we worked students discussed and were encouraged to add appropriate chart titles, and also axis labels. We identified which axis was the x and which the y, we discussed what was special about the data represented on these, and appropriate titles and labels for them. The students were also, shown how to change formatting and how to recolour the columns and bars in the chart.
Students were then left to practice this process creating a set of bar charts for each of the three other data sets they had created.
This process took approximately 3 sessions of an hour each. Once completed files and charts were upoaded to the VLE, from where they could be accessed for printing out and display.
Moving On: Presenting Pictograms in a Garden
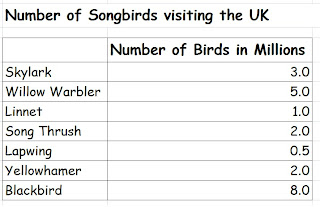 In class the students had been introduced to Calc and Google Spreadsheets, and they had experienced using these tools as part of a collaborative task, to input and collect data remotely and to tally, enter, present and rerepresent data locally. In the final stage of this project however I wanted the students to get creative, considering other elements in chart creation with a spreadsheet environment, that might make our maths more appealing interesting and accessible to a reader. To do this I used another prepared data set, but this time based on a set of survey data I had available to me around songbird populations in the UK. For this series of activities the students were given access to Excel, rather than calc which they had been using on the netbook. We began the session by discussing Excel and comparing it to the other tools they had used. What did they notice about the environment? What was the same about it and what was different? For all intents and purposes the tools were largely the same, they were visually a grid, made up of cells arranged in rows and columns. We formatted the cells, rows and columns in a very similar way. With these identified, the students were then provided with data sets to enter, and format as before. We identified the chart wizard tool, and then set to work creating charts based on the data, adding appropriate axis labels and a clear title, with the students recolouring and reformatting the chart.
The students were then asked about the data itself. How many of these birds had they ever seen? Where would they expect to see them? Did the students think it would be possible to create a bar chart that would really draw in their audience, or even wow passers by as they were working? Could we create a chart that included images of the birds, and set the birds in their natural habitats. Viewing charts as part of the Multimodal world this would add an additional layer of meaning making to the outcomes.
The students were now engaged in a collect and store task, using an image search to locate individual images of each of the birds in question and one final image of a garden.... A bar chart in a garden...
The students were then encouraged to further explore the formatting tools for their charts, and to apply the skills tha already had from work with Calc. We made a second version and this time instead of colour formatting bars, used the fill effects button and picture tab to insert individual bird images to our chart columns. These were then scaled by 1, to create a pictogram type effect. Highlighting the chart area the garden image they had found was then applied as a background to the chart plot area itself. Very pretty. However with the images inserted the axis labels and values as well as the chart title were less readable, requiring some further formatting effects to be applied, changing font colours and backrounds became a necessity to make them readable.
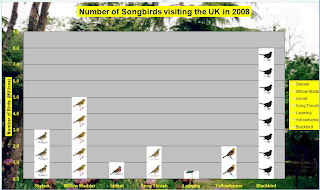 The outcomes are very attractive, as well as introducing for me a key aspect to the purpose of data handling the idea that we produce charts and graphs to be read and interpretted. Like other visual text sources, they are created to help an audience access and interpret them, the more relavant our content to context the more likely we are to portray the meaning we set out to share. Persuading students to use formatting devices for other reasons than because we can, is a key aspect to helping them understand the roll of such devices, and ICTs offer incredibly powerful and creative ways to do this. In this unit I wanted students to engage with Spreadsheets as a mathematical tool, not only for its pace and dynamic nature in presenting and representing information, but also as a way of managing the process and engaging with charts and graphs as a form of visual literacy.
Communal Data Collection Using Google Docs
 The unit began in class using our Asus netbooks and a Google form I had prepared entitled " A Few of Our Favourite Things." The form was set up as an online questionaire, with free entry text boxes. The students accessed the web and followed a prepared link from the VLE to the data entry form. In pairs the students were encouraged to talk about and then respond individually to a collection of questions around the subject of our favourite things, such as what is your favourite colour/song/football team/subject at school? Completing the form and pressing submit, automatically updated a Google spreadsheet, that was displayed on screen. The live data collection was a real draw, as they watched each other's data arrive and the spreadsheet update in real time. Pace in this part of the session was generated by the sense of urgency to submit their information and see it appear before others. We knew how many students were in class, and so the size of the sample we expected to see. We could check quickly that everyone had submitted their data by counting the number of rows completed, before closing the "poll" and exporting the data sheets for use table top based activities. When all the data was in the spreadsheet was exported and saved as a pdf file, this was then printed and distributed to groups of students to use as the basis for tallying and data entry.
 As a primary teacher, I am familiar with the amount of time that can be taken up with student data collection, as individual students navigate the room, collecting responses by tally. I like the idea that using this method a range of data was collected relatively quickly, and as a communal act was then available to all following submission. One of our key questions before engaging with our data sets, must be has everyone responded. Placing the google spreadsheet centrally to the IWB, the students could see the sheet being updated as data came in, since the form had been set up so all fields were compulsory, no one could submit until they had completed each field, and then simply counting or tallying the number of respondants visible we could identify who we were waiting for. Having a range of data available allowed us to use real information in our initial skills teaching activities, and then for students themselves to select from data sets they were interested in to develop their own individual data sets for further exploration.
Rerepresenting our Samples as Frequency Tables
With the downloaded "spreadsheets" distributed to pairs of students, we worked together on our Netbooks as I modelled, using a projected image of the screen how to create a frequence table using Open Office's Calc spreadsheet. We did this using the same data set.... Our Favourite colours. The students were shown how to enter text labels in one column, elimnating duplicates as they went, before in the parallel column counting/tallying and recording the frequency of voters for each colour. These tables were then given a group constructed title, and the cells into which data had been entered were adjsuted for fit, and then formatted with borders. Each student pair then saved their file.
Next the students were asked to choose two data sets from those on the spreadsheet printout and to create frequency tables for these independently, saving their work periodically so the data would not be lost.
From Frequency Tables to Pictorial Representation
With our data enterd to the Spreadsheet and the tables formatted, we moved on together using the data set we had set up together as our starting point. Using the chart wizard students were guided through the creation of a bar chart. As we worked students discussed and were encouraged to add appropriate chart titles, and also axis labels. We identified which axis was the x and which the y, we discussed what was special about the data represented on these, and appropriate titles and labels for them. The students were also, shown how to change formatting and how to recolour the columns and bars in the chart.
Students were then left to practice this process creating a set of bar charts for each of the three other data sets they had created.
- Applying really clear and thorough titles for their charts that would help their readers.
- Producing Axis Labels that would inform their readers of exactly what was shown there
- Recolouring the data plots and bars, choosing appropriate colour fills and effects to match the data.
This process took approximately 3 sessions of an hour each. Once completed files and charts were upoaded to the VLE, from where they could be accessed for printing out and display.
Moving On: Presenting Pictograms in a Garden
 In class the students had been introduced to Calc and Google Spreadsheets, and they had experienced using these tools as part of a collaborative task, to input and collect data remotely and to tally, enter, present and rerepresent data locally. In the final stage of this project however I wanted the students to get creative, considering other elements in chart creation with a spreadsheet environment, that might make our maths more appealing interesting and accessible to a reader. To do this I used another prepared data set, but this time based on a set of survey data I had available to me around songbird populations in the UK. For this series of activities the students were given access to Excel, rather than calc which they had been using on the netbook. We began the session by discussing Excel and comparing it to the other tools they had used. What did they notice about the environment? What was the same about it and what was different? For all intents and purposes the tools were largely the same, they were visually a grid, made up of cells arranged in rows and columns. We formatted the cells, rows and columns in a very similar way. With these identified, the students were then provided with data sets to enter, and format as before. We identified the chart wizard tool, and then set to work creating charts based on the data, adding appropriate axis labels and a clear title, with the students recolouring and reformatting the chart.
The students were then asked about the data itself. How many of these birds had they ever seen? Where would they expect to see them? Did the students think it would be possible to create a bar chart that would really draw in their audience, or even wow passers by as they were working? Could we create a chart that included images of the birds, and set the birds in their natural habitats. Viewing charts as part of the Multimodal world this would add an additional layer of meaning making to the outcomes.
The students were now engaged in a collect and store task, using an image search to locate individual images of each of the birds in question and one final image of a garden.... A bar chart in a garden...
The students were then encouraged to further explore the formatting tools for their charts, and to apply the skills tha already had from work with Calc. We made a second version and this time instead of colour formatting bars, used the fill effects button and picture tab to insert individual bird images to our chart columns. These were then scaled by 1, to create a pictogram type effect. Highlighting the chart area the garden image they had found was then applied as a background to the chart plot area itself. Very pretty. However with the images inserted the axis labels and values as well as the chart title were less readable, requiring some further formatting effects to be applied, changing font colours and backrounds became a necessity to make them readable.
 The outcomes are very attractive, as well as introducing for me a key aspect to the purpose of data handling the idea that we produce charts and graphs to be read and interpretted. Like other visual text sources, they are created to help an audience access and interpret them, the more relavant our content to context the more likely we are to portray the meaning we set out to share. Persuading students to use formatting devices for other reasons than because we can, is a key aspect to helping them understand the roll of such devices, and ICTs offer incredibly powerful and creative ways to do this. In this unit I wanted students to engage with Spreadsheets as a mathematical tool, not only for its pace and dynamic nature in presenting and representing information, but also as a way of managing the process and engaging with charts and graphs as a form of visual literacy.
Game Maker: A Summer Time Project 1
In September I have decided to run game making workshops as after school enrichment sessions for Phase 3 and 4 students. My absolute first choice for this would have been Kodu (site currently offline),as inschool sessions could have been extended if students chose to develop their games for use on xboxes (check out part one of this video tutorial by Stuart Ridout for a flavour). After some pondering background checks and discussion with our network manager we realised that in order to run the platform we would also need to upgrade our DirectX and .Net Framework installations before deployment, so Kodu sadly was placed on hold, at least for the time being anyway.
Having played around ocassionally withYoYo Games's Gamemaker Lite and built one or two simple multi level platform games quite painlessly, this is now the tool of choice for the two term project based sessions. The lite version is a free download, and allows games made to be exported as .exe files. My target over the next few weeks is to improve my familiarity with the tool and generate some support materials that will help students use the tool to clone some familiar games. I have identified one or two great places to start
Having played around ocassionally withYoYo Games's Gamemaker Lite and built one or two simple multi level platform games quite painlessly, this is now the tool of choice for the two term project based sessions. The lite version is a free download, and allows games made to be exported as .exe files. My target over the next few weeks is to improve my familiarity with the tool and generate some support materials that will help students use the tool to clone some familiar games. I have identified one or two great places to start
- Firstly the tutorials on Margaret Meijers fabulous website ICT Mindtools, This space is well worth a visit, if you haven't already I would highly recommend you do.
- Secondly I have bought a copy of David Waller's Basic Projects:Gamemaker
- And of course the introductory tutorial included with the software itself.
23.7.11
Digital Music Boxes: Random Music Or Simple Synthesizers Using Scratch
Last term we worked with our phase three students to Design and Make computer games using Scratch. One of the Focussed Practical tasks I used emerged from a music session I taught with some of our younger students exploring pitch and composing musical phrases using the pentatonic scale.
I knew that Scratch could be used to create music, and had used the pentatonic scale during impovisation and composition activities with students in my primary classes to great effect. I wondered how it would pan out if I involved my Phase 3 students in programming a simple random music generator.
To begin two sprites were created.
The Musical Note.
This was created using the paint a new sprite tool, and in my case looked like this.

Behind the musical note sprite I added the following pair of scripts.

When we set up the task the "when green flag is clicked" header block was was added from the control block to both scripts. However before running the program the header block from one of the scripts was removed.
The first script, Script one in the image, allows some user control, with the musical note following the mouse pointer, in effect allowing the user to play notes in the order they choose. A simple musical instrument or synthesiser.
The second script in the image. Script two has a very different effect setting the note moving under its own steam, when the gren flag is clicked, playing any note it comes into contact with in the order it meets it... But not quite yet, as we don't have any musician sprites.
Musician Sprites
The first musician sprite and its scripts were created by choosing a character through the "insert sprite from file" option. and then adding the following script. The musical elements of this coming in the form of elements from the "sound" blocks.

Completing My Digital Musical Box
So far I have one musical note and one musician. I need 5 musicians and each need to be tuned to play one note from the pentatonic scale. To achieve this I created 4 duplicates of my first musician sprite, by right clicking and selecting duplicate from the menu.
Next I changed the Sound script elements of each sprite. I kept the instrument and duration or beat the same in each case but changed the note value, and renamed the sprite accordingly so
Musician Sprite 1 was renamed playc Plays note number 60
Musician Sprite 2 was renamed playd Plays note number 62
Musician Sprite 3 was renamed playe Plays note number 64
Musician Sprite 4 was renamed playg Plays note number 67
Musician Sprite 5 was renamed playa Plays note number 69
Each Musician Sprite was also given a change of costume to uniquely identify them onscreen
Now on pressing the green flag each of the musician sprites begin moving randomlyish around the screen, as does the musical note. Each time a musician meets the note it contributes its sound to the tune.
I have to say at this point each individual student loved this a lot more than those around them. With the programming in place, I found now that the learning began through play and creativity. The students extended this task for themselves, experimenting and asking what would happen if they
I knew that Scratch could be used to create music, and had used the pentatonic scale during impovisation and composition activities with students in my primary classes to great effect. I wondered how it would pan out if I involved my Phase 3 students in programming a simple random music generator.
To begin two sprites were created.
- A Musical Note: that was programmed to bounce around the screen randomlyish!
- The second a musician sprite programmed as above but also to play a single musical note from the chosen scale, when it touched the note.
The Musical Note.
This was created using the paint a new sprite tool, and in my case looked like this.

Behind the musical note sprite I added the following pair of scripts.

When we set up the task the "when green flag is clicked" header block was was added from the control block to both scripts. However before running the program the header block from one of the scripts was removed.
The first script, Script one in the image, allows some user control, with the musical note following the mouse pointer, in effect allowing the user to play notes in the order they choose. A simple musical instrument or synthesiser.
The second script in the image. Script two has a very different effect setting the note moving under its own steam, when the gren flag is clicked, playing any note it comes into contact with in the order it meets it... But not quite yet, as we don't have any musician sprites.
Musician Sprites
The first musician sprite and its scripts were created by choosing a character through the "insert sprite from file" option. and then adding the following script. The musical elements of this coming in the form of elements from the "sound" blocks.

Completing My Digital Musical Box
So far I have one musical note and one musician. I need 5 musicians and each need to be tuned to play one note from the pentatonic scale. To achieve this I created 4 duplicates of my first musician sprite, by right clicking and selecting duplicate from the menu.
Next I changed the Sound script elements of each sprite. I kept the instrument and duration or beat the same in each case but changed the note value, and renamed the sprite accordingly so
Musician Sprite 1 was renamed playc Plays note number 60
Musician Sprite 2 was renamed playd Plays note number 62
Musician Sprite 3 was renamed playe Plays note number 64
Musician Sprite 4 was renamed playg Plays note number 67
Musician Sprite 5 was renamed playa Plays note number 69
Each Musician Sprite was also given a change of costume to uniquely identify them onscreen
Now on pressing the green flag each of the musician sprites begin moving randomlyish around the screen, as does the musical note. Each time a musician meets the note it contributes its sound to the tune.
I have to say at this point each individual student loved this a lot more than those around them. With the programming in place, I found now that the learning began through play and creativity. The students extended this task for themselves, experimenting and asking what would happen if they
- added more musical notes?
- changed the speed of the sprites?
- Altered the instruments being played?
- The random music generator
- A very simple synthesiser
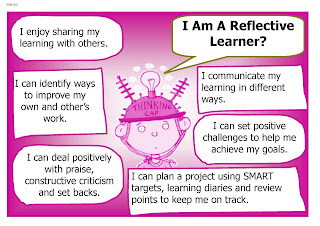
PLTS Wall Posters Draft Version 1
Have spent this morning compiling these draft A3 versions of student speak generic PLTS posters. Wondering if anyone has any thoughts.


 Thanks in advance :0)


21.7.11
Pondering Bird Boxes and monitoring

The Summer is here, and its time to unwind, reflect, review, refocus and reconnect.
To start the ball rolling I thought I'd share the Bird Box design created by a group of Phase 3 students for me during STEM Week. As members of a small company know only to us as "Avian Abodes" quality "Builders of Bespoke Billets for Birds," the students were challenged to research available bird box designs, identify and discuss the pros and cons of particular features of bird boxes, construct birdbox kits, identify the types of creatures that might be atrracted to or use their paricular kit, and to present ideas using their prototypes about how the kit might be customised using materials avalable around the home of a prospective customer.
Using ICTs to research and present our ideas and briefs, lead to discussions around how ICT might be included in the design, since several students had encountered camera kits. They were stunned by the cost, especially when we discovered the cost of building our box was around £3. One kit the students found including camera, and not disimilar to our own came to around £180, "thats way too dear," came one chirpy response. "What does it cost without the camera?" I asked. Around £60 was the reply. We couldn't identify how the box differed so enormously as to warrant this, and began wondering whether we could adapt our boxes, to use cheaper WebCams? How would we install them so that we wouldn't disturb the nesting birds and how would/could we establish a link between the box and a computer? Where would we need to site the box? How could we site the box to enable this? I really enjoyed the conversation, largely because it began engaging the students naturally with functional skills, as they created a possible new purpose for the kit, identified by them the audience. No conclusions were drawn from this but it was exciting to hear discussions as they began thinking outside of the box. The idea didn't fade, like so many often do, and periodically raised its head thoroughout the day. The opportunity to talk about monitoring systems, came and went, though I thought about a call out on Twitter. This is blocked in school, mentioning this as a shame, we again wended off the track, puns were raised about broadband links and how our feathered friends might atually like the opportunity to tweat with their mates... A half hour or so later and this bespoke billet of a slightly different kind appeared from beneath the pen of a group of Y7s, A bespoke twitter box for tweat clients of a different kind, and especially presented for a Geaky Teach to surf among his feathered friends.
Just pondering the possible mileage in considering how this discussion might be extended into a control and monitoring project for phase 3 any thoughts gratefully received :o)
Subscribe to:
Posts (Atom)