Pages

Showing posts with label animation. Show all posts

26.1.11

Animals Save The Planet

Loving these animated shorts from Discovery's Animal Planet.  Each clip depicts a diferent aspect of how we can engage with the three R's
  • Reduce
  • Reuse
  • Recycle
Great discussion points, lots of fun but how might they work as starting points for creating your own animated shorts?  How about using Fuzzy Felt or paper cut outs and backgrounds to tell a similar story during a themed persuasive writing unit?  If animals can recycle...

23.5.10

Making and Playing Computer Games With Scratch: Episode 2 A keepy Uppy Paddle and Ball Game

In the last post we were left with a cliffhanger. We had used a series of given scripts to take our sprite for a walk and used imported, downloaded or self created backgrounds to provide a context or place for this to take place.  Some of the students had also experimented within scenes, changing sprites or adding additional characters and objects.  The questions being raised as we worked reflected how the students wanted something different to happen when their sprites met, we weren't quite sure what but we knew that when characters and objects meet or "touch in a "real" computer game something usually happens.

This week we began again with an empty stage, and a session outcome to develop or create a small scale project where one object (or Sprite) within the environment would be programmed to interact with others.  Building on student queries, I thought it would be a nice idea to build a simple game.  I decided to borrow from a Phase 3 task and to build a version of the arcade game "breakout," but that I would limit the outcome to using only the paddle and ball sections of the game building a  "keepy uppy game."  Keeping the idea as simple as possible I hoped would allow me to build on student excitement from the previous session, and allow discussion of events and outcomes as procedures were added to the game.

With the world cup coming up there may be some interest in this fairly straight forward set of scripts, and the editing and extension possibilities they afford for adaptation of the initial idea.  Theming the game from its origins into something soccer like, using existing scripts as the basis, and including a spoonful or two of creative playfulness by the students could make for some wonderful ideas.  This however is an extension idea to come back to at the end of this post.  Needless to say the game of "keepy uppy" is one of those things we probably use as teachers a lot in skills practice during PE, or have played as children ourselves in the garden, with a tennis racket and ball or a football.   What I think students will enjoy about this as a creative starting point is that essentially it uses two sprites and a background.  Both sprites are fairly simple in their purpose, while changes and careful choice of background gives us a visual backstory or context for our game.


To introduce the session I began at the end...  modelling through a prepared design what we would be looking for if we were successful in making our game.  The students were asked if their game needed to look like this in order for it to be a successful design?  There are many games that work in similar ways but that look very different.  What could we change before we begin creating and building the code?

The stage I used contained a star field, a rectangular space ship for a bat and an asteroidish type ball.  Pressing the green flag set the asteroid in motion, while moving the mouse dragged the bat back and forth across the bottom of the stage (the x axis of movement).  When the asteroid hit the bat it bounced off until it hit the upper sides or top edge of the stage when it bounced and changed direction.  If we missed the asteroid and it made contact with the bottom of the screen then the game stopped running and was over.  This process was described to the students in pretty much this way as the model was demonstrated.  Why?  As well as following instructions I want the students to be able to see and begin evaluating step by step what was intended to happen as the program runs. Describing the intended actions in this way, I hoped would encourage the students to begin reasoning aloud and visualising what the code blocks they would later be building were intended to do.  In turn helping us to focus on particular blocks and what might be happening if the project did not work as expected.   

The students were asked where else the game could take place?
  • In a cave
  • in the snow
  • on the moon
  • outer space
  • under the sea
  • in the kitchen
  • In the classroom
were among suggestions made.

What might be falling/moving or flying in these spaces?
  • fish
  • meteorites
  • planets
  • bowls or cups
  • food
  • snowballs

What might be used to hit, catch, bounce or keep up these objects
  • pans
  • polar bears
  • spaceships
  • hands

The students had some really interesting ideas, many possible "right" answers, but to begin the activity, and inorder to ensure our code blocks did as intended I added the initial design stage proviso, that the part of the bat that meets the ball must be flat. The reason for this being that during the opening part of the software based activity I wanted the students to edit and alter the sprites that they chose to use.

The students began with their stage and the game background,
  • either importing a background from collection that matched the idea they had
  • searching for a background on the web they could download, import and use to set the scene for the game.
  • or creating a background of their own
To the lower edge of the background a coloured line was added from one side to the other.  The reason for which will become clear later.

    The students then deleted the default sprite to create their "ball."  This was imported from the collection and edited to work with and be in keeping with their background and so the game's backstory

    Finally the students created or added a new sprite that would be their bat.   This was
    • either a sprite from collection edited to include a flat surface
    • or a new sprite painted from scratch and designed to fit with the backstory.
    With the background added and sprites created we were ready to code our game.  The students were provided with support sheets, to guide them through the addition of code blocks to control the ball and bat sprites.  We began with the bat or paddle.  This object needed simply to be able to move across the screen from left to right, following the motion of the mouse.  This was achieved by clicking on our bat/paddle sprite, then the script tab and dragging the following code blocks into the space.


    The students were then encouraged to test the procedure, clicking the green flag header block, and observing the onscreen effect, and sharing their ideas about what was happening with each other.

    With the bat/paddle/ working correctly we moved on to add scripts to the "ball" sprite, using the following script blocks.


    I have included comments in this image, the yellow caption blocks, to demonstrate a feature of Scratch shown to me by one of the students this week. I didn't realise this function was available, but right clicking in the script area reveals a context menu, from which a comment block can be added, and descriptions of a code block or procedure and its function added. Dragging the comment to a particular section of the code visually links it. Thanks to J, this tool has now been added to my session plans for phase 3 next week, when students will be asked to create screen shots of their game projects and to annotate them to support our APP process. Loving this...never too old to learn something new.

    The challenge in creating these procedures lies in the fact that some code blocks, require combining blocks from different areas eg using a control block with a sensing block, to create the forever if touching shuttle command, or combining a motion block with an operator to construct the point in direction or turn clockwise something degrees command.

    The students were really excited about the outcomes, and enjoyed playing each other's games and adding the score variable made a real difference to the feel of what they had created.

    The possible extension I mentioned earlier relates to the Soccer World Cup coming up in South Africa.  It could be fun with the scripting now done to import photographs of players to scratch and then edit these to include as the "bat" sprite.  How many times can "Rooney" keep up the ball.  Perhaps the head only of the character could be added to a painted sprite with feet and head, allowing use of both to be used in the game?  What might a keepy up game look like if it were an animal or intergalactic cup?  What might be used for a ball? What if our favourite players were practicing in the kitchen or our school classroom before a match? What might they use to play keepy uppy with.

    Hope this is useful.  Have fun.  If you use this with your students or any other creative ideas inspire you around this post please share these through comments.  Thank you for reading.

      3.10.09

      Additional Stick Figures for Pivot

      This week I visited students in a secondary phase ICT extended learning session.  The students were using Pivot Stick Animator, to develop short stories following on from previous sessions where they had planned and developed their own background scenery to help them tell these.  As I was talking to one of the students about their work from nowhere there appeared a beautifully crafted jet fighter that flew across the scene, needless to say I came away from the session with a new online space to share and explore. 

      Droidz a webspace recommended by this group of students hosts collections of ready made stick figures and effects for use with Pivot, these include creatures, vehicles and weapons, as well as a forum and share space.  Though they may not all be everyone's cup of tea, and the existence of a forum and share space will have esafety considerations for direct use with students, the characters and figures available do provide interesting extension possibilities and variety for the existing set downloaded as part of this freeware tool.

      I would recommend however a visit to the site in order that colleagues can review and check out for themselves figures available, and that primary colleagues might like to create collections using those they feel are appropriate to the activities they they want to develop with students, rather than giving free reign. Hopefully this space will make an interesting visit and add an additional tool set to your bookmarks.  Thanks go to the student group who pointed this out to me this week.  Can't wait to read your outcomes.


      Revisiting Viewpoints: Working in the Style of Monet

      In a previous post, Viewpoints: Working in the style of Monet I presented a learning story, showing how I and a group of Y4 students had used
      • images as discussion points around the work and style of the artist
      • drawn on these over a number of weeks to sequentially develop graphics using ICTs based on this work
      The unit, involved the use of a common graphics package (MS Paint) to construct and manipulate student self created images while also consolidating functional ICT skills.  These include
      • limited tool choices to create image elements in the given style. eg spray can and colour pallette
      • Select and copy tools
      • Introducing and consolidating the "cascade save" process, using save as and "sensible file" names to build a portfolio of progression through each activity, and return points to which we can go if errors are made, and navigation of network drive spaces.
      • Understanding how we can use a graphics package to compose images by drawing together elements we create seperately
      • Using a collection of predeveloped (drafted image) elements and toggling between software instances, through the use of select copy and paste tools to arrange image compositions.
      • Explore cause and effect using rotation and flip tools (in Paint) or by extension to use more complex graphic tools, to investigate and explore filters and effects, before choosing images for our final outcome.

      Previous units have resulted in students creating "IKEA" style Prints.  Using MS Publisher to import their final image before adding text and printing out their work on the colour laser.  This time around though I am intending to develop an entirely digital outcome by exploring Monet scenes that reflect seasonal change.  Working with KS2 Students the outcome and brief is to use graphics tools and the collect, store, share and prepare process to produce a short animated sequence based on a single viewpoint or landscape that shows how a scene might appear at different times of the year.

      How will this be achieved?

      Using Microsoft Paint the students will create a landscape, showing skyline, mid and forground and develop a simple tree skeleton motif using the spray can tool to include trunk and branches.  The tree skeleton will be saved as treespring, treesummer and so on.

      Drawing on discussions about how trees appear in images representing the seasons, colour choices made by the artist for mood and effect, the students will  develop their own representations of the tree motif during each season considering  colour choices and exploring the effects they can create by layering spray effects. We will maintain a copy of our original tree skeleton motif as a return point, and for later use in the project.

      Using the original tree skeleton, students will be encouraged to create a single landscape starting point, by copying and pasting instances of it to the landscape they have created, composing their own particular viewpoint before saving four copies of this, named landscapespring, landscapesummer and so on. 

      To each of these landscapes the students will apply the effects  they developed during their exploration of their tree images to show how they think they might appear during each of the seasons.  They might also explore further detailing, eg sky colour effects perhaps through the use of additional painting tools and the undo tool,  while using save as to keep copies.

      Digital Outcome

      Using Photostory and the images the students have developed I would like them to create a simple morphing sequence of change for their landscape.  They will be encouraged to select 4 of their images 1 representing each season and to import these to Photostory.  These will then be chronologically ordered on the timeline, before applying transition effects and times.  They will be encouraged also to choose one additional image from those created and to add text to this forming a title overlay.  To complete the project they will add a music track before exporting their completed video for addition to either their class or personal blog space within the VLE for review by colleagues and other students.

      If readers have any thoughts about how this project outcome might be further developed I would love to hear from you.  In my new role this year I am also working with a number of Key Stage 3 classes and would be interested to hear from colleagues any ideas they may have about how this type of work might be adapted, extended or used as an element within projects for students in this phase of learning.    


      19.4.09

      A Simple Animatic: Digital storyboard Using MS Paint and Photostory

      Preparing materials to use in class next week, including a storyboard model to help my students frame their thinking as they plan a short animation about materials and change. To begin I created these four simple, sketch like images using Microsoft Paint. Using each through a copy and paste process I then compiled six further sketch like images figuratively representing the melting and freezing process to use in a smart book.


      As I was working I wondered about how the images might work as as part of a simple "animatic" story. The result of my wanderings, is this video clip created using photostory and my story board images.


      A similar process has been used previously to help students think about the changing seasons, by creating landscapes with PhotoFiltre and MS Paint. Through a "cascade" saving process the students were encouraged to revise and edit a template image they had prepared to show what they thought the same scene might look like at different times of the year. Completed images were then imported to photostory, chronologically sequenced and background music added before export to video for sharing. The process also supported documentary work and recount development with my class earlier in the year as they told the story of Grace Darling. and shared their feelings as we left our old school building behind. MS Photostory is a really nice tool to use with students and these simple techniques great starting points for thinking about animation and digital story telling if keen to have a try but concerned about the process and how to begin.

      21.3.09

      BECTA Filming, Podium and Oral Storytelling.

      This week we were visited by a film crew commissioned by BECTA to document our use of Softease's BETT award winning software tool and podcasting platform Podium. The wider publication of which this is part will include other schools and tools who won awards at this year's BETT show.

      I have made much previously of my commitment to using Podium as a platform for developing and supporting literacy across the curriculum, because of the effect I feel it has had as a tool on the confidence of my students as writers and readers for purpose and meaning. This has also taken me on a reflective journey exploring the pedagogical value the tool has added as a
      • writing tool
      • scaffold for writing
      • and supporting frame for performance and evaluation of outcomes.
      In the multimodal world that we live in I feel the distinction between what we traditionally call reading and writing is becoming increasingly blurred, as I begin to unpick the relationships between modes of representation used and their potential for supporting and developing other more traditionally text types. Providing a challenge to what these processes look like in everyday practice and use, and increasingly providing a context where text development as a process can be seen as design as well as composition. I decided for the session to be filmed this week that I would draw on and try to pull together some of my thoughts, building on and using the ongoing activities of my students using visual storytelling devices to develop the tasks they would engage with.

      On Monday we had just begun phase two of a unit of work around stories from other cultures, which is being iteratively designed as part of our wider theme about life in India It is intended to help our students learn about Hinduism as a major world religion contextualised in its country of origin. This week we were beginning to apply experiences from phase one, where we had spent sessions engaged with talking as readers around a number of Hindu stories, including the Ramayana, and for the day of filming I decided to set up a carousel of experiences using mixed tools to engage the children in a variety of visual and oral storytelling activities.

      Activity 1 oral Storytelling with Podium

      Prior to this session the students had created story maps and begun thinking through structured talk about how, when they write they could link the passage of their stories together. They had added their opening phrase to the story, eg Long ago and far far away... and begun thinking how their story might end. We had also talked about how in the oral tradition of stories, these frequently change over time, so the original tale may be very different to the one that was told when first written down to become a standard. This had been reflected in the different versions of the Rama and Sita story we had heard.

      We have begun to use more widely work from recent CPD sessions to encourage oral storytelling as part of our talk for writing process. "Overlearning" of narratives, seems to help us develop a coherent plot for a story, enabling us to engage with the details of what characters might be doing within scenes that surround the events, and knowing the plot so well we have less incidences of "we don't know what to write." The problem within the wider scheme of things is that oral rehearsal of stories is usually transient and lost. “Evidence of outcome” existing only in the pictures we have drawn, and the long gone spaces between us and our friends. I have been worried for sometime about how I can evidence this to satisfy the observer, and so for this session set up Podium as part of a thought experiment to help.

      Within the activity, the children worked in pairs first of all to set up podium to create a paired "podcast." Using the chapter tool, the children were encouraged to split the story they were about to tell into a number of sections coinciding with the stages in their story maps. In terms of writing this probably best equates to the planning of paragraphs or “boxing up” the plot. The story maps contained only limited text, the linking notes the students had made, around specific vocabulary choices they would like to include, and was to be told entirely without written text support.

      Before beginning their recordings the children were encouraged to rehearse aloud each step in the story as a separate chapter (oral paragraph). In this way the children could edit each chapter after play back, considering use of author voice and how they might build on this in the next section of the tale.
      • Were they happy with their use of expression?
      • Was it interesting to listen to?
      • How could they improve this?
      • What additional story language might they need to include to help this?
      • How would they connect this part of the story to the next and so on?
      The children were challenged by the process and really enjoyed it. The outcomes were lovely not only to listen to but also to see how the students reacted to what each other had "written."

      Thinking about the overall process in retrospect, has provided an interesting perspective on the “rereading” process, since in this activity the reader's and teller’s voices became merged to form an audible author's voice. In the coming week we will be beginning to write our own versions of the Rama and Sita story, and as we work I am considering how to use the outcomes created by the students in Podium to help focus on the “writer's tools” that will to allow our readers to hear what we want them to. Using the oral text delivery of one student we could “box up” the story plot as a whole, one which through oral rehearsal the students are now familiar with, before using elements from the "oral" text to support guided and shared writing in the form of paired work. Part of our already established success criteria is how we want the student's characters to have a voice, but that the things that they say should be appropriate to them and their situation. Hearing what they say through the stories presented should be useful in identifying not only what we want them to say, but also in discussing whether the dialogue is apropriate to the situation and in considering the choice of speech verbs to be included, that willallow the reader to hear our intention.

      Towards the end of the day I was interviewed and given the opportunity to express some of my thoughts about how the tool has been used in school and the effects I feel podium has had on the learning of my students. I hope that the outcomes of this reflect my feelings, and do some justice to the power of the tool. I know by this point in the day I and the children were exhausted. I would like to thank both BECTA and Softease (Lightbox) for the opportunity to share my thoughts and feelings.

      Other activities that went on in class during the day were also linked to the ongoing unit of work and included

      Activity 2. Even Potatoes have feelings an introduction to Clay Animator

      Here a pair of laptops had been set up using clay animator and webcams to encourage exploration and familiarisation with the software tool to make an animated short entitled even potatoes have feelings. After a brief introduction the children were encouraged in small groups to explore how the tool worked building on prior experiences of using Stick Figure Animator. Using a potato, cocktail sticks and modelling clay,the challenge was to change the smiling features of the character into a face displaying a a change in mood. The reason behind this may seem a long way from the overall theme of the other activities, but hopefully will become clearer when combined with activity 3.

      Activity 3 Making Stick Puppets

      For this activity the children were provided with stick puppet characters from the Ramayana to decorate and assemble. Each puppet provided consisted of a number of pieces to be decorated, cut out and then assembled to construct the four key characters from the story. Possessing articulated limbs, these characters will later be used against backdrops created by the students in groups, to create short scenes that will be compiled to make a class movie. Using clay animator with these props I want to link their prior experiences with stick figure animator and immersion in the Rama and Sita story to begin exploring the differences and similarities between the flick book and stop motion approaches of the two packages.

      The potato head activities, presented in (2) alongside immersion in the story of Rama and Sita will provide examples and talking points will also help us identify issues for later work when we consider planning our class movie,
      • establishing and framing scenes,
      • working together to develop these
      • establishing success criteria for our outcomes

      Earlier Posts on Podium and Student response

      5.3.09

      Wallace and Gromit's Cracking Contraptions: Digital starters for Explaining Processes

      A couple of weeks ago I posted some thoughts and starting points as we began working together on texts that explain processes how they work and how they are presented. This is something we have found students can find challenging, not describing the process but the aspect of the work that requires the use of passive voice, a commentary on action without personal involvement. The text type can very easily change from one to another depending on the use of pronoun for example

      First of all Wallace or we pressed the big red button, and the arm came out.. places the author in the recount domain.
      First of all you press the button places the author in the domain of instructional writing,

      What we were aiming for was for the students to be able to describe a process as if they were looking in on events as the device does all the work while they commentated on the action.

      Visualising and rehearsing this type of recording process is a real challenge, especially I find with youngsters who no matter how hard they try are in the middle of the experience. For this unit then we decided to use talk as the vehicle to engage with the process, and to enable the children to hear how the process sounded and from here to develop their writing skills.

      The unit began with the children engaging with and exploring a number of explanatory texts and providing opportunities for the children to hear the differences between
      • recounts
      • instructions
      • and explanations

      Texts that explain processes rarely exist in isolation, but are usually found as part of larger textual bodies. The texts we provided included longer textual pieces that had a process explained somewhere within in it. We were keen that these texts should not be just traditional paper based forms, and among the texts we provided was also a Video explanation about web search strategies from Commoncraft. This was an interesting tool, that really made us sit back and think. As with many such texts it opens with a general statement, but at times the tone and movement of the text meant it was tricky to distinguish between it and a set of instructions. Was the text explaining how a web search works, or providing tips on how to use a websearch more effectively. Actually it seemed to be doing both at different points. So what was it that differentiated the instructional part of the text from the explanation part. We used this video alongside other written texts to help us unpick the features that made one type of writing different from the other. This was then used to help us create a marking and review ladder to use when we began working on our own writing.

      Talk for Writing: Rehearsing the Process Using Video

      To frame and practice the process of writing an explanation we began with modelled and guided talk for writing ativities based on "The Tellyscope," an Aardman's Wallace and Gromit short. We watched the video together, and then spent time talking about the device, in its context. A wild and whacky tool for controlling the TV from the comfort of an arm chair. Next the sound was turned off and elements of the video used to focus on the process involved in operating the device, before in talking twos the students were encouraged to describe the sequence of events to each other. The process was played again and the children tried to commentate on what they could see happening, matching their commentary to onscreen action. At this point we also began to introduce the use of passive pronouns such as it, and the addition of time connectives to act as sentence openers and to extend the ways we could describe and link sections of the sentence to include causal connectives,

      eg. A big red button is pressed which causes the arm of the chair to open. A ball is placed in the hand and pulling this back results in a spring being squashed down.

      After rehearsing and engaging with the explanation in this way, the children were provided with flow charts containing frame captures from the film, that showed significant points in the process. The children worked in pairs following modelled writes and building on their their oral work to describe the stages in the process. Key to these tasks were choice of sentence openers and how they would join pairs of sentences that described cause and effect.

      Having described the process the children were then encouraged to work together to create a short generalised opening statement for the explanation, saying what the device was for and who might find it useful, and to write their own headings for their written piece. The children also used computer based versions of the writing frames to re-present edit and improve their work against our success criteria.

      Independent Have A Gos

      With the guided and modelled part of the process completed and our marking ladders and rubrics developed, we watched together another Walace and Gromit short, The Snooze-a-tron, we had chosen to be our big write focus and stimulus.

      This marvellous machine designed for the discerning chomper of cheese lulls its user to sleep by fluffing pillows and tucking in with ted, before the long suffering pooch becomes integrated within a sheep counting machine that will carry him off to the land of nod. As a home learning challenge the children were asked to design their own "snooze-a-tron" or "wake-a-tron," that they would use to frame an explanation text of their own.

      The children responded marvellously to this, bringing in models, diagrams and sketches. Some students had begun to rename the suggested devices. I had a particular fondness for the machine known as the "Alarm Cluck," the name conjured up all sorts of ideas even before I found out how it actually worked. Again this series of sessions began with the students talking about their devices, explaining how they worked to their friends and rehearsing how and where they might use particular text features. Throughout the post are a few examples of the students engaged in this process. All that was left now was for the students to put into practice what they had been learning as a result of these activities.

      During this unit of work a number of ICT tools were used to support first of all, the talk for writing process and also the student's presentation of written outcomes. These were developed from a series of Collect, Store, Prepare and Share activities.

      • The Common Craft and Wallace and Gromit videos were downloaded from You Tube to allow use of them in school.
      • The Wallace and Grommit videos were downloaded as MP4 files using the "get You Tube Video" bookmarklet mentioned in this previous post.
      • The MP4 files were opened in Quick Time Pro, enabling frame captures to be made. These images from the movie were used in the development of table top talk and writing frames, as well as in the making of IWB notebooks to help with sequencing and ordering.
      • Talk for writing frames were also made available on the school network so that students could use these to present their explanations, and facilitate further discussion and review of their texts.
      • Within the talk process children were also encouraged to use Podium as an audio recording device to help them present and hear as a reader the texts that they had been authoring.
      Thanks to Aardman Animation for the inspiration, and Wallace and Gromit for their help in our learning process.

      25.2.09

      Great Multimodal Starting Points for Writing -Text Number 8 and 9

      Would like to take credit for finding this movie, but I found it as a suggested tool on the Lancashire Grid For Learning's, website as frame and starting point for a unit of work on explanatory texts. The Shirt Machine by Jon Davis. Also on the Lancs site is a suggested plan for developing work around the video, linked to the new framework for Primary Literacy's longer unit structure.


      get The Shirt Machine in HD on sph3re.tv

      While thinking about this post a number of other possible digital texts began to spring to mind that could be used as talk for writing frames with this genre, in explaining processes.These include personal favourites such as Wallace and Grommit's Gracking Contraptions by Aardman's, that were included on The Curse of The Were-Rabbit DVD release, but can also be found as part of this Aardman Playlist onYouTube.

      In reading, thinking about and comparing types of explanatory texts, we also used a downloaded CommonCraft video, displayed on a laptop in class,
      as part of a carousel task today. Encouraging the students to use this alongside marking ladders to identify features used in this presentation type and to begin comparing it with other written explanations.

      24.1.09

      Where had he come from? Nobody knows

      Ted Hughes' The Iron Man, subtitled a Bedtime Story in 5 nights, is a text I have drawn on time and again with students, as a story, a focus for literacy tasks and as a starting point for thematic Science and DT work.

      If unfamiliar the text is a fantastic resource drenched in poetic devices that set scene and create atmosphere. My favourite part of the story is without doubt the opening chapter, that uses simile and rich description, to build up the story, as the central character emerges from the sea with "a head like a bedroom" and "eyes like headlamps" to explore a sibilant and onomatopoeic sea shore washing scene, before crashing from a cliff to the beach below.

      If you haven't already then this book is a must read. The animated movie The Iron Giant, although a cracking multimodal yarn and based on the characters in the book contains none of the original's content, though could be used in parts to support the idea of an alternative beginning to the story.

      This term we are working to write a narrative text to be developed around the Iron Man as a unit of work on stories set in imaginary places, and rooted in the Sci Fi genre. The outcome will be multimodal and based on the writing of a prequel, stimulated by the opening lines from this story,

      How far had he walked? Nobody knows.

      Where had he come from? Nobody knows

      And one we hope will contextualise our Design and Technology work to create a "pop up" or "animated story book."

      As we prepare to start the planning and modelling phase for writing, building on talk for writing tasks, the sharing of the story as a serial, our investigation of other texts, images and the collection of vocabulary, this week in our big write the students were encouraged to have a go and draft their thoughts about what might have happened to the Iron man before Ted Hughes' story began. This will be developed through modelled writing activities a paragraph at a time, using the "box up" method, we were introduced to recently, and based on this story as a model.

      Although quite florid, after sharing with the students, this story as a frame will be cropped back into a series of dull structures, for use to scaffold the writing process, and as a model that some of our more reluctant writers can draw on, to develop their own ideas. For others it will act as a means to explore the ideas of setting a scene, developing a build up, presenting a problem, creating a resolution before presenting an ending that links to an upcoming chapter or instalment (something we will engage in during later units of work as we move towards writing chapter stories later.)

      As a model I hope it will provide opportunities and stimulus for the students to innovate on a theme, to respond critically, and stimulate further their how their own stories could be improved or might be developed.

      Here then is my prequel to the story. If you like it and want to use it please do. Please do return to share your comments either on the response of your students or your thoughts and ideas around other ways you have used or developed it. Thank you.

      The Coming of the Iron Man (An alternative beginning)

      Hurtling through space, a sleek metallic object shot towards the scrap mines of Germania. Inside the Intergalactic transport ship, Tesca, everything was running smoothly and the solitary pilot made one final check. The banks of still green lights on the control panel and gentle hum of the engine, showed it was safe to go. Turning on the automatic pilot the creature set off toward the gyrolift, to prepare his cargo bay and transporter for the job ahead.

      Suddenly the calm was disturbed by a high pitched whine and flashing red lights on the control panel. Spinning around the metal man, spotted a strange object in the centre of the view screen. His enormous eyes like headlamps, changed from green to amber as he realised that roaring towards him like a rocket was a vast space rock. Calmly he walked back the way he had come. Sitting down, he quickly changed course, hoping to steer away from the object's path, but to his shock and horror with every change in course the rock seemed to follow his every move. His eyes changed from amber to red as he realised that his attempts to escape the rock, had brought him dangerously close to a sleeping small blue green planet that was now directly in the meteor's path. Not one, not ten, not one hundred but millions of creatures were now in danger because of his decision to take the shortcut. What should he do? How could he put right this selfish decision?

      Bravely the Iron Man parked his craft between the meteorite and small blue marble. He set the rescue beacon, strapped himself into his escape pod, and pressed the button, that sent him racing towards the planet far below where he hoped to hide and await rescue. Spinning through the starfilled sky he watched helplessly but hopefully through the porthole as the meteorite exploded into the side of the Tescas.

      Fortunately his plan seemed to work, and as his craft disappeared glowing into the atmosphere, he watched relieved as the Tescas and rock span safely away from the earth like a Catherine wheel. Now he and the people of the planet were safe, the Iron Giant steered his lifeboat towards a crash landing in the planet's vast oceans. Groggy after his crash landing he checked that all was safe outside his capsule. He released the hatch and shakily and uncertain of what was to come he headed for land. Crawling and staggering ashore he started his search for somewhere safe to repair his injuries.

      "How far had he walked? Nobody knows.

      Where had he come from? Nobody knows. How was he made? Nobody knows."

      Original Story Attribution: The Iron Man by Ted Hughes
      Image Attribution: Get Glasgow Reading
      The Iron Man on Love Reading4kids

      29.11.08

      An Animated Short: From Wrapping Paper to a Digital Greeting

      I know, I know, its only the end of November, but as we all know preparing quality work takes time. For the last 3 weeks I have been working with my students in the school's ICT suite to develop graphics for use in their own personalised and Desk Top Published Christmas cards.

      The process took the students through
      • Wireframing a draft Christmas Motif
      • Editing this to create a final coloured design
      • Copying and pasting this motif to create repeating patterns (wrapping paper style)
      • And finally experimenting with how different background colours and colour sequences in their designs effected the seasonal appeal of their image.
      Bulleted ListMy favourite file name has got to be "complicated," expressing the students view of his work, as he included 2 colours in his background pattern and developed a similar process in recolouring sequentially the Christmas trees on his paper. Mathematically the task provided opportunities to use flip and rotate tools in MS Paint, enabling exploration of ideas around translation, rotation as well as line symmetry. Linking patterning to these ideas also provided challenges around rule making, and requiring visual prediction skills, and editing to ensure all spaces within the design followed the rules we had decided upon for our patterns.

      This week most of the students have chosen their "favourite" wrapping paper design and used design wizards in MS Publisher to create their card, including this design on the front, and some including the smaller design motif elsewhere, personalising the greeting. They are very attractive as outcomes and even the simpest of designs, when repeated have produced some really intricate outcomes.

      One of my students, building on our units of work last year, has developed a real interest in using Pivot Stick Animator to tell short visual stories. It's been a bit chilly this week and during lunchtimes he has been working away on this.


      Very imaginative and creative yet somehow "Pythonesque" or "game like," he extended his use of the wrapping paper design to form a background and structure for his story including characters, who navigate a maze of santa's sleighs, falling between gaps, or limboing under others, transforming as they move shapes from one sleigh to another. This has inspired some thought about how easily we could extend this project to use images we have already developed to create digital online christmas cards.

      To make this movie
      • The pivot animation file was saved as a .gif file
      • The gif was imported to MS MovieMaker along with a suitable sound track.
      • The gif was dragged to the timeline and sound track added
      • After some editing in MovieMaker to get the look and feel right, the completed movie was then exported as a video file in .wmv format.
      I have posted previously about this and you can read about it by following this link. The completed movie can now be played standalone in a Media Player, or could even be uploaded to somewhere like Google Video for hosting and inclusion in a blog or school website like I have done with J's permission here. So J and I will begin the festivities here early and with no apologies by wishing you all a very Merry Digital Christmas.

      5.8.08

      Stick Figure Animator: Extending the Possibilities with MovieMaker

      My students have asked a few times how to get the animations they make with Pivot to stop looping, and whether they can add sound...

      The simple answer to this is Yes!
      Yey!
      But not using Pivot itself!
      Oh! So how?
      By using Microsoft MovieMaker.

      First of all

      • Create action sequences as clips in Pivot.
      • Export or save animations as .gif files (animated images)
      • Open Microsoft MovieMaker and...
      • Import your .gif files to media clips.

      Once you have imported your .gif files to a media clip gallery or collection they can be dragged to the video timeline, moved around and if neccesary resequenced, as if they were photographs or video clips.
      Once on the video timeline
      • Scene transitions can also be added between clips, and opening and closing credits added.
      • Sound files can be imported to the clip gallery too, and then added to the audio timeline to support the action, and here they can be edited, split or cropped to match the length of the movie.
      • If you would rather, the narration tool can be used to record your own sound or add a voiceover using a microphone.

      This model movie using a few clips created by yours truly, a couple by my students and a borrowed sound file from the web, was made using this process and uploaded to google video for sharing. The video file could also have been saved to somewhere like podomatic to become part of a video podcast sequence.


      I guess this process would work with images from other tools with the ability to export images as animated gifs too.

      2.8.08

      Pivot Stick Animator:thoughts and reflections on a new writing tool

      I have published a number of posts about the freeware tool, Pivot Stick Animator and shared a number of independent student outcomes, but the excitement generated by my class over the last couple of weeks of term lead to this post, that sets out to introduce a few basic moves and a few thoughts about its place in the writing process.

      Pivot Stick Animator was first shown to me by our technician. We downloaded it from snapfiles and installed it on the network where it lay unloved and unexplored, until during a unit on control and modelling a student found the shortcut, and asked what it was. I first used it with Y3 (7-8 yr old) students last summer, but when the outcomes created were discovered on the school website, older students began downloading the software for themselves to play with at home and developing short animated sequences to share with me through think.com. I really became excited by this when I began to see what the tool revealed about their understanding of story structure and visual narrative. Over the last 2 weeks or so this is what has really grabbed my interest observing how the "talk for writing process" we have engaged in over the past 12 months supported and informed the iterative storytelling process involved in creating their visual outcomes.

      Beginning with a free play and exploration session proved really beneficial allowing the students to see for themselves how the environment worked. Essentially the tool works like an onscreen flip book. A single image is first of all created by placing the stick figure character in a starting position and then pressing the next frame button. From here simple motion can be created by pressing and holding the mouse over a "pivot Point" and dragging that element to a new position, before pressing the next frame button again.

      Creating movement and motion is achieved by dragging and moving elements of the figure and then capturing each frame when finished. This wave action for example was created by repeatedly moving the upper portion of the characters arm, and pressing the next frame button in between each movement .

      Waving


      Changing the colour of the character to red, and moving the whole image upward slightly each time the arm moves, and then down as in the next image makes him a little angry, hopping mad so to speak. Or perhaps left as he started he could be calling for help! Whole character movement is achieved by clicking on the orange pivot pont, dragging the image and pressing the next frame button in between each movement as with the wave.

      Working with the students, we chose a story context, by searching the web and downloading a background image. This supported discussion about who the stick character might be, what they might do, how they might do it and so on. Perhaps what was most interesting and powerful for me, as I observed the process as a whole however was the iterative nature of the narratives that unfolded throughout the task and between and across sessions. As the children began to play and review their "drafts" watching their current story unfold, new narrative possibilities began to emerge and would be introduced into discussion, students drawing on the story so far to project and plan possible next steps in the action. Working in pairs they made decisions about what path the story would take by agreement. "it would be really fun if..." Shall we make him dance here..? "I think he should.... next." Central to this activity is a view of authorship beyond penmanship and one that sees story creation as an ongoing process of design and redesign, something that can be difficult to model in the more traditional writing session. The power to support visualisation and engagment with muliple narrative through talk, while evaluating "potential" outcomes, predicting plausible or possible next steps in the action, is an important part of the process that writers go through in bringing their imaginings to the minds eye and ear of their audience . And is something that as a person plus,this tool seems to offer in abundance. To close my ramblings for today, I leave you with an animated short of my own. with the olympics around the corner, I introduce you to the weightlifter.


      Got a few minutes to spare, why not download a copy yourself for a play from snapfiles.

      16.7.08

      Year 3 Have Fun With Pivot Stick Figure Animator

      Last week I began exploring Pivot Stick Figure Animator with my class, they spent their first session playing with and exploring the environment, sharing with each other how various tools worked and what they did. Today we discussed how we might use background images downloaded from the web to help us tell simple stories. I am so pleased with the outcomes and how hard they worked I thought I would share a couple of todays outcomes here.


      Our Swimming Movie By T and P (2008)


      Our Mad Movie By W and T (2008)

      12.6.08

      Pondering on visual storytelling

      We have been sharing adventure stories and traditional tales with a twist, during Literacy Sessions for the last couple of weeks, and this week we have particualrly focussed on another of my favourites The Paper Bag Princess, By Robert N. Munsch.
      My students seem to really enjoy, my taking a story I love and then trying to retell it in my own words. Perhaps this has come from the podcasting work we have done and their appreciation of how challenging this can be for them at times, or perhaps it simply comes from watching and listening as I try to recount and embellish the tales going through the mental processes I expect of them, visualising, mentally rehearsing and then retelling the tales as they develop. Hopefully though it is also because they recognise the magic of ideas. A story although in existence can still be reshaped, reformed, and refined in the mind of the teller. Even great stories and books such as this are made and altered through performance and enhanced by our interpretations and imaginings. This story telling process however I feel closely models and mirrors the path I currently using in encouraging the talking for writing process. Multimodal views of literacy see written text as "oral text," a symbolic permanent or semi permanant record of what it is we want to say or wish others to hear. Maybe as experienced writers this is something we have lost sight of in the teaching of writing. How many times do we say to ourselves, "hang on that doesn't sound right!" Perhaps we have forgotten over time that the voice we hear, and link to our actions as writers, took years not only to perfect but also to internalise. A forgotten part of our writing repertoire, however this is something which in the primary sector particularly many of our students are either only beginning with or are still in the process of developing. It took an introductory course in Semiotics, communication and representation recently, to actually challenge my perceptions and help me to realise just how complex this process must be. It was great this week then, when the students having eventually read The Paper Bag Princess themselves for the first time, to hear expressions about how they had already read this story, not heard it as I might have expected, and beginning I hope to make the link even if inadvertently between the spoken word and written text they were engaged with.

      Over the last couple of days the students have begun to move on from the reading process to begin talking together, planning, mapping out and rehearsing potential plot elements for their own versions of the story. We have discussed and collected new titles for the story to help us innovate on the text, these include such barnstormers as; The Trash Can Princess, The Wheely Binbag Princess and so on, all of which have potential to influence the reactions of other characters in the story, and effect closing dialogue between the princess and the kidnapped prince charming she sets out to rescue. In the process the children have also created some fabulous story maps, and it is these that have prompted this post.

      Stimulated by the discussion which began to emerge from the class and the quality of the illustrations the children generated around the story, I have decided to trial something a little bit different in tandem with the story writing process itself. We often use role play and freeze framing as part of our talk for writing process and in a previous post I talked about how interesting it might be to use elements of the Commoncraft approach to animation to support visual storytelling. Having watched the recent release of the Indiana Jones trilogy that featured some really great animated storyboards, I was really fired up to have a go at using this to frame my in to the process. This week we began making scenery and cutout characters, to support the idea of multimedia storyboarding. I am hoping this will inspire the children and help with rehearsing story sequence, something one or two are still finding difficulty with. The idea revolves around using the scenery and character cutouts to frame scenes from the story, capturing these as digital photographs and then using Photostory to sequence the scenes and events. From here I would like the children to add voice overs to tell the story with completed outcomes for publication as simple group movies.

      For my more able students I hope this will help extend and expand their vocabulary use and help with the text revision process as they write, while for others, some who are still reluctant to record, or having problems in maintaining logical sequencing as they move from plot element to plot element, that this visual and oral story prompt will help scaffold their progression through the story events they want to tell.

      26.5.08

      Explanatory Texts From a Multimodal Starting Point

      As a class this term we have been reading the Amanda Mitchison Biography "Who was... ? Isambard Kingdom Brunel." The story even though a challenge in places has fascinated the students. The book has proven to be a fantastic stimulus for discussion about the "great man of Iron" but when combined with web based images and tools has also stimulated high quality talk for writing in support of mechanism based explanatory texts .

      Of Worms and Men..

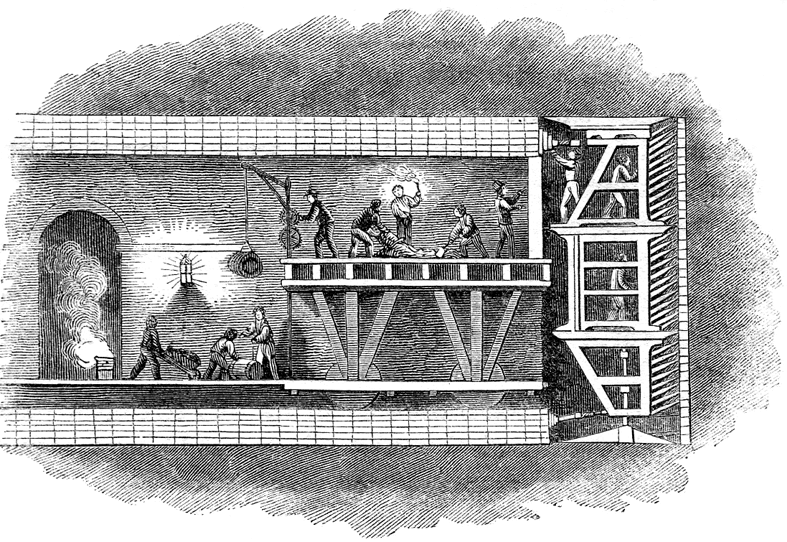
      The tunnelling shield invented by Brunel's father, appeared in the opening chapter of the biography and was a great starting point for discussion, one which began with Marc Brunel's observing ship worms at Chatham Docks, before inspiring his idea to dig tunnels through a process of removing spoil, inching men forward in a protective shell and lining with bricks the space behind them as they work. This principle is still employed in modern tunneling, and the enormous tunnel boring machines we see today work on a similar basis. The use of modern control technologies, machine automation of processes, global positioning and monitoring and sensing technologies may have improved navigational accuracy, speeded up the process, but it is no less dangerous today than in the past, spoil still must be removed and the machinery maintained, driven and programs planned, miners still scurry around in the spaces between the tool and the tunnel, lining it as the machine edges forward. The system has advanced, but even as the technology charges on, the principles of its evolution and in many ways its operation remain similar to those originated in Brunel's time. A need is identified, available designs and tools explored affordances exploited to identify possible solutions, before adaptations or innovations are made on these to create a product that either meets our needs, or carries us forward into the unknown. As we have read Brunel's story together I have tried to be mindful of this in the discussions we have had, not only talking about the great man's life and works, but also exploring the similarities between old and new technologies. Not only is this a valuable place to be in terms of historical investigation, comparing past and present, but an essential process based conversation to have in light of a DT curriculum in the England that requires students to engage as designers and makers through Investigation Dissassembly and Evaluation Processes, and an ICT curriculum that requires a similar set of processes to evolve beyond the skills based aspects of the curriculum in developing ideas and exploring the impact of ICT on everyday life.

      In terms of Literacy development the formal use of terms relating to "cause and effect" are not common place in the talk that we use or encounter. The written genre of explanation requires us to write from an impersonal perspective and to use "Causal Connectives" such as "this causes, " "as a result," and so on. Taking an impersonal view of the action we are describing can be a real challenge, I remember myself writing science experiments up for the first time at secondary school and being reminded constantly that I needed to use impersonal pronouns while I tried to explain the process as if I wasn't involved. In essence this made the difference between my report being an explanatory text and a set of instructions or a recount. In talking about diagrams such as the tunnelling shield I began the process of modelling the language structures the students needed to hear, that would help them rehearse the written work they would use later. Recording these on the diagrams we explored as a flow chart.

      Eg
      Men standing in the shield dug out the soil and rock, which was thrown to the ground.
      Labourers loaded the spoil into barrows, that were used to carry it out of the tunnel.
      As the shield moved forward, the tunnel was lined with bricks, this helped support the roof... and so on.

      As the students became more familiar with the sound of the genre, we began to collect some of the words and phrases we were using to display on our word wall.

      Converging Technologies

      For the last couple of weeks we have been using our literacy sessions to extend our experiences of writing explanatory texts while exploring how some of the technologies that enabled Brunel's visions to emerge worked. We focussed on steam engines and Steam Locomotives technologies Brunel did not invent but was keen to adapt and exploit in his endeavours. To explore the principles behind turning up and down movements into rotary movement to drive ships such as the great Eastern and Western we explored how stationary pumping engines worked. "North Star" one of the first locomotives to run on the Great Western Railway was built at Robert Stephenson's works in Newcastle, and as we had found some amazing material online about Stephenson's Rocket we decided to use this as a model to help us find out about how Brunel's locomotives worked.

      Multimodal Starting Points Using Talk to Promote Writing

      Within this unit although using some written texts initially to support how the features of an explanatory text are presented and work, most of our activity involved making and using models, and exploring video presentations and animations to help the talk for writing process. During the first week we used videos from Espresso, to share visual and audio descriptions of the processes involved in powering a Bolton and Watt Stationary Beam Engine. We used these video texts to scaffold and rehearse verbal explanations of how the engine worked. As a class we made cardboard models, including linkages and a background diagram of the engine to help us create the link between our talk and the writing we would later engage in. As the children worked with these they were encouraged to talk about share and rehearse with their partners their growing understanding of how these machines worked, gradually being encouraged to expand and present their oral explanations to include a range of sentence openers from our word wall and to begin including the causal connectives they would need to use in their written captions for presentation later in the week. The children were very excitied by the quality of the modelled outcomes they produced, but I was also really impressed by the quality of written outcome produced.

      The second week, of activity involved the students in expanding the process previously worked on by creating a similar model of Stephenson's Rocket. We began with the image below left, before the students began creating their own background diagrams similar to that on the right. The students were given a cut out drive wheel to begin with, and the large wheel space at the front drawn in as their starting point. While discussing the source image we also identified that this drive wheel would be where our mechanism would be added to the diagram later in order to give a sense of scale to their drawings.

      To support the sessions as the week progressed we used this nice Flash animation from the BBC website as our stimulus for talking for writing. It helped us decide what the mechanism we needed would look like, and to pick out the four key processes we would include. The Steps in our explanation would be

      1) Firing up the engine (how the water was heated)
      2) Water turning to steam (why the water was heated)
      3) Steam forces down the Piston (what the steam was for)
      4) The drive shaft turns the wheel (the outcome of all this effort)

      On completion of the diagram and mechanism the children were encouraged to explain the process orally to partners and rehearse the captions they would add.
      They were challenged to use a variety of sentence openers interestingly several of the students used time connectives they had collected in previous writing session and units to do this. Among the success criteria for the activity was also the need to use the causal connectives we had collected link action with outcome in their model as they described them. I have been really excited by the quality of the children's work. I haven't any photographs of the outcomes from this activity yet, but will include an example or two later. Combining multimodal text use, talk for writing and animated mechanisms however did have a dramatic effect on the way the students finally presented their outcomes. Linking the use of DT to model the process not only gave context to scaffold talk for writing but beyond the DT and literacy based experiences gained from this series of activities, the students were also helped to make links between this and their science work on forces using magnets and springs, and to apply language developed here in their ICT unit on control as we explored how input brings about output.

      Image Credits:
      Tunnelling Shield from Wikipaedia
      Stephenson's Rocket Cutaway From BBC
      Student work and outcomes SDMills

      20.4.08

      Stick Figure Animator is still a hit

      Untitled Animation by C. Click on the image to view the animation.

      A while back I published a stick figure animation by one of my students called "The Box." He recently sent me another creation, with no title, and here it is. For some reason Blogger doesn't want to play the file in the page but clicking on the image will open and play the file in a new page. I really like it, because knowing C and the software tool he used I recognise how much effort has been put into its creation and how the narrative it carries draws on and expresses an enormous amount about the visual nature of the process he brings to all his literacy activity. Every frame in this clip has been added by hand, and the narrative presented shows how far he has come, independently in his understanding of the animation process. Motion and transitions are much smoother in this movie than in his previous attempt.

      It never ceases to amaze me just what our students are doing with ICTs when not in school, and how easy it is to underestimate their creativity and capabilties with the tools they use and have available to them. Well done C and thanks for sharing.

      3.4.08

      Bristol Past and Present

      Have just discovered this fabulous web based resource " The Changing Face of Bristol England and It's People."

      This image from the site and acredited to Paul Townsend, is part of a vast collection of images both on the site and in the Site's Google Earth Geotagged Set. However watch carefully because there is more to it than meets the eye, once on the site follow the Bristol Then and Now link for further examples.

      I like the idea of Geotagging Historical images, it gives them a presence and point of reference in the here and now. Perhaps even more powerful for me in this site though is the use of image swapping through animation, allowing direct visual comparison between street scenes in the past and images captured at the same location more recently.

      I have pondered a number of times on how cool it would be, to enable use of old photographs with students in this way, using digital cameras to frame shots as they engaged in a kind of historical orienteering activity, collecting images on trails perhaps before using other digital tools to morph between one their modern image and the old photo they had been given as a reference point.

      In our modern cityscapes, with potential access to mobile technologies and GPS this strikes me as an increasingly practical possibility. Paul's site provides some interesting models to use and share when I next set out to explore this with colleagues.

      It also represents a fantastic visual history resource for the people of Bristol. Thank you.

      Historyman's geotagged collection of Memories of Bristol, can be found on Panoramio.

      Adendum Pictorial tours of the city from About Bristol