21.7.11
Pondering Bird Boxes and monitoring
The Summer is here, and its time to unwind, reflect, review, refocus and reconnect.
To start the ball rolling I thought I'd share the Bird Box design created by a group of Phase 3 students for me during STEM Week. As members of a small company know only to us as "Avian Abodes" quality "Builders of Bespoke Billets for Birds," the students were challenged to research available bird box designs, identify and discuss the pros and cons of particular features of bird boxes, construct birdbox kits, identify the types of creatures that might be atrracted to or use their paricular kit, and to present ideas using their prototypes about how the kit might be customised using materials avalable around the home of a prospective customer.
Using ICTs to research and present our ideas and briefs, lead to discussions around how ICT might be included in the design, since several students had encountered camera kits. They were stunned by the cost, especially when we discovered the cost of building our box was around £3. One kit the students found including camera, and not disimilar to our own came to around £180, "thats way too dear," came one chirpy response. "What does it cost without the camera?" I asked. Around £60 was the reply. We couldn't identify how the box differed so enormously as to warrant this, and began wondering whether we could adapt our boxes, to use cheaper WebCams? How would we install them so that we wouldn't disturb the nesting birds and how would/could we establish a link between the box and a computer? Where would we need to site the box? How could we site the box to enable this? I really enjoyed the conversation, largely because it began engaging the students naturally with functional skills, as they created a possible new purpose for the kit, identified by them the audience. No conclusions were drawn from this but it was exciting to hear discussions as they began thinking outside of the box. The idea didn't fade, like so many often do, and periodically raised its head thoroughout the day. The opportunity to talk about monitoring systems, came and went, though I thought about a call out on Twitter. This is blocked in school, mentioning this as a shame, we again wended off the track, puns were raised about broadband links and how our feathered friends might atually like the opportunity to tweat with their mates... A half hour or so later and this bespoke billet of a slightly different kind appeared from beneath the pen of a group of Y7s, A bespoke twitter box for tweat clients of a different kind, and especially presented for a Geaky Teach to surf among his feathered friends.
Just pondering the possible mileage in considering how this discussion might be extended into a control and monitoring project for phase 3 any thoughts gratefully received :o)
26.5.09
Lego Digital Designer: Another LEGO based CAD environment.
LEGO Digital Designer : Virtual Building Software
This tool and free download has been all the rage in school recently. Discovered by a couple of our Y 6 students, who having used it at home managed to download, install and get it to run from one of the shared drive spaces on the network, it initially gained attention as the focus of some firm but I hope fair discussions about our acceptable use policy and argeement.... The ingenuity of it all!
I hope you'll agree with the resolution, too good to miss as a tool, but also because I want our AUP to work within the realms of trust, I agreed to download and look into an installation of the tool for them to use, on the proviso that in future, they should share tools like this that they would like access to in school with me first. This situation was an ideal opportun
ity to discuss the reasons why we do this and esafety issues such as licensing and copyright.
The Demo provided by the students and the brief play I have had with LEGO Digital Designer only scratches the surface of the potential uses I think it could have. It includes an extensive library of components that include Mindstorms and Creator kits. On a basic level the tool could be used in ways outlined in this previous post about the Freeware tool BlockCAD. Digital Designer is quite a different beast however, and with the inclusion of Technic and Mindstorms components could be used to support design work or recording from control activities using nxt. In addition the interface allows the user to switch betwen a number of different onscreen viewing modes.
- Build mode where models can be developed from existing prototypes or from scratch,
- Viewing mode where the model can be placed on different backgrounds, rotated, exploded and in some cases animated,
- Building guide mode, where completed models can be put together step by step, using a walk/step through video presentation, or building guides exported in HTML format.
My brief engagements with the tool don't as of yet I feel do full justice to this potentially powerful freeware platform. To get your imagination whirring and creative juices flowing I'd recommend you download it and check it out for yourself. Certainly the students who recommended it to me, J and T love it and this has got to be the best starting point for thinking about how the tool might be exploited further engage them. I would love to hear your thoughts, and ideas about where and how you might use the platform.
19.4.09
BlockCAD: Modelling Onscreen with "Lego" Style Blocks
BlockCAD, is a computer aided design (CAD) environment allowing its user to build onscreen, 3d models using LEGO type bricks.
On opening BlockCAD the user is presented with an empty base board in the main design window onto which bricks can be laid. The dimensions of this board are not fixed and can be changed by typing the desired dimensions into text boxes to the bottom right of the window labelled base. To the right of the design window is a component gallery. To begin your creation, select your block clicking and dragging it to the baseboard. Clicking the left mouse button locks it in place. Rotating a block is achieved by right clicking the mouse before placing it. Within the gallery are a wide selection of blocks, that include many familiar components including wheels, windows, doors and so on. The colours of these components can also be changed by clicking the colour pallete above the component window.
I found that it was easiest to place bricks accurately if the baseboard was rotated to a plan view. Rotation tools on the tool bar allow the models you build to be turned through 360 degrees in both vertical and horizontal planes at any time during the construction process. There is no undo button. Deleting a brick requires the use of a mouse and del key combination. Pressing the del key before clicking on the brick in question, highlights the brick with a frame and hitting the del key again removes the brick from the model.
Throughout the making process the 3d model as a whole structure can be viewed from diffferent perspectives using the rotation tools. Using the capture tool, images of these various perspectives can also be captured and saved. Clicking the capture tool opens a dragable window that can be dragged around like a camera viewfinder to frame the image and view of the structure you want. These in turn can can be saved in a number of different image formats for use in other software environments.I really like this tool, and as freeware students can access it and download it away from school too, opening opportunities for them to extend their creative uses and learning away from school. It uses as a model a construction kit type that we have readily available for students to use in school, and that they themselves may have at home.
The tool has obvious cross curricular applications within DT, where it could be used in the IDEAS and FPT phases to model outcomes and facilitate evaluation onscreen before students begin construction. If included as part of an onging design and make process by groups of students it could also be used through a cascade save process to track, monitor and present changes they make as a result of difficulties or considerations within their making processes. The images could be used in DTP outcomes for display or included alongside photographs in learning stories presented in Powerpoint or even photostory.
I also like the idea of the environment being used as a scaffold for onscreen instructional writing, mediated by talk. Images exported from the environment could be used to help students create and design new models, and frame instruction leaflets for others to use as reading tasks. Context, purpose and audience for their work. I'd like to add this to our modeling and simulation tool box and see what the crew make of it.
14.2.09
Early Examples of Our Iron Man Moving Story Books
As an extended literacy unit this has worked extremely well, and the students have been completely captured by the process. The use of ICT has been limited to the development and presentation of text for their DT project and as a literacy tool has acted to scaffold paired text review and editing by supporting the talk for writing process. The children were encouraged to use the wordprocessor to help review their work and revise stories developed over the drafting period against agreed success criteria. The key benefits of using wordprocessors in this way are
that work does not need to be constantly rewritten, it can be revisited and text altered without the resulting outcomes needing to be continually rewritten. I also use a cascade saving process with my students so we can track changes in a document over time, and if we should lose something we later decide we want to keep, we can go back to previous versions of the file and copy/paste it back in.During the writing process I have introduced the students formally for the first time to use of the spell checker. There is a tendency for students left to use this tool without specific teaching to spot the red zigzag, drop the spell check menu and then choose the first word that appears. It is important for students to realise the contingency of these devices, and that the same spelling strategies they use when they write by hand apply when we write on the computer. A wordprocessor is not the font of all knowledge and they need to take an active part in the decisions they make when using tools such as this. The students have been encouraged to use the spell checker alongside a host of other classroom tools, including dry wipe whiteboards and provided spelling banks as well as to draw on their own and their learning buddy's reading experiences to check
the "look" of the words they are selecting. A real challenge was that in our success criteria we had included the use of invented words and obviously these did not appear in the dictionary. This did however lead to the challenge of how we actually spell these? Whether we have used the correct phonology? Does this word say what I want it to and will my reader be able to understand and pronounce what I have written?Since we have been using Word to work on our stories I also asked the children to think about what the green grammar checker might be telling us about what we have written. Have we written in full sentences? Can we hear why Word may have highlighted this as an error. Sometimes even this tool makes mistakes, as
anyone constantly reminded to insert semicolons, remove then, rearrange a sentence or add a comma will no doubt confirm. The tools allowed some challenge to student thinking in support of recent thinking around homophones, and the appearence of Fragment suggestions prompting suggestions to think about whether what was presented was actually a full sentence, or serving as a reminder about the inclusion of appropriate punctuation.Within the evealuation stages of the DT Process the children did a great deal of prototyping, and were encouraged to use recycled materials to develop these. Some children decided to recycle their prototypes too or extended their work at home hence the use of lined paper for some of the illustrations. What does not appear here, but I want to add later perhaps as a Flickr slide show, is the range mechanisms used. My favourites include a rocker mechanism developed to show the Iron Man emerging and decending into the waves, that set out to give the sea its rough feel, and another that tried to illustrate and simulate the swimming/bobbing motion of the Iron man heading for shore.
As a class the opening lines and "where did he come from? Nobody knows," No longer applies. From
- crash landings caused by asteroid or meteorite collisions
- encounters with chocolate eating candy monsters
- attacks from intergalactic space termites
- being shot down during orbital battles
- being distracted by our ring-a-mones, boiling kettles
- or taking turns too tightly during space based drag races
24.1.09
Where had he come from? Nobody knows
If unfamiliar the text is a fantastic resource drenched in poetic devices that set scene and create atmosphere. My favourite part of the story is without doubt the opening chapter, that uses simile and rich description, to build up the story, as the central character emerges from the sea with "a head like a bedroom" and "eyes like headlamps" to explore a sibilant and onomatopoeic sea shore washing scene, before crashing from a cliff to the beach below.
If you haven't already then this book is a must read. The animated movie The Iron Giant, although a cracking multimodal yarn and based on the characters in the book contains none of the original's content, though could be used in parts to support the idea of an alternative beginning to the story.
This term we are working to write a narrative text to be developed around the Iron Man as a unit of work on stories set in imaginary places, and rooted in the Sci Fi genre. The outcome will be multimodal and based on the writing of a prequel, stimulated by the opening lines from this story,
How far had he walked? Nobody knows.
Where had he come from? Nobody knows
And one we hope will contextualise our Design and Technology work to create a "pop up" or "animated story book."
As we prepare to start the planning and modelling phase for writing, building on talk for writing tasks, the sharing of the story as a serial, our investigation of other texts, images and the collection of vocabulary, this week in our big write the students were encouraged to have a go and draft their thoughts about what might have happened to the Iron man before Ted Hughes' story began. This will be developed through modelled writing activities a paragraph at a time, using the "box up" method, we were introduced to recently, and based on this story as a model.
Although quite florid, after sharing with the students, this story as a frame will be cropped back into a series of dull structures, for use to scaffold the writing process, and as a model that some of our more reluctant writers can draw on, to develop their own ideas. For others it will act as a means to explore the ideas of setting a scene, developing a build up, presenting a problem, creating a resolution before presenting an ending that links to an upcoming chapter or instalment (something we will engage in during later units of work as we move towards writing chapter stories later.)
As a model I hope it will provide opportunities and stimulus for the students to innovate on a theme, to respond critically, and stimulate further their how their own stories could be improved or might be developed.
Here then is my prequel to the story. If you like it and want to use it please do. Please do return to share your comments either on the response of your students or your thoughts and ideas around other ways you have used or developed it. Thank you.
The Coming of the Iron Man (An alternative beginning)
Hurtling through space, a sleek metallic object shot towards the scrap mines of Germania. Inside the Intergalactic transport ship, Tesca, everything was running smoothly and the solitary pilot made one final check. The banks of still green lights on the control panel and gentle hum of the engine, showed it was safe to go. Turning on the automatic pilot the creature set off toward the gyrolift, to prepare his cargo bay and transporter for the job ahead.
Suddenly the calm was disturbed by a high pitched whine and flashing red lights on the control panel. Spinning around the metal man, spotted a strange object in the centre of the view screen. His enormous eyes like headlamps, changed from green to amber as he realised that roaring towards him like a rocket was a vast space rock. Calmly he walked back the way he had come. Sitting down, he quickly changed course, hoping to steer away from the object's path, but to his shock and horror with every change in course the rock seemed to follow his every move. His eyes changed from amber to red as he realised that his attempts to escape the rock, had brought him dangerously close to a sleeping small blue green planet that was now directly in the meteor's path. Not one, not ten, not one hundred but millions of creatures were now in danger because of his decision to take the shortcut. What should he do? How could he put right this selfish decision?
Bravely the Iron Man parked his craft between the meteorite and small blue marble. He set the rescue beacon, strapped himself into his escape pod, and pressed the button, that sent him racing towards the planet far below where he hoped to hide and await rescue. Spinning through the starfilled sky he watched helplessly but hopefully through the porthole as the meteorite exploded into the side of the Tescas.
Fortunately his plan seemed to work, and as his craft disappeared glowing into the atmosphere, he watched relieved as the Tescas and rock span safely away from the earth like a Catherine wheel. Now he and the people of the planet were safe, the Iron Giant steered his lifeboat towards a crash landing in the planet's vast oceans. Groggy after his crash landing he checked that all was safe outside his capsule. He released the hatch and shakily and uncertain of what was to come he headed for land. Crawling and staggering ashore he started his search for somewhere safe to repair his injuries.
"How far had he walked? Nobody knows.
Where had he come from? Nobody knows. How was he made? Nobody knows."
Original Story Attribution: The Iron Man by Ted Hughes
Image Attribution: Get Glasgow Reading
The Iron Man on Love Reading4kids
26.5.08
Explanatory Texts From a Multimodal Starting Point
Of Worms and Men..
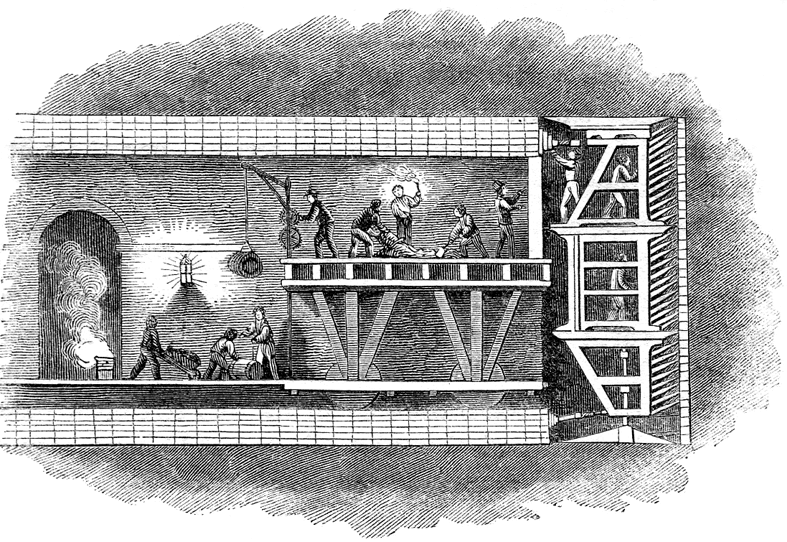
In terms of Literacy development the formal use of terms relating to "cause and effect" are not common place in the talk that we use or encounter. The written genre of explanation requires us to write from an impersonal perspective and to use "Causal Connectives" such as "this causes, " "as a result," and so on. Taking an impersonal view of the action we are describing can be a real challenge, I remember myself writing science experiments up for the first time at secondary school and being reminded constantly that I needed to use impersonal pronouns while I tried to explain the process as if I wasn't involved. In essence this made the difference between my report being an explanatory text and a set of instructions or a recount. In talking about diagrams such as the tunnelling shield I began the process of modelling the language structures the students needed to hear, that would help them rehearse the written work they would use later. Recording these on the diagrams we explored as a flow chart.
Eg
Men standing in the shield dug out the soil and rock, which was thrown to the ground.
Labourers loaded the spoil into barrows, that were used to carry it out of the tunnel.
As the shield moved forward, the tunnel was lined with bricks, this helped support the roof... and so on.
As the students became more familiar with the sound of the genre, we began to collect some of the words and phrases we were using to display on our word wall.
Converging Technologies
For the last couple of weeks we have been using our literacy sessions to extend our experiences of writing explanatory texts while exploring how some of the technologies that enabled Brunel's visions to emerge worked. We focussed on steam engines and Steam Locomotives technologies Brunel did not invent but was keen to adapt and exploit in his endeavours. To explore the principles behind turning up and down movements into rotary movement to drive ships such as the great Eastern and Western we explored how stationary pumping engines worked. "North Star" one of the first locomotives to run on the Great Western Railway was built at Robert Stephenson's works in Newcastle, and as we had found some amazing material online about Stephenson's Rocket we decided to use this as a model to help us find out about how Brunel's locomotives worked.Multimodal Starting Points Using Talk to Promote Writing
Within this unit although using some written texts initially to support how the features of an explanatory text are presented and work, most of our activity involved making and using models, and exploring video presentations and animations to help the talk for writing process. During the first week we used videos from Espresso, to share visual and audio descriptions of the processes involved in powering a Bolton and Watt Stationary Beam Engine. We used these video texts to scaffold and rehearse verbal explanations of how the engine worked. As a class we made cardboard models, including linkages and a background diagram of
the engine to help us create the link between our talk and the writing we would later engage in. As the children worked with these they were encouraged to talk about share and rehearse with their partners their growing understanding of how these machines worked, gradually being encouraged to expand and present their oral explanations to include a range of sentence openers from our word wall and to begin including the causal connectives they would need to use in their written captions for presentation later in the week. The children were very excitied by the quality of the modelled outcomes they produced, but I was also really impressed by the quality of written outcome produced.
The second week, of activity involved the students in expanding the process previously worked on by creating a similar model of Stephenson's Rocket. We began with the image below left, before the students began creating their own background diagrams similar to that on the right. The students were given a cut out drive wheel to begin with, and the large wheel space at the front drawn in as their starting point. While discussing the source image we also identified that this drive wheel would be To support the sessions as the week progressed we used this nice Flash animation from the BBC website as our stimulus for talking for writing. It helped us decide what the mechanism we needed would look like, and to pick out the four key processes we would include. The Steps in our explanation would be
1) Firing up the engine (how the water was heated)
2) Water turning to steam (why the water was heated)
3) Steam forces down the Piston (what the steam was for)
4) The drive shaft turns the wheel (the outcome of all this effort)
On completion of the diagram and mechanism the children were encouraged to explain the process orally to partners and rehearse the captions they would add.
They were challenged to use a variety of sentence openers interestingly several of the students used time connectives they had collected in previous writing session and units to do this. Among the success criteria for the activity was also the need to use the causal connectives we had collected link action with outcome in their model as they described them. I have been really excited by the quality of the children's work. I haven't any photographs of the outcomes from this activity yet, but will include an example or two later. Combining multimodal text use, talk for writing and animated mechanisms however did have a dramatic effect on the way the students finally presented their outcomes. Linking the use of DT to model the process not only gave context to scaffold talk for writing but beyond the DT and literacy based experiences gained from this series of activities, the students were also helped to make links between this and their science work on forces using magnets and springs, and to apply language developed here in their ICT unit on control as we explored how input brings about output.
Image Credits:
Tunnelling Shield from Wikipaedia
Stephenson's Rocket Cutaway From BBC
Student work and outcomes SDMills
1.12.07
Repeating Patterns and DT: A Christmas Card Project For KS2
The about this unit section says in this unit children will
- learn to develop visual ideas
- realise these ideas using ICT.
- use a computer graphics package to explore and experiment with ideas, amending and modifying their work to meet specific outcomes.
- learn to save their work as they go along (I would hope that by Y4 they are consolidating this).
- learn to use ICT tools appropriately and to select areas of an image to cut, copy and change. learn to export their work to other packages and import images from sources such as clip art, scanner or digital camera.
The key statement for me in this whole introduction is that "children will apply what they have learnt in this unit... to produce pictures, plans and maps in art, design and technology, and.. (or).. geography." When I originally designed my unit of work the series of tasks that evolved focused around the Design and make Process for a Christmas card, embedding the ICT skills in moving towards this outcome.
The outcome for the "integrated task" says that children should use"a variety of materials, created on and away from the computer, and use them to make a final image." This I interpreted to mean, drawing on available designs as well as the use of additional ICT tools and resources. The remainder of this post describes the process in its DT context, through ICT
IDEAS (Investigative, Disassembly and Evaluative Activities)
This unit was designed to fit with and work alongside a mechanisms unit for Design and
FPTs (Focussed Practical Tasks)
The intention of any DT project is that all children should be able to realise a quality outcome, and in order to achieve this they must be provided with available designs to evaluate , innovate on and or develop. In class the students engaged in a range of making tasks, that involved them in constructing predefined mechanisms, rotary window type designs, the use of cams and lever based mechanisms, pop ups and sliders. As we engaged the students were required to evaluate as a class the outcomes they were creating. Drawing on previous experiences with cards, which parts of the images might we be able to animate, and which of the mechanisms might we use to enable this to happen. In my classroom I see FPTs as early prototyping activities, spaces and activities through which students can begin to visualise the relationships between the skills input, and the final design outcomes they hope to develop. Gill Hope, presents some really interesting ideas about design and technology in the Primary School, and the dangers inherent in requiring young children to draw and record what they want to make before they begin, design as a process is an ongoing sand iterative process, evolving continually as we evaluate and appraise our progress, and solve problems. Prototyping is a key area in the design process, and one which I feel should be as practical as possible. During DT activities, I am never without my digital camera, as I find this is one of the most powerful tools I have available to record and document student activity, and frequently use images captured through the use of Powerpoint to document learning stories. DT it seems for many is a real issue in terms of maintaining evidence, where do we store it? I find my hard drive or flash drive is ideal!?
The DMA (Design and Make Activity)
In DT sessions the students, made "mock ups," and working models which were separate initially from their cards. They went through processes of trial and error, drawing on the mechanism designs they were familiar with to bring about the effects they were trying to achieve, and when happy that their designs met the success criteria we had established earlier from our design brief, applied their mechanism to a card. These cards then were decorated to match the effect required. Some children used images and objects developed in ICT sessions to apply to their cards.
In ICT, the children now had a range of motifs and design types they had developed that they could use to make their Christmas Card. We used Microsoft Publisher to do this, beginning from a design Wizard, the students used the the step by step process to generate their own Christmas card writing frames. Choosing from the images they had developed they were able to recreate the card the way they wanted it to look, innovating on the presented design to include/import their own images, and to drag them around the page to where they would like to put them. They could also include text in the form of text boxes or through the use of Word Art, and add borders and boxes to break up the pages they were making. Using Publisher in this way the students were also engaging in visual prototyping, discussing the effects they were creating and and making decisions about which images they would like to include and why? Considering text effects, and how these impacted on the overall design and personal aesthetic they wanted to bring to the document. The students were able to use clipart to reform the border art they wanted to apply, or to bring in additional web based or clipart images. When completed the students were asked to publish the card they wanted to keep and take home to the "Published Work folder" on their home drives. We only allow monochrome printing in the ICT Suite, so black and white mock ups were printed by each child to learn the making process, but each child's individual card was also printed out to card on the Colour Laser Printer we have for special work.
Using the tools on the iBoard Christmas site, our year one students last year were also encouraged to make Christmas scenes. See my very first post Photofiltre and screen printing. I used the print screen function to capture and save the images they had developed, pasting these to a graphics package, cropping them to be saved as .jpg files using the student's names to index them. Using MS publisher, I later imported and printed cards individually, that they were able to fill in with their own greetings. They loved the quality of the output, and were really excited that they were able to give something they had made on the computer to a special someone .
Just thinking now how amazing and exciting it might be to develop this further to combine the DT and ICT elements through the use of the plotter cutter we have recently gained...
10.11.07
The Craft ROBO Plotter Cutter: Integrating sensing, modelling and control in DT
On Firday last I spent a really enjoyable morning working with a colleague at our local secondary school exploring the Craft ROBO plotter cutter and its associated CAD package. I was really pleased with the Christmas card I finally made, but as a user of the Nuffield DATA Primary DT materials, available freely on line, this tool is now a potentially powerful addition not only to our DT toolbox, but also in support of the modelling and sensing strands of our ICT curriculum. Thanks to Phil for inviting us to take part in the DT project he is developing between a local cluster of Primary schools and his department with the support of the Medlock Charitable Trust. I left yesterday, at lunchtime with yet another toy to play with and share, a community sharable object based CAD package and one of these lovely tools.As a personal professional support tool, I have uploaded these videos to return to later, but thought some of my regular readers might also be interested in taking a look at the tool and its potential uses for themselves.
Video 1: An overview of the Craft ROBO
Video 2: A demonstration of the tool
In terms of modeling, one of the things I liked about the tool is the potential to prototype. Designing on paper first how an object might look before beginning to develop the project in real time. Students can sketch design proposals to paper, and then transfer these designs to the screen, by applying shapes to a work surface in the craft ROBO software package. Being object based these features can be dragged around and placed using layout grids. Turning on snap to grid, means the objects can be dropped and held in place accurately on screen. Using colour coding, the plotter cutter can be instructed which areas to cut, which areas to leave and with the insertion of a biro, the tool is converted to plotter rather than cutter mode. Prototypes and mockups, can be plotted first, and then replacing the biro with a cutting bit, a prototype can be cut using paper first. Inserting dotted lines lead to perforation cuts, being made, that allows for easier folding by small hands, no need for scoring.
After prototyping the full design, can be developed, with photographs or images inserted to the design file. Printing out on a colour printer, leads to the production of a colour net and the addition of "registration marks." which are later used by the cutter to align itself in relation to the design, when instructed to cut. This has alsorts of potential for developing these sessions to discuss sensing and control, within the context of the DT application for which the tool is being used. I am looking forward to trying out this tool with students as christmas approaches, and have already got one or two ideas for how we might use this to develop standard as well as animated christmas cards.
15.6.07
Bill And Ben's Outstanding Adventure: Closing One Chapter to Begin a New for Online Learning
Another lively week has come to an end. An evening with Alan November on Tuesday was an enlightening and thoroughly thought provoking experience, but as I am sure he would agree from the sentiments he expressed regarding Networked learning the highlight for me was my DT challenge group's Airbus event on Thursday, Sorry Alan, I will get back to my thoughts on what you had to say later, but this event and the processes leading up to it backed up strongly many of the powerful things he had to say about the power of ICTs to support collaborative online learning, even if still at a very embryonic stage in our school.
As well as online activity a number of really nice activities emerged from the project as it developed. I love cross curricular work and so this "off Curriculum" project was a real diamond for me. Design and Technology as a process rather than a subject is often seen not as a guided series of interelated activities, but chunked into Focussed Practical Tasks, then Investigative, Disassembly and Evaluation activities, before an independent or group based Design and Make Activity. Design and Technology for young students particularly is rarely seen as an ongoing iterative series of interelated events, we expect our youngsters to plan make and test from the outset, though as research by colleagues such as Gill Hope suggests, this is something which many young students find problematic, while I know from experience that teachers find more iterative processes difficult to manage and keep track of. Using Webpages and Blogging enabled us to faciliate this through the recording of our Practical DT activities through text supported digital photography, and to plot the process as a "narative of learning" as we worked, through tasks as they emerged. From the outset students had a clear design brief, this was chunked and success criteria identified, before we engaged with the required scientific concepts, or the making skills required to develop our vehicle. Disassembly and evaluation activities were mixed in with focussed practical tasks as required, and the internet used as a source to find examples of ideas used in the real world to meet our needs in developing the project. Working in small groups the students developed prototype designs, and these were tested unpowered, using Excel to help us make our tests fair, testing each vehicle several times before finding the average distance travelled. The students then redesigned or borrowed aspects from each other's prototypes to improve their designs, before retesting in the same way, and chosing one final vehicle to develop as a group. All of this developmental work was photographed and included in the ongoing learning story.
As well as this 3 students made an animated short using Digi Blues, PhotoStory and Movie Maker. They used the Comic Strip from my previous post, in PhotoStory to make a video clip they could include, adding a flash effect after the explosion of the volcano. Using Lego, and a can of gunge they had brought from home, they added a short stop motion clip to create the "run away, run away" scene, before exporting the finished animation to the network for inclusion in the final film. Using Movie Maker, the two clips were brought together, and the borrowed music track, titles and credits added. Albeit short, I think the effect was fantastic, and have chuckled several times at the outcome. In our final presentation to students in school during a celebration assembly this also gained gasps of appreciation from other students too, who spent much of Friday playtime either asking me about when they would be doing things like this or asking th students how they did it, while students in Year four and six who have been using the tools themselves, suddenly seemed to see new things they would like to try when they next do animation work. It was also an incredible learning curve for me, setting my mind racing about possibilities for the next time I set out to plan either an animation unit or better still how I embed this into a series of literacy Sessions. The PowerPoint students were so impressed that they went off to find the file on the network, and embedded it into their show.- Modelling the value of structured use of online learning environments, with physical practical outcomes I can share with colleagues
- How the careful choice and use of ICT tools can support and motivate student engagement
- How ICT can be used not only to develop and support student learning but also to provide and suppor the development of evidence bases to track developments and support assessment and evaluation
- How use of Online learning environments can motivate out of school engagement and independent work mong our students.
So how did we do? Well we didn't win overall, but our vehicle did win the prize for travelling the furthest, arriving in one piece with our heroes safely strapped inside it 7.2 metres away from catapult initiated starting point. The students were amazing, polite, courteous and gracious, a credit to us and their community. once again they have taught me a number of lessons, which I have been able to bring back and share with colleagues. What more could I ask. Congratulations and thanks one and all!31.5.07
Thinking Together
I visited our community this afternoon, as I had asked a group of students I am working with on a DT project to set up a new page to record and log the progress of our project to share ideas with each other, and to seek help in collecting materials we might need in order to develop our project when we return from the half term break. I had proposed that the pages could also act as a space to collect together group thoughts about how we might present our project to the judges at the final exhibition day in June. In this example, the student had visited our school website and blog, in order to download images he could use to support his presentation. He has also inserted a hyperlinked list to direct other community members to our project blog, and added a brainstorm/discussion board to his page inviting other students in the community to contribute ideas to his project. Other members of the team have followed suit, and within the discussion boards the group are beginning to share their thoughts. He has also contacted me through think, using email, to ask questions consolidating his thoughts about the project, and offering suggestions about how I could alter and edit the web pages we have uploaded. As an active member of the community, he also takes on additional responsibilities offering support to other students who want to know how to do things when an adult is not online, and acting as a "think buddy," highlighting and pointing out transgressions from our online agreement when visiting other pages. What was touching is how as a year six student he has also kept a Blog, during SATs week that made very interesting reading. Within our community he is not alone in this. 26.5.07
Bill and Ben's Outstanding Adventures
The props for our DT challenge, have been centred around two Play People, who for some reason or another must use the vehicle we design to escape safely from something. I visited the Playmobil Website for inspiration this morning, and in the Online Shop found some scenes, from which two characters particularly cried out, "caption us! Liberate us from this cage of two dimensional meaninglessness!" Never one to refuse anyone in such obvious distress I downloaded the Hazmat Team to my PC and Using Microsoft Publisher did my best to help the fearless pair express themselves, and share their current predicament.6.1.07
Control and Monitoring: Do I need to expand my view point on what this means in my school?
The control and monitoring strand of the ICT national curriculum has been idendified nationally as an area requiring development. I recently spent a day working alongside colleagues from my LA discussing and reviewing how we might address this concern where we work. At school, as I am sure is happening in many others, we are in the process of reorganising and replanning our curriculum provision, and part of my role this year is to focus on how ICT can support this, exploring how the available software and hardware environments we have can enhance or support the process, and forward planning for future needs.
My primary concern is that control particularly, is frequently taught as a stand alone area within the ICT curriculum, and I am increasingly convinced that the basis for many of our problems, is that as concepts, control and monitoring are considered to be outside of the daily experiences of many of us, or at least our interpretted potentials within the documentation we draw on to develop our wider curricular. They require us to use tools and environments which are not common place in our daily lives, or neccesarily intuitive to use. So relevance becomes an issue. LOGO for example as a control environment, seems to be an alien landscape and is an immediate turn off to many colleagues, though I have to admit, geek that I am, I still find LOGO to be a potentially exciting tool to use, and am frequently surprised by the power that this scripting language affords other more committed users. Engagement with the web, and in particular some of the Interactive teaching programs, and dynamic page content has given me a new handle on why such packages are important to use with students. "Flash" content such as Interactive Teaching Programs for example would be just interesting pictures, animations or visual models if they didn't involve some sort of scripting, with additional commands and instructions behind the interface, to enable us as users to engage with the presentation, or to change representations, reset and input new starting points. I have been known in the past, when I have come across an interesting web site design to wander off track, and to view the page as source briefly while working with the class, leading to questions like why did you do that? Or what is that we are looking at? It doesn't need a long winded explanation, merely something like, "well these are the instructions our browser uses to change this (the code) into that (the web page). "What we see is this glossy wow bit, when we down load the page with the pictures, buttons and animations, but the person who built the page probably spent some or all of their time working with the code or script we can see here as well." What we and the children often don't see when we engage with the web, is the person behind the technology, and I think it is important for the students to know that this content didn't magically appear, it was created by someone or a team of someones, somewhere else in response to the percieved needs of another someone, or team of someones. The fact that we can see it now is often a by product of this series of actions. At its most basic LOGO as an example programming environment affords a scripting tool which enables students to input commands and observe and evaluate the results of their actions as displayed on screen, for us as teachers it provides a starting point and context to scaffold and begin to support and explore one aspect of control in the wider world, and to begin making links between the work students do and the wider applications of programming and ICT generally in the real world.Control and monitoring technologies today are widespread and very much a part of our daily lives. I asked my mum once as a youngster why we didn't have a remote for our telly, when my mates did. Her reply, why do we need one I've got you, go on it's time for us to watch a question of sport... I now use similar responses by the way, when asked why I don't have a dishwasher.... But these tools, which we use without thinking all rely on the basic concepts of control, input and output. Input from the remote brings about a range of outputs, they turn up the volume, change channel or set up the video before we disappear out to the pub. Magically and hypothetically of course, when we return home Match of the Day, Lost or Big Brother are there waiting for us. The Kebab, which has gone cold on the walk or bus journey home, gets stuffed in the microwave for 2 minutes while we walk away and get the TV ready and then on the ping, we remove our hot mass... Technologies constantly move on, and sky+ boxes now record tv to hard drives, allow us to rewind programmes in real time, enable us to watch the footie from a range of different angles and so on. Outside we may drive or catch the bus from
home to school, stopping at zebra crossings and traffic lights, perhaps swinging by the supermarket where doors open automatically, metal gates swing in response to our passing, purchases are scanned and our spend calculated. We whip out our cards, punch in our pins and suddenly our wallets are lighter not just virtually I hasten to add. Most of our shopping trip has probably been recorded on video, and in the case of my local Supermarket, everything I have purchased has been logged, along with previous trips against my loyalty card, so that in a couple of weeks, money off vouchers relevant to my percieved lifestyle will fall on my door mat, whether I want them or not. At school my swipe card, supports a decision about whether or not I can enter the site, and after registration the contents of my register are inputted to the office system to record those present or absent, and calculate dinner monies. We cannot escape control and monitoring devices, they are a part of ours and the students everyday lives, what seems to have happened however is that we are so familiar with them, they have become mundain and lost in the world of the everyday. To create relevance to our curriculum and the learner, perhaps we need to draw these into focus, begin to look beyond the technology and make them transparent through our approach to classroom teaching and learning. A model of control in action is not that far away from many of my colleagues in the classroom today, its most prominant recent incarnation being the Interactive Whiteboard. Perhaps as starting points for control and monitoring units of work we should begin closer to home and draw on the everyday, develop ICT trails in school or "field trips," to explore where and how ICTs are used in the world around us, and identify and explore concrete examples of these. We could photograph, or video them, to facilitate a more evaluative approach to why they are used. What value do they add and what would happen if we didn't use them? We might also examine and explore what was used before these technologies? As learners it is easy to accept that technologies as they exist have always been here somewhere and somehow, or for us to label all ICTs as being computer driven, but our history is littered with tools that have enabled us to communicate, store and share information, with each other. These range from pictographs to formalised written alphabets, running messengers to ocean steamers to satelites, and the penny post to email and bulletin boards. This was my reasoning behind displaying an ICT timeline in our online classroom including hieroglyphs, the first formal writing systems, stage coaches, the first computer games, a history of the PC which included the typewriter, printing press and so on. When next we meet as a staff perhaps we should play with and discuss these images, to help humanise and personalise ICT development. Perhaps we could begin to consider questions such as what ICTs were available to the Romans, Ancient Egyptians and Greeks? What might have lead to the boom of ICT development in the 20th and 21st century, and how has the emergence of the telegraph from the 19th century impacted on this process? Would exploring the cultural impact of ICTs through history, support our understanding of the role which they play today, and enhance the relevance of ICTs in the teaching and learning process?
Sad as it may seem one of my jobs this weekend has been to find a zebra crossing and a set of traffic lights to video for this purpose. Pink and cold I sat in a local shopping centre, and later on Temple Meads station to achieve this. I am however planning to use Flowol with our year 6 students this term, and want to make the context for their projects as real as possible. I feel I can best achieve this by situating them in concrete settings. By combining the video I have captured with maps and aerial photos from Google Earth I want to broaden the context, to help them understand, not only how input and output effect the systems and artefacts we will control, but how the sequences and structure of the outputs support the purpose of the artefacts and sytems (DT speak) in their real world settings. Using my video alongside class based monitoring tools, timers and the like, the students will be encouraged to time the delays between flashes, and log and sequence the changes in the traffic lights first hand and to use these within the Flowol environment to control the mimics, drawing on this particular location as a real life model. I want to encourage discussions about whether or why traffic flow in one direction requires longer sequences of green light show than another? Why they think traffic lights have been considered necesary in this location? What problems might be encountered without them? To consider local places where traffic lights might be beneficial? Why we might have traffic lights in some places and Pelican Crossings in others? What are the differences and similarities between pelican crossings and traffic lights? These types of questions are intended to support the children in the use of geographical questions which they will be developing in class. Human Geography of this type, which is in essence town and country planning, also has links to Design and Technology, discussing and identifying needs, evaluation and disassembly, and application with short focussed practical tasks. They will begin to address the need to critically engage with the technological world around them, and begin to question purpose and application.I will also be using LOGO this term with year 4 students in a series of guided investigations exploring ideas around the properties of regular polygons. I have carried this out as a series of Numeracy hours in the past, ending with the painting and presentation of images created using MSW LOGO in Microsoft Paint, developing rotationally symmetrical designs, or mandalas as the projects outcome. These designs, raise a great deal of excitement. We will work together as a community to explore how we can use the LOGO environment to construct regular polygons, and over time develop a shared recipe or menu, reducing extended routines to introduce repeat commands and build routines which result in the production of these shapes by a single word input. These will be saved by the students for later work. My aim ultimately is to promote understanding of the term degree as a measurement of turn, and to introduce and develop as the unit builds a context for the use of language related to the description of regular 2d shapes. Final stages of the project rely on a growing knowledge that a full turn is equal to 360 degrees, and that one command within a LOGO routine or procedure controls the amout of turn the turtle will make, one the number of turns and the other the distance it will travel or one of the shapes we have developed. Working together to collect factors of 36o, as inputs to help create their rotational designs, provides context to discuss not only shapes, but also to introduce the mathematical term factors, and the effects of multiplying and dividing by 10. There is also the possibility to explore the inverses of multiplication facts, and how these effect the patterns they produce. eg repeat 10 [hexagon rt 36] will produce a different pattern to repeat 36 [hexagon rt 10] and so on. Collecting and making shared menus of options and factors, means that the focus shifts constantly between knowing and using, and enables the higher attainers to be extended mathematically, while engaging those who might struggle in the overall purpose of the unit, the visual exploration and investigation of effect. Having a menu of choices provides a scaffold for less able mathematicians to explore and resolve ICT based problems of turtle control, using community based mathematical knowledge to overcome the barriers they might otherwise have in engagagng in the tasks. The investigation has purpose for everyone in exploring visually, shape, pattern and design, and provides a context to discuss and observe turtle control in it's mathematical context.
In establishing a foundation for this work, our youngest students must also have opportunities to engage with the ideas surrounding input and output. Christmas has already provided a wealth of starting points for this. For example working with Year 2 students yesterday, a host of controllable toys were shared as presents during check in. One child had even brought a programmable toy tank to school for show and tell, another a remote control Dalek, while many others excitedly talked about their new Playstations, X boxes or Nintendos. I was suddenly struck by how easily a series of activities could have evolved, building on this excitement and relevant experience. On reflection, during the session children were using sequences of talk which could have been redirected to develop around control and its concepts. Opportunistically we had found ourselves talking about what these toys do and the different user inputs required to bring about varying outputs as actions. Pushing buttons or levers made the toy move in different directions, make sounds, or turned on and off the lights. The discussion compared or described gaming controllers and how some had wires, while some didn't. How the function of the controller on one game changed according to what was being played, and how a new type of controller for a Nintendo required its user to simulate particualr actions in order to work in the gaming environment. Using catologues, digital photographs we could extend this type of starting point to develop displays or sorting activities, focussing discussions on comparing toys, games or other familiar artefacts that are controllable, not controllable; electronic, not electronic, make sounds do not make sounds and so on.This type of activity could also be extended or emerge by exploiting other contexts such as the role play area, where we might use the social context to focus structured play around objects from home that use monitoring and control, such as the video, the TV, the microwave, the vacuum cleaner and fridge, or maybe in the travel agency when we provide calculators and telephones, or include the computer as a tool for practicing writing our name to make tickets, or baggage labels.
Having gone full circle, I am beginning to convince myself that I do need to broaden my view of control and monitoring, and am beginning to see how a range of activities and computer based peripheral devices, previously not identified for purpose could be considered for inclusion within a working definition of control and monitoring and then written into schemes of work or plans within the wider curriculum context. The computer itself, uses a host of input devices to bring about a range of outputs. Starting with the mouse which enables us to navigate and use software. The keyboard to input text, scanners which capture and input images and software environments which enable us to change the outputs produced as a result. Combining the use of video to develop animated movies within the literacy hour, linked to other cross curricular themes, or even the making of a podcast, or documentary/newstory, relies heavily on the notion of input, and the influence of users to create output. Does the consideration of bias in news stories, potentially link to control and monitoring in its widest sense. Our wireless keyboards, voting systems and slates allow us to move around the classroom and involve ourselves and our students as a community in engagement with a dynamic and constantly changing set of resources. Digital projectors and interactive whiteboards alongside these resources allow us to share and control a tool we once staticaly used from remote locations. Control and monitoring is perhaps more relevant and indeed prevalent in the curriculum and classroom now than it has ever been. One of the considerations I think I have to face, is how I develop the area to make its importance across the curriculum more transparent, discrete and evident in the activities we engage in every day. However I need also to make sure that this currently wooly view of control becomes more firmed up so to speak, and that it does not get buried and lost, in asssumptions that control is caught not taught. The view must include a shared understanding between myself and colleagues, that if such activities are to be considered as control and monitoring, they must be planned into and the ICT concepts highlighted and transparent within the teaching and learning contexts designed for.
Having wittered to my hearts content. I would value greatly any comments or contributions readers may have about this article.