For a while now one of my colleagues has been producing video files to support student revision and publishing these to his own You Tube Channel.
The videos feature modeled examples of working past GCSE papers and questions. This post is an opportunity to celebrate his work and to encourage visitors to check out the materials he has developed. Rob's Videos can be found by following this link. I hope you find them useful.
Showing posts with label video. Show all posts
Showing posts with label video. Show all posts
6.2.13


18.11.10
Man of Iron: Silent Movie Presentations From Phase 3
Last term I began working with colleagues and students in phase three, as a member of the Integrated Curriculum Team. The young people in phase three are vertically grouped 11-13 years old (y6 to 8) students, and Integrated Curriculum Sessions involve them in engaging with cross curricular themed activities, developed around the focussed teaching of Personal Learning and Thinking Skills.
During term 1 we worked primarily on a project based on The Man of Iron, Isambard Kingdom Brunel and his legacy in the Bristol Area. The Key focus areas were rooted in developing key skills for Independent Learning and Research as well as facilitating situations to promote Team Work and collaboration. Throughout the term, students explored a number of aspects of Brunel, his life and his legacy, using material from Primary and Secondary sources. The following are a pair of video outcomes created using Internet based collect and store processes, and our first attempts at using MovieMaker to prepare and share the outcomes of our work digitally.
In class a number of table top activities were used to prepare and plan the presentations, before using ICTs.
As the video creation process evolved we began to think about how we could create video presentations in a "victorian style." Silent movies/Newsreel arose as a possible idea, and in MovieMaker the credit tools were used to add captioned splash screens between clips. To give the clips that "olde worlde" feel an aged film effect was applied to many of the individual clips, and music added as a soundtrack. The students had a great time, and these are just two from our collection. Hope they provide a little inspiration :o)
Video Attribution: Thanks to George, Maisie, Oliver and Katie
During term 1 we worked primarily on a project based on The Man of Iron, Isambard Kingdom Brunel and his legacy in the Bristol Area. The Key focus areas were rooted in developing key skills for Independent Learning and Research as well as facilitating situations to promote Team Work and collaboration. Throughout the term, students explored a number of aspects of Brunel, his life and his legacy, using material from Primary and Secondary sources. The following are a pair of video outcomes created using Internet based collect and store processes, and our first attempts at using MovieMaker to prepare and share the outcomes of our work digitally.
In class a number of table top activities were used to prepare and plan the presentations, before using ICTs.
- Inference squares were used to facilitate and support image based reading activities, and ground the raising of questions as starting points for research.
- Mindmapping was used to record and help link and group key ideas collected from a range of text sources, including books, internet based texts, images and the reading of videos.
- Timelines were used to chronologically order and sequence the major events in Brunel's life.
- Desk Top Timelines then formed the planning frame that supported image searches and helped sequence the basic story we wanted to tell using Movie Maker
- Images collected from the web were imported to MovieMaker and sequenced/ chronologically or grouped according to the preferred method of presentation.
- The original intention was to have students record a voice over, so our paper based timelines were developed to become "storyboards" with simple scripts to support this.
As the video creation process evolved we began to think about how we could create video presentations in a "victorian style." Silent movies/Newsreel arose as a possible idea, and in MovieMaker the credit tools were used to add captioned splash screens between clips. To give the clips that "olde worlde" feel an aged film effect was applied to many of the individual clips, and music added as a soundtrack. The students had a great time, and these are just two from our collection. Hope they provide a little inspiration :o)
Video Attribution: Thanks to George, Maisie, Oliver and Katie
15.8.09
BECTA Podium video
It seems an age now since Softease (now Lightbox Education) received their Award in the Content-free tools category for Podium at BETT this year. Having been ill, away from school and my blog for a while, it somehow seems even longer since I blogged about the day my students and I were visited by the film crew tasked by BECTA with capturing the tool in action and our thoughts about how it has supported teaching and learning in class. Logging onto Twitter the other evening after an extended break with family I was grateful for this tweet from James Watson.

If you would like to see how the video short turned out, and what we had to say about Podium, then it can be found on the BECTA website by following this link. Thanks for the heads up James, look forward to seeing you soon.

If you would like to see how the video short turned out, and what we had to say about Podium, then it can be found on the BECTA website by following this link. Thanks for the heads up James, look forward to seeing you soon.
7.5.09
Getting Persuasive: Creating TV Style Advertisements with Photostory
 This term we have been working on a science based theme around materials and their properties. To engage our students with cross curicular persuasive writing we decided to adapt parts of this to focus on the "three Rs." Hmmm Back to basics ay! A real vote winner in the past, but in this case not "readin' 'ritin' and 'rithmetic" (though we have done lots of this too) rather the Three Rs in question have been how we can "reduce, reuse and recycle."
Getting Persuasive
We began our literacy unit by reading and reviewing a range of texts, posters, leaflets and letters, and using these to identify features of the text type that drew our readers in. These included visual and layout features such as
- headings
- emboldeni
 ng
- the use of logos
- slogans,
- and bulleting,

- emotive imagery,
- the use of rhetorical questions
- cause and effect and logical connectives.
- and looking at how these devices were used to support the expression of opinion
- What persuasive texts look and sound like?
- Who might write these and why?
- and How they work?
Persuasive writing is an interesting and complex sub genre, in that even though classified as Non Fiction, texts are constructed around the feelings of an author. They may appear to find their origin in "fact" but are usually driven by the emotions and opinions of an author based on their interpretation of facts as they see them. They may appear to be objective, but usually present only one side of a potential argument. Helping students to understand this, requires that they attempt to put themselves in the shoes of their audience and begin to develop some empathy with the other side of the case, inorder to choose relevant ideas they can express that appeal to both sides or those without their experience.
 To help with this and our exploration of the genre we presented a simple "marking ladder" that we could use to help evaluate the texts we engaged with, and that could be unpicked and developed as we worked to reflect the key features of a persuasive text as we saw them. This included ideas presented above, but also set out to frame generically success criteria for the writing outcomes that students would develop later, and that could be used to frame comparison between their work and the texts we had explored. These texts we decided should
- Open with a strong statement of opinion
- Provide 3 key points to support this supported by facts
- Close with a reassertion of the opening statement using either a slogan, an assertion or a question.
Working Towards A Digital Writing Outcome
In building up to our final Writing Outcome, which was to produce a TV advertisement or Video Presentation, we also read these British TV advertisements with voice overs by Eddie Izzard and Jane Horrocks, as well as this interesting stop motion project by simondo89 I discovered on You Tube.
Refering back to our Marking Ladder and success criteria for "writing," we investigated how these videos used similar ideas to persuade. The students identified the use of slogans and Logos as key tools to stating opinion and asserting ideas, but also how the use of visuals such as gesture alongside music were used to persuade us that "recycling was cool." We used comparison charts to review the three videos gradually over several sessions, looking at one initially to identify features that supported our big idea. If the advertisements are telling us that recycling is cool how are they doing this? What makes us think or feel this way?
In The Eddie Izzard Example, the voice over was seen as cheeky and quirky, presenting a casual almost throw away idea. We got to this point via the expression by one of my class that the voice over was "idiotic." This invited discussion around what she meant by this, and lead to time spent unpicking the idea and why the voice might have been prersented in this way. In addition students mentioned the type of music chosen, the bright airy look of the scenes, the shiny newness of objects and the fact that the "new everyday objects" presented were highlighted in the video as the cans they were made from. This added to the "coolness" because no one would have anything like them in their homes. The young fellow who was the focus of the story told also had a slinky, casual way about him strutting about the scene, casually casting his can into the recycling bins, and going about his business as if it was everyday. I was really pleased when a number of students after several readings mentioned how the advert also began with the character throwing away his can and ended in the same way... The advert itself was "kind of recycling." As can be seen in the outcomes later, many of the ideas in this video were borrowed as available designs to use in the works that developed as a result.
Looking at the other 2 advertisements we began with these ideas looking for similarities. The Jane Horrocks Advert from the same series used very similar ideas, Here the character from the previous video was seen playing a computer game, skateboarding and collecting points as he collected bottles to recycle. As a result the "coolness" of recycling glass was expressed in almost identical ways, but also afforded the questions around the idea of audience and who the advert might be aimed at? Using clues such as continuity of the central character, the music and visuals we decided that the video was probably directed at us, and how we could persuade our
 parents and grandparents to recycle. Though the main idea that it was cool, the use of the game perhaps lead us to see how recycling needn't be such a big thing, or get in the way of how we usually behave.
The final stop motion project, I think really excited the students as they had recently done some stop motion work, and could see how this advertisement had been been put together. A fantastic tool in as it turns out for engaging them crosscurricularly with the oft neglected ICT curriculum strand 4 statements around "Reviewing, modifying and evaluating work as it progresses." In this video using simple visual tools such as the recycling symbol, items from the bin, an image of the world, lettering from an old newspaper, and a piece of carefully selected music, a really simple message was transmitted by reusing material that could have been found in our bin to persuade, no voice over just a litter dance using throwaways, slogans and captions. The message portrayed used a number of familiar processes, and as such enabled them to begin drawing on prior learning to begin discussing how this had been achieved. It also began to open up the task we wanted the students to carry out. Helping identify with them the transferable skills we could use from a variety of ICT based processes such as animation, podcasting, video storymaking to contextualise the writing outcome.
Getting Persuasive with PhotoStory
The final phase of our Literacy Project was to make a short TV style advertisement./video presentation aimed at persuading our parents and other adults that we should recycle. For this we decided to use PhotoStory, the reasons for this I hope will become clear as the process is outlined and you view the completed outcomes .
In making the advertisement the children worked in groups of 4.
- Firstly they planned and then scripted their voice overs using the structure and success criteria above.
- Using the script as a frame we used Flickrstorm and Google Images to locate and save 5 images that we thought would support and help express our ideas.
- These images were imported to Photostory and sequenced.
- The text tool was used to place our slogans or key message on the first frame and to add credits to our final one.
- The children then rehearsed there voice overs, considering how they would express their ideas before..
- Using the inbuilt voice recorder and microphones to record each child's contribution over the appropriate image.
I love the outcomes of which these are only three examples. They are starting points on a journey that I feel reflect the children's emergent and growing understanding of how these text types work.
- Slogans and opening statements include ideas like "Don't Turn Away," "Prepare to be Amazed," "Our World Could Look Like This." Attempts to grab attention!
- An appropriate choice of Emotive images or bold and borrowed ideas to open and close their advertisements.
- Use of simple cause and effect sequences such as, how composting feeds worms, who feed the birds and this is Good for them and must be "GOOD FOR YOU!"
- and assertions of ideas such as "It is up to you!"
- The sense of fun in the experience from a student perspective is also eveident as they attempt to include features they experienced in reviewing advertisements eg singing part of a script, and how their reading process is developing with experiences from storytelling and podcasting sneaking in as they find themselves inadvertently inferring and improvising through prediction rather than verbatum use of scripts.
In supporting the development of this unit, the immersion of the students in a theme,
- involving visitors,
- auditing classroom and staffroom bins,
- asking questions around school about what happens to our "rubbish,"
- discussing and exploring how materials can be reused, the process of recycling materials and the possible consequences of not doing so
 As a result of a "bin audit" from the staffroom this week, students have suggested the need to create posters that offer advice to staff and other students about how they can improve their 3 Rs. Our completed advertisements have been placed on the VLE to share with our parents at home, though not being able to wait it seems one student arrived yesterday, knowing we were about to make our advertisements with a flash drive, so she could take her group's home to share after school. Another student out ill yesterday, but knowing we were going to be making our advertisements yesterday, used photostory on his home PC and sent the result to me by email. The students have clearly been excited and highly motivated by the projects with the images throughout this post reflecting the level of engagement and fun associated with developing the outcomes. Next week following the excitement of this process we hope to launch our campaign a little wider with a first public airing during assembly.
These videos also present themselves not as an end product but rather potential starting points for future work as reference tools for others as well as ourselves. I was privileged last week to experience some of our secondary students working on OCR Nationals coursework, and in addition to use within the Pimary Phase, have begun wondering how as an all through school, these could be used to promote and support continuity and progression, acting as evaluation tools and starting points for older students to evaluate and develop video based projects of their own. The idea of beginning with the work of other students regardless of age, in order to illustrate processes and identify steps for self improvement and development in the quality of outcome would be fantastic. In an all through environment such as ours it would be a really exciting to involve older students taking on and helping to move forward the work of their younger peers, extending work such as this and developing it for their own benefit, while perhaps sharing and presenting new resources that can further enhance the learning and experiences not only of themselves but other students and the colleagues who are learning alongside them. Perhaps in closing my thoughts truly are running away with themselves... However in recycling these videos the Possibilities do seem truly endless.
21.2.09
Great Multimodal Starting Points for Writing -Text Number 7
This might just be Text Number 7 in my collection of great multimodal starting points for writing. Spotted on You Tube Today and having thoroughly enjoyed its puns and back story, am beginning to wonder what it might offer as a starting point for persuasive writing or perhaps as a stimulus presenting one perspective for a discursive text.
8.2.09
6 Great Multimodal Starting Points for Writing
Have had a great afternoon browsing, rereading and bookmarking some of my favourite Mulitimodal and Visual Texts. I bookmarked these on Delicious, but have also decided to share them here with the notes I jotted as I went and in order to provide back links to a couple of previous posts where I reflected on the use of a couple.
YouTube - Bert - Moon Sung Lee
Animated story, dialogue free narrative. Great for multimodal reading actvities and talk for writing. Previous Post Spot the Inference.
YouTube - Kiwi! - Don Permedi
Another great dialogue free narrative. Suggested uses by visitors include support for framing y5 narrative units either alongside or instead of the piano.
Links to previous Post: Kiwi by Don Permedi
YouTube - Geri's Game From Pixar
Another useful story for prediction, inference, freeze framing and discussing feelings from Pixar
YouTube - Mike's New Car From Pixar
Some fantastic moments in this movie for freezeframing, discussing thoughts and feelings through exagerated gesture? Just what was going through Sully's mind before he replied to Mike's question? What did he realy think about his new car?
YouTube - DIVX version of Birds Short from Pixar
Not entirely dialogue free but what what might be being said? Just what is going on here? How do the characters respond to each other and the arrival of the larger bird? What do the small birds think of him, and how de we know? Can we create a sense of atmosphere, using clues from action and gesture? What might a human voice over for this film sound like?
YouTube - Michael Dudok De Wit - The Monk and the Fish
A dialogue free narrative, useful for talking about the structure of film, scene setting and camera shots, framing and angle. See reference on Teachers'TV
Reading Film: The Lesson
Reading Film: The Monk and The Fish
YouTube - Bert - Moon Sung Lee
Animated story, dialogue free narrative. Great for multimodal reading actvities and talk for writing. Previous Post Spot the Inference.
YouTube - Kiwi! - Don Permedi
Another great dialogue free narrative. Suggested uses by visitors include support for framing y5 narrative units either alongside or instead of the piano.
Links to previous Post: Kiwi by Don Permedi
YouTube - Geri's Game From Pixar
Another useful story for prediction, inference, freeze framing and discussing feelings from Pixar
YouTube - Mike's New Car From Pixar
Some fantastic moments in this movie for freezeframing, discussing thoughts and feelings through exagerated gesture? Just what was going through Sully's mind before he replied to Mike's question? What did he realy think about his new car?
YouTube - DIVX version of Birds Short from Pixar
Not entirely dialogue free but what what might be being said? Just what is going on here? How do the characters respond to each other and the arrival of the larger bird? What do the small birds think of him, and how de we know? Can we create a sense of atmosphere, using clues from action and gesture? What might a human voice over for this film sound like?
YouTube - Michael Dudok De Wit - The Monk and the Fish
A dialogue free narrative, useful for talking about the structure of film, scene setting and camera shots, framing and angle. See reference on Teachers'TV
Reading Film: The Lesson
Reading Film: The Monk and The Fish
2.12.08
On Downloading Video from YouTube
As a teacher I frequently encounter videos on YouTube that I think would be great to use with students, but because of firewalls am unable to use directly from the web.
There are a number of ways that videos can be downloaded from YouTube to enable their use directly from your computer. I tend to use Zamzar, following the process described toward the end this post. I like Zamzar because
There are a number of ways that videos can be downloaded from YouTube to enable their use directly from your computer. I tend to use Zamzar, following the process described toward the end this post. I like Zamzar because
- The site provides the facility for the video files to be converted and downloaded in a number of different formats. This is important as not all media players will play all file types.
- When a file is ready, a link to the file is sent by email, allowing the file to be picked up and downloaded from school, within a 24 hour time period after reciept.
5.8.08
Stick Figure Animator: Extending the Possibilities with MovieMaker
My students have asked a few times how to get the animations they make with Pivot to stop looping, and whether they can add sound...
The simple answer to this is Yes!
Yey!
But not using Pivot itself!
Oh! So how?
By using Microsoft MovieMaker.
First of all
Once you have imported your .gif files to a media clip gallery or collection they can be dragged to the video timeline, moved around and if neccesary resequenced, as if they were photographs or video clips.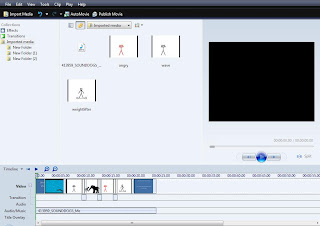
Once on the video timeline
This model movie using a few clips created by yours truly, a couple by my students and a borrowed sound file from the web, was made using this process and uploaded to google video for sharing. The video file could also have been saved to somewhere like podomatic to become part of a video podcast sequence.
I guess this process would work with images from other tools with the ability to export images as animated gifs too.
The simple answer to this is Yes!
Yey!
But not using Pivot itself!
Oh! So how?
By using Microsoft MovieMaker.
First of all
- Create action sequences as clips in Pivot.
- Export or save animations as .gif files (animated images)
- Open Microsoft MovieMaker and...
- Import your .gif files to media clips.
Once you have imported your .gif files to a media clip gallery or collection they can be dragged to the video timeline, moved around and if neccesary resequenced, as if they were photographs or video clips.

Once on the video timeline
- Scene transitions can also be added between clips, and opening and closing credits added.
- Sound files can be imported to the clip gallery too, and then added to the audio timeline to support the action, and here they can be edited, split or cropped to match the length of the movie.
- If you would rather, the narration tool can be used to record your own sound or add a voiceover using a microphone.
This model movie using a few clips created by yours truly, a couple by my students and a borrowed sound file from the web, was made using this process and uploaded to google video for sharing. The video file could also have been saved to somewhere like podomatic to become part of a video podcast sequence.
I guess this process would work with images from other tools with the ability to export images as animated gifs too.
30.7.08
Saltford Lock: 1st Play with Disgo Camcorder
It has been a beautiful evening and visiting a friend we decided to have a drink at one of our favourite watering holes. The Jolly Sailor, is on the bank of the River Avon, next to Saltford Lock, between Bristol and Bath. The activity around the lock and weir became the focus for this very short movie and first try out of the Disgo Camcorder I bought the other day.
This very short movie was compiled from 5 x 10 second video clips I shot, and then put together using Microsoft Movie Maker. The sound is actual footage, recorded by the camera. The clips were imported directly to Movie maker from the camera's SD card using a USB card reader. Some of the clips were trimmed, before adding clip transitions, a title and short credits. As an experiment, to explore the ease of use, quality of video and sound this has proven a really useful activity. I am really impressed with the outcome considering the relatively cheap cost of the camera. Fancy a class set of these to supplement other digital capture devices, really got the creative juices flowing. What to do next? Are you ready for your closeup ...?
This very short movie was compiled from 5 x 10 second video clips I shot, and then put together using Microsoft Movie Maker. The sound is actual footage, recorded by the camera. The clips were imported directly to Movie maker from the camera's SD card using a USB card reader. Some of the clips were trimmed, before adding clip transitions, a title and short credits. As an experiment, to explore the ease of use, quality of video and sound this has proven a really useful activity. I am really impressed with the outcome considering the relatively cheap cost of the camera. Fancy a class set of these to supplement other digital capture devices, really got the creative juices flowing. What to do next? Are you ready for your closeup ...?
29.7.08
Disgo Video
 At £24.99 the disgo Video camcorder, I found in PC World this afternoon seemed too big a bargain to miss. A pocket sized camcorder with built in Microphone the unit is powered by two AA bateries and comes with a 1 GB SD Card, that holds approximately 1 hour's video stored in avi format. The card is upgradable to a maximum of 2GB. A 2.0 inch tft screen acts as a viewfinder and playback space, and an internal speaker allows for audio playback and review.
I am pondering just how useful this tool might be as part of a "collect, store, prepare and share" toolkit. Granted it does not take stills, but these can be captured from video using the provided editing software and also through MovieMaker. I wonder also how useful the tool might be as an audio capture device. There seems to be quite a lot of space to play, and explore. A little something else to delve into over the break.
22.3.08
The Bayeux Tapestry
Yet another You Tube Video, but this time courtesy of Joe Dale's Blog.Here he has pointed readers to this amazing Animated version of the Bayeux Tapestry by David Newton, and additonal online resources from The Museum of reading.
16.3.08
Kiwi: by Dony Permedi
 This fantastic animated short by Dony Permedi, in which a Kiwi seeks to fullfill his dream to fly, is a nondialogue based narrative that you might find useful as a starting point for talk for writing or for framing multimodal work. Doug Dickinson commenting on my posting of this clip through del.icio.us earlier this week recommends Kiwi as great for use within the Y 5 Unit 5 on Narrative.
13.3.08
Layering it on Thickly! Playing With Podium Multitracking
 This week I downloaded, installed and had a little time to play with the Podium Upgrade and am loving it. The key difference between version 1 of Softease's Educational Podcast Tool and the upgrade is that it affords multitracking, and the ability to layer sound within the episodes being produced.
It would be an understatement to say little other than this has changed, though the simplicity of the tool has not altered. The principles and processes underpinning podcast development with the tool remain the same but the ability to add additional tracks to files being developed, adds an entirely different dimension to the possibilities for multimodal outcome creation. The addition of multitracking now enables a less linear approach to developing episodes than before, and is something I know at least one of my students has been waiting for. By adding a new track; background music or sound effects can be imported and added, and individual volume controls on each track used to alter their volume, enabling simple mixing and allowing the user to add depth to the "soundscape" they are recording.
The idea of "soundscape" development is a really exciting additional aspect of the upgrade for me, I can see possibilities for using this new version of Podium not only for podcasting but as a wider part of our digital authoring toolbox. Perhaps performing a role as a basic editing suite alongside Garageband, to create narration and backing for MovieMaker or PhotoStory projects. The addition of Multitracking makes Podium much more versatile, somewhere to create and produce sound tracks or "soundscapes"for use in other digital outcomes as well as its intended purpose, for example the narration for a video with background music. The object based nature of the soundtrack, means that not only can new sounds be imported, but they can also be dragged to the location desired by the user on a timeline, making them audio authors. Where perhaps previously the notion of, we added that sound because we could or because it was the only one we could find, this enables us to build on student experiences of Podcasting or evaluation of video texts to support consideration of the role sounds and music play in multimodal texts we engage with or are creating. I am really excited by the possibilities that this new version of Podium brings to the idea of "Playing With Sound," So now its time to have the upgrade installed and begin exploring the practicalities of my wandering mind!
22.2.08
Video, Hyperlinking and Quikmaps!
 Having spent a good part of last week playing with Quikmaps, and getting really excited by the possibilities that attaching photographs to place marks provided, I have been pondering on a comment left by Tom, around tagging other media to place marks, and how this might be used with my class. As he suggested, If we can use html tags to embed images from the web to place marks, can we use similar methods to embed other media types, and have them play inside the place mark too? This left me however with additional questions, what if this were not possible, how could we then provide a link to these resources, so they could be used, either as part of a presentation or as part of a data logging or "collect store and share," process. I am concerned that tools such as this do not get used simply because we can, but that the tools we choose to use should match the context of their use and support the generation and development of meaningful and purposeful outcomes. As I began to think my way round this I was also reminded of the E Safety issues we must consider when preparing and developing material for a project such as this. Because of the use of geolocation technologies, we need to ensure that we evaluate material with students to minimise personal reference and risks to identification. These are however considerations that we should all bear in mind as good practice when developing digital content with and for students, as central to their E Safety Education. In preparing digital media work, and reviewing material for publication, we need to bear in mind our school's e safety and digital permissions guidelines.
So this was my starting point. How could and why should I use video with quikmaps? What tools might I use to develop the video in the first place? What purpose might developing this resource or asset have? The notion of asset or resource development is I think a key one in how we view this tool and its role in the teaching and learning process. So where to go!
Contextualising this Asset
Our School is undergoing enormous changes at the moment with the development and construction of a new through campus, of which we will become part. In less than a year the school we now attend will be gone, and the landscape which the students are so familiar changed completely. A great context then for using video assets with students linked to Quikmaps might be to create a living History Archive.
Tools for the job!
I have used MS PhotoStory and Movie Maker a number of times with students at school to present and edit digital work, and with my class early in the year as part of a vodcast experiment. I have been really impressed with how quickly they are able compile and create projects from scratch with this tool, adding sound as a musical background or through direct recording of voiceovers for individual images. In contextualising this idea I am revisiting an idea from an earlier post regarding little patches of ground. As I said above the footprint our school currently leaves in its landscape is about to become a memory or shadow with the development of the new school campus, and its demolition, but this is a place has been a large part of our student's and community's lives for the past 50 years, so how do we preserve the legacy, while moving on?
Using PhotoStory to create a video
Using digital cameras the students might be asked to identify a place or memory from within the school grounds or locality that is special to them, that they would like to preserve or to change, and to capture 2 or 3 images which sum up the essence of their connection to that place, or sum up their reasons for choosing it. Returning to class they would import their images to Photostory, and begin drafting and or rehearsing their script, recording voiceovers to support their "voicethread." On completion the photostory would be exported to video, for upload to a web host.
Uploading Video to the Web
At the moment Quikmaps does not support independently hosted video, and my LA like most does not allow "YouTube" files through the firewall, for the time being anyway, they do seem to allow "Google Video" so for the sake of this project, I will upload my student video clips  to "google video" marking them as unlisted educational files.
Once the videos are uploaded to Google, clicking on the file hyperlink takes me to a page where I can view the video file in its new google video format.
- To the right of this screen is a link button to "email-embed html,"
- Pressing this button offers the chance to get the "embed code" for the video file.
- Click the "embed html" hyperlink to retrieve the code
- Highlight and copy it.
Adding The Video Clip to a Quikmap Place Marker
I need to create my map as outlined in Imaging our Learning Journey and add our place markers. Once this has been done:
- I Click on the pin I wish to associate my video clip with
- Add a heading text or annotation for the clip.
- Copy my "embed code" from Google Video
- Return to my quikmaps window or tab
- Right click in the place mark bubble and paste the embed code
- Repeat this for each pin, and then save the map.
Viewing my Map with Video
Returning to the My Maps page, I can press the view larger image hyperlink, perhaps expanding the view to full screen.
Clicking on the placemarker pins, now not only opens a bubble, but one which contains a "Google Video" player, where I can watch the clip, attached to the context where it was shot, or with which it has an affiliation. (See the image at the beginning of this post)
This "Mashup" can now also be embedded itself into a blog, a website, or maybe even a wiki, by copying and pasting the code given in the "this map in my website" link.
Adding Hyperlinks
In addition to video from Google, embedding images from the web as described here, hyperlinks can also be added to place markers using html. So even if the resource or asset cannot be embedded in the place marker directly, then readers can be redirected to it. Inserting the following piece of code to a place marker where
- Red = the tags embed the hyperlink
- Blue text should be substituted with the web address/url/location of the resource on the web
- Black text should be substituted to create the text in the placemark that describes the place being linked to.
Appologies for the blurriness and pixcelation in this image, will try to fix it later... The tag in place should look something like this.


Linking in this way makes reference to a place on the web, where content you cannot associate directly with the place marker can be found, eg a podcast, a website, or a wiki age/project. If associated with a media file, this would also enable direct download perhaps to the browser, to be saved to the user's computer, or with permission from the user, enable it to be opened in an appropriate application, eg a sound or video file in Media Player. If you wanted to use a file saved to an independent host site then this would be a possible solution to achieving this without using Google.
Born to Ponder
I wonder how many similar contexts for this asset could be conjured up. Some that stand out at the moment are
Recording, logging and tagging a field trip,
Logging experiences on a school journey. A Geoblog!?*
Thinking of Joe Dale and the use of digital media to support MFL, I was wondering whether there might be opportunities to use this tool to support development of MFL assets. Maybe drawing on the student's locality and experiences, to log familiar locations with images and adding/developing commentary in languages as well as English, to develop virtual tour guides, and tools for younger students.
21.2.08
Its A Small Old World...
 An amazing thing happened today, I recieved a comment from Paul Klintworth sharing how he had used ideas from Imaging our Learning Journey to present a journey around his school with a group of children in Vancouver. Visiting their blog today was a fantastic experience. I really liked the way he had adapted the process using colour coded flags to mark the different viewpoints, green to look in towards the school and red to look out onto the landscape surrounding them.
I was reminded on my visit of how, when I first began teaching in Bristol, we used to use photographic trails around historical sites, one that particularly stood out was a trail in the city docks, where students would use photographs to help in an orienteering activity. As I was watching the Photostory made by the students at Paul's school on a visit to Yew Lake, I began thinking again about how interesting it would be to combine media and to use quikmaps as part of a multimodal resource or presentation set, to help students explore and share their viewpoints around their "place in space."
I have been playing over the last couple of days again with Quikmaps, and discovered that video clips uploaded to Google Video can be embedded to play in their player within the place mark bubbles. I have been drawn to the idea of developing a "little patches of ground project" with students for sometime. This afternoon I have been pondering on the possibility of combining the use of photostories with Quikmaps to help develop and embed this idea in a geographical context. Perhaps using MS Photostory to present/create short audio visual clips about places and student thoughts about them, uploading these to the web and then tagging them in quickmaps as student "voice" threads to the locations they relate to.
There are obvious e saftey considerations here, in that places would need to be non specific to particular students personal space in the world, and be impersonal in that they would not feature images of the students themselves. However, in relation to the campus developments at our school currently, it would be an intersting exercise to engage the children in before the landscape they are used to disappears completely. As a Wiki based project this might also be an intersting idea to consider developing with other schools, or maybe other classes within school.
Returning to the small world alluded to in the title, the most amazing thing today was discovering, while seeking permission to share Paul's work, that Bristol, and particularly the area I work is common ground to us both. Albeit a while ago, it seems Paul spent time working with colleagues at my school, as well as teaching in at least one other where I spent time on secondment. Great to hear from you. Thanks to you and your students for sharing your work. Hope to hear again from you soon. :o)
26.1.08
Starting with Bobby: Exploring Repeating Patterns in a Mathematical Context
 Meet Bobby, a tile character I initially created this morning, to accompany me as I began to explore and think through some of the mathematical possibilities in using QCA ICT Unit 4b to explore repeating patterns. In a previous post I presented some ideas around how I have used these ideas and processes to develop a Design and Technology focussed project using MS Paint. Here I wanted to take a different tack, and expand on and explore another context where I found the process useful, in exploring the language of shape and space through a mathematical context.
Why MS Paint? Well since the PCs I use in school, all run Windows, and those of my students who have computers at home generally work within this environment, paint is a tool, that we have ready access to, frequently underused and exploited, there is the possibility that if excited and motivated by the tasks we develop, the students may choose to extend ideas away from school.
In beginning projects involving repeating patterns I favour an approach where my students begin by making their own tiles, using simple shapes, copy and paste, alongside flip and rotate, to develop more complex designs, that can eventually be used to develop their patterns. Repeating patterns activities such as the one I am thinking through in this post, have it seems to me enormous mathematical potential, an affordance we may not readily associate with graphic and painting packages.
Beginning with the development and creation of a set of tiles based on irregular polygons, such as an L shape, which we can describe as an irregular hexagon or hexagonal, and others such as these examples.
 The sessions might be developed from the limiting of tool use, and copy and paste to develop initial tiles exploring different polygons that can made using only 2 rectangles, perhaps expanding to explore polygons that can be made using 3 and so on, and then using these tiles to support discussion around the properties of shapes. Perhaps we might explore the number of right angles they have? Are the angles always right angles, perhaps inviting reasoning about why the students think this might be the case? What happens if we overlap rectangles? How does this alter the possibilities for polygons we can make?
 In developing these relatively simple "objects" we have begun to think mathematically about the activities we are going to engage in as the process unfolds, and this can be further built upon using the flip and rotate tools as we move to develop our tiles. In MS Paint the flip and rotate dialogue box offers options to flip horizontally or vertically and to rotate an object through 90, 180 or 270 degrees. These can be compared with 1/4, 1/2 and 3/4 turns, that our students may be familiar with through their use of tools such as the BeeBot floor turtle, and maybe even related to table top work related to using mirrors when exploring symmetry. Here we can begin to introduce or develop the use of numerical values for right angle turns with visual modeling and exploration of effect being developed as children create new tiles based on copy, paste and rotation of their original tiles. The idea of angle and a measurement of angles being related to rotation and turn around a point being introduced at the same time, through discussion and exploration of the effects applying these tools to the objects has.
 This tile was created by copying and pasting one of my irregular polygons 4 times, rotating it each time progressively through, 90, 180 and then 270 degrees, and overlaying each newly pasted tile onto those pasted previously. From this context there is the possibility to expand on discussions begun around my Polygon activity, by exploring further, ideas around the properties of the tile and shape created. This shape possesses no line symmetry, as it was made by rotating tiles, it may be rotationally symmetrical however as all of my rotations were through right angles. We could test this together, using copy and paste, and the flip and rotate tool, with the object set as a transparent layer, and by dragging the tile over the original, to observe whether or not the tile is rotationally symetrical. We could also ask what the children notice about the angles? Again theyare all right angles, why might this be so? Using the tile, we pasted and the flip and
 rotate tool, we can make a tile or a shape that does possess line symmetry?
This tile was made using the "flip vertical" tool in MS Paint, by copying
 the tile, pasting it and then dragging to touch or tessalating the two tiles. What will happen if I copy this whole shape and join this to my other tile? How many lines of symmetry do I have? What effect will "flipping" this tile vertically have on the pasted shape and the one I make as a result of
 tessellating them?
Moving on from these simple tiles, the children could be challenged to make their own designs, firstly using rotation tools to make their own simple tiles and then flip tools to make symmetrical tiles, that they can tessellate, by repeated copy and paste.
 Patterns are governed by rules, having produced their tesselating designs and saved, these they can then be coloured using flood fill tools, to follow either given rules or support reasoning and generalisation around visual lines of enquiry. Using save as in between each step of the activity, eg
- Using two colours, make a pattern where no two shapes adjacent to or next to each other are the same colour,
- Create a design where adjacent columns or rows are different colours?
- Use three colours to create a diagonal pattern?
- Use your design, save as and 2 different colours to investigate the different ways in which you can paint half, quarter, three quarters of your design.
- Use a multiples of 2, 3, 4, 5 or 6 pattern to colour your design.
- Colour your design using a multiples of 3 pattern, and then a multiples of 6 pattern. What happens to your design, when the new rule is used? What about a multiples of 2 and 4 pattern, or 5 and 10? What happens to my pattern if I use three colours and paint a multiple of 2 4 and 8 pattern?
As a bit of an afterthought a great follow up to these tasks would be to use a tool such as MS Photostory, to enable children to use and rehearse mathematical language and reasoning by including the digital outcomes of their tasks within a presentation. Dragging the images developed into Photostory, the students might use ideas from discussions they have engaged in during tasks, to record orally their work, ideas and findings as voice overs supporting their images, describing the processes they went through, and using and applying vocabulary developed during the sessions within the production of their presentation. The completed videos would make exciting evidence of learning while also supporting student understanding in using and applying mathematics activities and puzzles, as well as acting as a vehicle for sharing their work with others. These could be published for friends in school, but could also be added to blogs or VLEs for comments by visitors.
What happened to Bobby?
Well here he is and as I have been writing this he has not been far from my mind, in fact I have had a really challenging time working with my fussy friend, while in a mathematical frame of mind, to think about how I could use him to support systematic investigational work with a year2/3 Class or group. How about the possible colour combinations he could wear...
 Despite his complexity, and his inability to tessellate, in his current form he does make some interesting designs and patterns, when used on his own initially to form part of an investigation. I wonder what combinations of trousers and jumpers are possible using only two colours, and what would happen if I had three Colours to choose from to make these combinations?
 How many different ways could he be dressed using four different colours? This as a simple pattern design would make a really attractive wall display!
Maybe extending this to make an initial tile, and using some of the rules from our investigation, we could systematically reapply the investigation to decorate these tiles, For this pattern I had three colours, and tried to find the different combinations I could use to colour opposite characters the same while rotating the colour fills between them.
 As a discussion point, there other whole class possibilities for using some of my original more complex patterns using Bobby. Using an open ended question I might be able to use some of these following student engagement with tasks like those above.......
 Perhaps embedding this pattern into a smart notebook, I could use a hide and reveal techniques to explore the patterns and shapes, asking questions such as What can you see? Is there anything else you can tell me? What shapes can you see? Is their anything special about the colours I have used, and the way I have used them? Encouraging responses and answers to be given in sentences, asking why do you think that? and seeking responses that require and support students as they use not only I think.. or I can see ... statements, but require reasoned "because" type responses to be formulated, perhaps through paired discussion teacher modeling and group rehearsal.
20.1.08
Video Clips from the BBC Learning Zone
Again from ictopus, but this time the news pages. Have you visited the BBC Learning Zone's Clip Library. Following this link will take you to a Phonics Clip called "Sophies Scrapbook," based around the the long vowel sound picture "ea." There are many others including Magic Pencil Videos, from "Words and Pictures." I only surface skimmed the library, which is divided into Primary, Secondary and College Level zones. I hope you find the space useful, and strongly recommend that if you have not done so yet, you first of all visit and then subscribe to the ictopus website.
Winged Sandals: Thinking Around Writing Myths from a Multimodal Starting Point
 In this post I want to share a great website I discovered last year. From the website of the Australian Broadcasting Corporation, Winged Sandals is themed around Ancient greece, and plays host to 4 beautifully presented flash movies of Greek Myths.
Our narrative unit in literacy sessions this term is based around Myths and Legends. and so I wondered if the materials presented here, might ignite the students enthusiasm, for a genre where the language structures can be complex and difficult to understand.
During the first week of the teaching sequence we used some of the beautifully illustrated traditional texts we had available to introduce how Myths as oral stories, were created to explain natural phenomena. We chose three stories from Nordic and Greek mythology around the theme of creation. These were photographed and the resulting images used in smart notebooks as shared texts. Once in the notebook, pens and highlighters were used to annotate the texts, and to help us identify and highlight the features of the text type for charting and inclusion in our VCOP displays and writing ladders.
Another way to share texts from digital photographs, is through use of the slideshow tool, an integral part of Windows XP's fax and picture viewer. On Smartboards, though I am sure other whiteboards will allow something similar, images can be annotated, and then captured along with additions to the notebook for saving and later reference.
Despite loving the stories and the strange names and places, accessing the text itself independently was problematic for some of our students. To support this, and the key reason we chose to embed these images in a notebook for sharing, was that we began the stories with a rub and reveal activity. This was intended to develop the idea of using the images as reading prompts, and to begin introducing more complex words, such as character names before we engaged with the story itself.
"Rub and reveal," is an Interactive whiteboard technique that involves inserting objects to a notebook page, painting over them and then with students, using the eraser tool to uncover sections of the object a piece at a time. In 2 previous posts, Images from the Past 29/04/07 and Hide and Reveal Techniques 17/02/07 I expanded on this technique, which I have found particularly useful in using images to support student talk in inferential work and reasoning around texts.
 Returning to Winged Sandals, this week we decided to use the story of "Perseus and Medusa" as our focus text. Our choice of this as a text was in part due to the appeal of presentation, but also the structure of the movie and how we thought it lent itself to the key objective we wanted to explore
- To use beginning, middle and end to write narratives in which events are sequenced logically and conflicts resolved
As the shared text, we drew on multimodal analysis techniques to engage with the story. First of all episodes were engaged with minus one of their key modes,
- Without sound
- Without visuals
 Children were encouraged between "viewings" or "listenings" to talk about and think together around key ideas, such as
- Where the story or this episode might be taking place?
- what clues did we have from what had been seen or heard?
- What were the characters like? How did we know?
- What happened as the episode progressed? How was this different to the previous episode? What might happen in the next?
- Who did the children think was the hero and why?
- What did we find out about the other characters?
As follow up from the reading activity, students were given storyboards, including screen captures we had made that featured key moments from the story, and encouraged to compose super sentences, that they could use later, when they came to write their own version of the myth. Openers for each new episode were of particular importance, because we wanted to be able to move our readers from one part of the quest to another, and begin to think about how we enable changes in "sequence, place and time in a way that would give coherence" to our story overall.
Explaining paragraphing can be difficult, but I think this video offers enormous possibilities for helping with this too. Each episode, as representation of a beginning, middle and end, allowed the children to see this story recount as existing in 3 parts. Each episode representing a particular part of the story, was in a sense a visual paragraph, and the sentences we developed in our storyboards, the beginning middle and end of these. The students really enjoyed this story, and the visual and auditory nature of the experience I hope, through the charting process will give us points of reference to draw back to as we move into the guided and shared creation of our own myths.
 This week as we move on we want to familiarise the students with a local legend. Our school at the base of the Dundry Slopes is very close to the Stanton Drew Stone Circle, a site with a story all of its own. Building on the multimodal approach we have begun, We want to introduce not only the text, but also to begin thinking about the setting and scene. We have made a collection of photographs, at different times of the year and day, have a version of the story retold by some Y4 students a couple of years ago, and as I ponder this morning, am thinking about how music might help stimulate thought and thinking about language use, perhaps adding the use of Clannad, Enya or even well chosen Mike Oldfield tracks to support slideshows and zones of relevance activities we already have planned. Placing the students in the story, the legend tells
 of a wedding feast that goes wrong, so we have decided as later authors, needing to retell the tale, they should be the official wedding photographers, and as things begin to unfold, they discover they have only space for three photographs that tell the story of the day. The magical nature of events and the place opens a window that means they can move back and forward through the story to capture and revisit key events. Using a film strip story board/map, and based on freeze framing, the children will be encouraged to record pictorially key scenes from the wedding feast and so the legend, to form the beginning middle and end of our writing week next week. Drawing on these we should be able to relate back to the episode structure of "Perseus and the Medusa," to help the students see, how our story might be presented as three paragraphs, featuring a beginning middle and end. Our big write , rather than a narrative this week will be a poem, (though some students might decide to structure this as a narrative) using figurative and descriptive language or phrases collected from our engagement with images and the story, that will hopefully inspire adventurous use of language when we develop a version of the story we can publish. Interestingly when we were discussing this, we wondered about the idea of writing a picture book for younger students, however we also began to discuss whether since we wanted to challenge the student's use of language, whether we might not rather consider writing for an older year group instead. This is something I think we still have space to negotiate, and it will be interesting to see what the students themselves have to say about their preferred audience.
19.8.07
Shapes In The Environment: Digital Tools In The Numeracy Hour
Green Park Station, is a little off the beaten tourist track. No longer in use for its designed purpose this attractive building is now home to a local farmer's market, houses a number of small specialist retail outlets, and is part of the local Sainsbury's car park. However despite its aesthetic and retail therapy appeal it is as a mathematical resource, that I was drawn out of doors one damp Saturday afternoon, and before a leisurely shop and a coffee in the Brasserie, I wandered around armed with a digital camera to snap these images.
It has been interesting to engage recently with posts around the use of ICT and digital media within the Literacy Hour, so I thought I would turn my attentions towards thinking about the potential some of the tools explored might hold for the Mathematics Framework.
Using and applying has a central dimension within the new mathematics framework, and the recent NCETM research digest mentioned in a previous post, draws our gaze toward the valuable role that talk has to play, through class discussion, collaborative group work and guided investigational activity in developing and rehearsing processes while contextualising the use and application of mathematical vocabulary in context.
The real world context of Green Park, is alive with shapes. Its curving semi-circular central roof, supported on cylndrical pillars, presents the impression of a majestic semi cylindrical covering to what was once the train shed. While a closer look shows the glass roof itself not to be curved, but made up of rectangular panes of glass, rising to an apex, that makes it triangular in appearance. Wooden wall panels made up of tesselated rectangles, cross braced to divide the irregular quadrilaterals still further into right angle and equilateral or are they isoceles triangles. Supporting structures from the pillars create triangular openings with curved sides, arcs and to the sides of these are mounted spherical lamps. Windows form rectangular openings in the fascade of a largley cuboidal building, divided into smaller rectangles the window frames in turn hold still smaller square panes of glass. Vertical, upright girders form perpendicular supports riveted to horizontal beams which rise parallel to their neighbours. The central roof, and facias also present yet more tesselating and symetrical patterns to be explored.
Using the IWB and/or printouts of the images there is enormous potential to frame discussions around the properties of shapes. From simple shape hunts to the investigation of congruence, and shapes within shapes, from identifying lines of symmetry to describing and reasoning about the forms evident in the photographs. Extending and developing this with students themselves we might create local shape trails, using digital cameras to help develop not only their observational skills but encouraging them to focus on the structures around them and their features in the landscape.
There is an increasing catologue of ready made Excel, and flash or object based tools, available on the New Mathematics Framework Website, sorted and grouped by strand and unit, for use with the whiteboard or by students in the ICT suite. In the Literacy Framework there is an increasing focus on how digital technologies might be used to support learning outcomes practically as extentions and alternative ways of presenting activities developed within the and from the Literacy Hour. Perhaps activities such as this might be one way of beginning to see that ICT can be used in a similar way for the presentation, exploration and representation of mathematical ideas.
It has been interesting to engage recently with posts around the use of ICT and digital media within the Literacy Hour, so I thought I would turn my attentions towards thinking about the potential some of the tools explored might hold for the Mathematics Framework.
Using and applying has a central dimension within the new mathematics framework, and the recent NCETM research digest mentioned in a previous post, draws our gaze toward the valuable role that talk has to play, through class discussion, collaborative group work and guided investigational activity in developing and rehearsing processes while contextualising the use and application of mathematical vocabulary in context.
The real world context of Green Park, is alive with shapes. Its curving semi-circular central roof, supported on cylndrical pillars, presents the impression of a majestic semi cylindrical covering to what was once the train shed. While a closer look shows the glass roof itself not to be curved, but made up of rectangular panes of glass, rising to an apex, that makes it triangular in appearance. Wooden wall panels made up of tesselated rectangles, cross braced to divide the irregular quadrilaterals still further into right angle and equilateral or are they isoceles triangles. Supporting structures from the pillars create triangular openings with curved sides, arcs and to the sides of these are mounted spherical lamps. Windows form rectangular openings in the fascade of a largley cuboidal building, divided into smaller rectangles the window frames in turn hold still smaller square panes of glass. Vertical, upright girders form perpendicular supports riveted to horizontal beams which rise parallel to their neighbours. The central roof, and facias also present yet more tesselating and symetrical patterns to be explored.
Using the IWB and/or printouts of the images there is enormous potential to frame discussions around the properties of shapes. From simple shape hunts to the investigation of congruence, and shapes within shapes, from identifying lines of symmetry to describing and reasoning about the forms evident in the photographs. Extending and developing this with students themselves we might create local shape trails, using digital cameras to help develop not only their observational skills but encouraging them to focus on the structures around them and their features in the landscape.
There is an increasing catologue of ready made Excel, and flash or object based tools, available on the New Mathematics Framework Website, sorted and grouped by strand and unit, for use with the whiteboard or by students in the ICT suite. In the Literacy Framework there is an increasing focus on how digital technologies might be used to support learning outcomes practically as extentions and alternative ways of presenting activities developed within the and from the Literacy Hour. Perhaps activities such as this might be one way of beginning to see that ICT can be used in a similar way for the presentation, exploration and representation of mathematical ideas.
Subscribe to:
Posts (Atom)