Pages

14.8.08

My Class Podcast Station Challenge: Preparing The Web Space To Host Our Audio or Video Files

In my previous post I set the scene for the Class Podcast Station Challenge I set myself, and in this post I am going to outline how I have approached the trickiest issue that of storing and getting our audio files onto a web space so we can use them with our podcast. If I am not going to use Podomatic to upload my files to as a host, then I need to find somewhere else to put them, so the world and my podcast station can access them.

Our school has its own FTP space where we host the school website. This was set up for us by our local education authority and is this space to which our .sch.uk domain name was pointed, during the early days of the National Grid For Learning.

All schools in Bristol, have their own web space, and I suspect similar spaces have been allocated for schools elsewhere in the UK. If you are not sure about this then contacting your LA's IT team would be a good place to start. Perhaps with a spot of sweet talking, they will set up some space for you, if they haven't already. Schools with a website already, will have online storage space and a chat with your webmaster, will hopefully allow get you access to part of this space and the ability to follow through the rest of this project yourself.

To access this space you will need the
  • ftp:// Server's web address and details
  • log in details, eg a user name and password.
  • an FTP Client or maybe you can also use
  • Internet Explorer
With these details already in hand, I was ready to prepare the space to recieve audio and video files. I chose to use the File Transfer Protocol (ftp) Client, FileZilla to do this.

Why FileZilla?

Well 2 reasons really
  1. It is open source, and available for free download.
  2. But it is also available as a portable application from portableapps.com, and so can be installed to a "flash drive" to use on any computer attached to the internet.
Because I want to use this process in school the portable application was an attractive option, and is the tool I have chosen to use during this project. I mentioned a visit to the PortableApps site in a previous post and had already downloaded and installed the suite to a flash drive. Adding FileZilla meant another visit to download and then installing this as an additional tool.

Using Filezilla (portable) to Set Up the Space
  • Insert your flashdrive to a USB Port
  • Run The Portable Apps Suite
  • and Select FileZilla Portable from the menu.
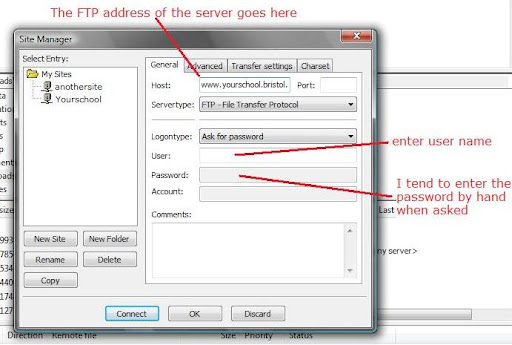
To begin using FileZilla to work in your FTP space you will need to set it up.
  • click the file menu
  • click site manager
and a dialogue box like this appears.

  • Press the new site button
  • Enter the FTP details for the site that you have been given
  • and connect to the server
  • your password when prompted
  • and wait for the software to connect.
In a short while you will notice two sets of folders appear in the filezilla windows.
  • the panes to the left are files and folders on your PC (the local site)
  • the panes to the right files and folders in the FTP server (the remote site)
You can now work in these panes pretty much as you would in Windows Explorer, treating the remote site like a drive you have just plugged into your PC.

To prepare the space and to help organise my future podcast files I
  • right clicked in the remote site window
  • Selected create directory
  • right clicked again and named this new directory podcasts
When naming folders and files to store in your ftp space it is good practice to keep all file and folder names in the same case. You may use numbers in your file names, but it is advisable not to use spaces. Use an underscore or hyphen instead.
  • Double click the podcast directory
  • repeat the create directory process
  • Name this folder for your year group/class or station name,
In our case it is named for the year group and it is here we will store the audio or visdeo files we make for inclusion in our podcast.

So in this post I have
  • Set up FileZilla Portable to access my file storage space from any computer,
  • Created my two folders (directories) on the FTP server
The space is ready for me to upload and to begin hosting the audio and video files that will make up our podcast.

Before I do that though I need to set up the podcast page, and establish the feed that will allow our listeners to subscribe to it. I will talk about how I have approached this in the next posts in my Podcast Station Challenge series.

Previous posts

13.8.08

My Class Podcast Station Challenge:Starting Point

This weekend I decided to take up the challenge of setting up a customisable class Podcast station for my students.

Over the past year we have been using Podomatic, a fantastic free host that has proven really useful, alongside my preferred classroom Podcast Authoring tool, podium, in helping me understand how the technical side of process works (ish!).

As a learner however I have decided it is time to try something new, to move beyond the adoption phase and take a few risks, as I move into the adapt and innovate phase of using this technology. So in this series of posts I want to share the first steps I am taking in "mashing" together some free online tools, with some not so free or readily available ones to set up this new and customisable podcast space .

Podomatic As a Starting Point

Podomatic is an online Podcast "publishing" solution. It offers for the absolute beginner three key ingredients required to set up and run a podcast station, and all in one place. They offer two solutions
  • Basic (a free service)
  • and Pro (their fee paying service).

Both solutions provide
  • Easy upload and storage space for your audio or video files
  • A home page to host and display details around your podcast and it's episodes
  • An RSS feed to allow regular listeners or viewers to subscribe to, be updated about and download your show to a podcatcher (eg iTunes) without the need to continually visit your podcast site.
Additionally the service enables online file conversion, this has proven particularly useful on the odd occasion we have wanted to upload video podcasts. Submitting files from Movie Maker for example, the site converts these to pod friendly video formats behind the scenes with the minimum of user experience and no input beyond hitting the publish button required. The site also has a basic online recording tool, allowing audio podcasts to be recorded through the site. Once you have set up your account, using the Podomatic Site to publish a Podcast or Podcast Episode is really straight forward.
  • Log in to your account,
  • navigate to your My Podcast Space
  • Upload your audio or video file
  • Create a post and show notes
  • Attach the audio file from your uploaded media or PC to this page
  • and press the publish button.
The process of publishing a Podcast to Podomatic is very similar to creating a blog post, and if you are looking for a starting point to explore the possibilities of Podcasting in class this is certainly a great place to begin.

Publishing the file to your would be audience is however the final step in the process, and even though sites such as this offer online recording tools, if you want to be a bit professional and add music or refine and edit recordings before publishing you will need local tools on your computer to help prepare and edit your audio files before publication. As I have mentioned in a number of posts and above Podium by Softease is my prefered classroom tool for this, though a number of other tools such as the open source platform Audacity, and Garageband on the Mac have been written about by other colleagues as tools they use to enable this.

Moving On The Context For The challenge

I originally set up a Basic Podomatic Account. This provides 500mb of online storage space for your audio and video files but also a bandwidth limitation for downloads. This has been more than sufficient for the work we have done this year, but I want the students to begin using video and audio podcasts more regularly as part of their classroom work this session, and enable them to help customise the page that hosts links to their content and feed, this either meant finding or developing a local solution or looking at a subscription serviece or combining tools available to support this and so the crux of this personal challenge, and the subject of the upcoming series of posts.

Using the solution I have decided upon, I have already set up the space, and as a taster it can be found here. Over the next couple of posts I want to share with you the tools I have used to do this, and the process involved. Hopefully you will revisit and follow my quest.

10.8.08

Stelarium: Open Source Planetarium

""
Found this in my feeds this week from Portable Apps, I have downloaded it for a play later, and was really intrigued by the visuals on the home site. Available as a portableapp this open source application, may hold some intriguing possibilities for home school learning, and anyone running windows xp on portable platforms. I am avidly watching the space labelled Linux at portable apps to see firstly what applications become available, and then whether or not they can be run on the Asus ee, from flash drive through the Linux distribution installed. Still a newbie to this.

9.8.08

Seven Wonders Of The Whiteboard Challenge Via Kwout

""
From 11th August for seven weeks, the Seven Wonders of the Whiteboard Challenge is set to begin. The aim of the project

"To improve the use of interactive whiteboards in the classroom and to stimulate more discussion about how they can best be used."

I am looking forward to a little focussed blogging and a revisit to how I am using my classroom Smartboard. However it will be interesting to see what folk are doing with the range of board types and if users of mobile solutions such as Mimio and e beam share in the process. I will also be interested to see how or if the role of peripheral devices such as voting sytems, tablet PCs, and input slates are explored in blog posts, used alongside these. Could be an exciting seven weeks.

7.8.08

Sojourn Via Kwout

""
Am loving using Kwout to bookmark and post site links and other interesting things I come across to my tumblr tumble blog. Hopefully this "Kwout" from dictionary.com and the Guardian won't sum up the entire use I put this tool to. It may be a "sojourn" at the moment, but I am beginning to appreciate the neat Archive tool in Tumblr, that lets you flick between views and track your content. I can imagine this becoming a really useful tool for logging online research references later. Kwout also allows direct posting to blogger as can be seen above, and a number of other spaces including Flickr.

"Robot Voices" And Reading For Expression

Voice Synthesisers and text readers are much more lifelike these days, but still lack a certain something. Something I admit to finding difficult to listen to and often "cringeworthy", is that a word? Today in my feeds however I spotted a space, that set me up for a brief playtime, and thinking about how I might reconsider their place in my classroom.

We have used word processors with text reader plugins for a long time, and my colleagues and I have been regularly entertained by the mispronunciations, the effects that misplaced punctuation has on the way the text is read, and extended periods of phoneme play as we have tried to get the reader to say what we meant. My all time favourite has to be the metallic "youglee," read by an MS Word plug we had once, that no matter how hard we tried we could not get the synthesiser to pronounce as "Ugly."

The space that inspired this post today was "Read the Words," posted by colleague Angela Maiers. "Read the Words" hosts and converts text from a range of sources to audio. The files it produces can then be linked to, embedded in blogs or websites, used to podcast with or be downloaded as MP3 files to use locally for playback. They also offer advice about how to have files read more realistically, by spelling phonetically or including punctuation to effect cadance and expression, even slowing down the pace of the reader. Text can also be uploaded in Spanish and French, though not being a linguist, I don't feel able to comment on this. The space also offers a choice of avatars to read the files for you, and it was playing with these this morning that has lead to this post today.

While playing, I discovered choosing two different avatars to read the same text, gave not only two different voices to listen to, but also two completely different renderings of the text. Here are two examples of a section of the fairy tale "Little Red Riding Hood," read by "Michael" and "Lauren" The text was copied and pasted from an online PDF file, at Logo.com.

Lauren |Example


Michael Example


Example read by Your Truly


Listening to these clips got me thinking about how I could use this tool in tandem with student podcasting to help help evaluate and think about our use of expression when reading, and the importance of enunciation when we perform texts reading or speaking aloud.

As well as embedding these files in web pages, they could be prepared and downloaded for use within Powerpoint shows or IWB notebooks as shared texts. Comparison files could be recorded by the students, other colleagues or the class teacher, using tools such as Podium or Audacity, to support discussion around the effects on the audience of different aproaches to reading the text. Perhaps sharing a prepared text in this way, with groups of students could form the starting point for a challenge during guided sessions. Can they listen to and improve the presentation together? This could result in them recording their performance for sharing with the class and comparison with what they originally heard. Using voice synthesized files, prepared pre session might be an interesting starting point and way in to supporting critical review of performance, and using the files alongside or embedded in enlarged texts on the IWB, a means for promoting discussion around the role of punctuation, while mispronunciations could be a vehicle for thinking about how words sound in context and modelling the strategies we might use to ensure sense from the text we are engaged with. I would be really interested in any thoughts you might have around this post, and look forward to hearing from you.

Screen Shot Captured from Read the Words via Kwout

5.8.08

Stick Figure Animator: Extending the Possibilities with MovieMaker

My students have asked a few times how to get the animations they make with Pivot to stop looping, and whether they can add sound...

The simple answer to this is Yes!
Yey!
But not using Pivot itself!
Oh! So how?
By using Microsoft MovieMaker.

First of all

  • Create action sequences as clips in Pivot.
  • Export or save animations as .gif files (animated images)
  • Open Microsoft MovieMaker and...
  • Import your .gif files to media clips.

Once you have imported your .gif files to a media clip gallery or collection they can be dragged to the video timeline, moved around and if neccesary resequenced, as if they were photographs or video clips.
Once on the video timeline
  • Scene transitions can also be added between clips, and opening and closing credits added.
  • Sound files can be imported to the clip gallery too, and then added to the audio timeline to support the action, and here they can be edited, split or cropped to match the length of the movie.
  • If you would rather, the narration tool can be used to record your own sound or add a voiceover using a microphone.

This model movie using a few clips created by yours truly, a couple by my students and a borrowed sound file from the web, was made using this process and uploaded to google video for sharing. The video file could also have been saved to somewhere like podomatic to become part of a video podcast sequence.


I guess this process would work with images from other tools with the ability to export images as animated gifs too.

3.8.08

Exploring Ways of Searching Flickr

Over the past year or so colleague blogs, tweats and feeds have highlighted and recommended a number of interesting ways to search the online image sharing space Flickr. In my day to day classroom work I use images a great deal to support and stimulate the talking for writing process, and as visual starting points for reading activities and inferential tasks. Flickr is a fabulous source for this so I thought I'd pull together one or two of my favourite colleague pickups and tools here, while taking a break from other things.

Recently Angela Maiers pointed out the Idee Multicolr Search Lab that uses colour recognition to sort and group search returns, and retrievr that uses doodles and sketches or uploaded images to search, retrievr does return some interesting finds and interpretations, though perhaps isn't as appealing as the outcomes from Idee.

Spell with Flickr is one of my personal favourites, here you enter a word, and after a short wait, if available image tiles are returned, from Flickr that match your search, along with the embed code enabling the images to be used in other web spaces.

Joe Dale has also published a number of posts around flickr and FlickrStorm. FlickrStorm uses words or phrases and I really like this tool, it seeems no mater how abstract you think your keyword is, someone somewhere has tagged or partially tagged an image to match, really useful for mood images, atmospherics and metaphor, though great when you simply want to find a quality image of something particular, and the Google Image search simply doesn't cut it.

John Johnston has developed a tool he calls the Simple Flickr CC Search Toy, that cleverly searches fickr, and returns images with their creative common's attribution information. Clicking on the thumbnail of the image of choice, provides an embed code for the image, including a backlink to it's source, and the terms of the CC License. This is a really cool tool.

Within the flickr community itself, people have also organised themselves into groups to share images around a common theme. Last Autumn I discovered the Nine Group, who share images that are all related to the number nine. At the time my thoughts flew to the opportunities this opened as a starting point for investigational work in Mathematics.

How would you use your

S E A23 r-ca C H Returns?

Comiqs: For your Online Comic Life

Thanks to John at Creative ICT for directing me to this really nice online comic strip creator. Called Comiqs, the environment is much more flexible than others I have visited, and mentioned so far, and in many ways is Comic Life Like, in how it is presented and works.


Within Comiqs, you can search for flickr images or upload your own photos and doodles to use, add additional pages and choose from a variety of page layouts and templates. Using the tools and uploaded images in your comic strip is a matter of dragging them from the palette space to the left of the screen, onto the work space where they can be resized and moved around. The Graphic tab, is where the page layouts can be found along with a collection of call outs and the caption box. Dragging these to the workspace and double clicking allows text to be added. To make my playtime easier and shorter I copied text from a file of Homerisms I already had, and pasted these to the bubbles. Not greatly creative on my part, but I did do a little something more with this one.

Completed comics can be saved to your personal space and then embedded in the slide show format below to your blog or webspace using provided embed code.


playing with Comiqs from twowhizzy on Comiqs

I am a big fan of comic strips, their potential as multimodal learning and literacy tools. Comic Life mentioned above and in several other posts, is a local application available for both PC and Mac. It has helped I and my students to write classroom learning stories, and played a key role as a data analysis and presentation tool, helping make sense of interactions in classroom based Video Data collected for my research project. This environment I think is amazing in that it utilises similar affordances and tools, as a web based environment, allowing direct sharing of content to the web, via other web2.0 services. I will certainly be considering how I can use this space with my students to support our blogging adventures, but without losing touch with Comic Life for other things. Having just visited the plasq site, I was interested to find the latest incarnation of Comic Life, Magiq, and to see versions of the tool now available for the iPhone and iTouch. Unfortunately Comic Life magiq is only available for the Mac, but I've embedded the video here for those who might be interested.


2.8.08

Pivot Stick Animator:thoughts and reflections on a new writing tool

I have published a number of posts about the freeware tool, Pivot Stick Animator and shared a number of independent student outcomes, but the excitement generated by my class over the last couple of weeks of term lead to this post, that sets out to introduce a few basic moves and a few thoughts about its place in the writing process.

Pivot Stick Animator was first shown to me by our technician. We downloaded it from snapfiles and installed it on the network where it lay unloved and unexplored, until during a unit on control and modelling a student found the shortcut, and asked what it was. I first used it with Y3 (7-8 yr old) students last summer, but when the outcomes created were discovered on the school website, older students began downloading the software for themselves to play with at home and developing short animated sequences to share with me through think.com. I really became excited by this when I began to see what the tool revealed about their understanding of story structure and visual narrative. Over the last 2 weeks or so this is what has really grabbed my interest observing how the "talk for writing process" we have engaged in over the past 12 months supported and informed the iterative storytelling process involved in creating their visual outcomes.

Beginning with a free play and exploration session proved really beneficial allowing the students to see for themselves how the environment worked. Essentially the tool works like an onscreen flip book. A single image is first of all created by placing the stick figure character in a starting position and then pressing the next frame button. From here simple motion can be created by pressing and holding the mouse over a "pivot Point" and dragging that element to a new position, before pressing the next frame button again.

Creating movement and motion is achieved by dragging and moving elements of the figure and then capturing each frame when finished. This wave action for example was created by repeatedly moving the upper portion of the characters arm, and pressing the next frame button in between each movement .

Waving


Changing the colour of the character to red, and moving the whole image upward slightly each time the arm moves, and then down as in the next image makes him a little angry, hopping mad so to speak. Or perhaps left as he started he could be calling for help! Whole character movement is achieved by clicking on the orange pivot pont, dragging the image and pressing the next frame button in between each movement as with the wave.

Working with the students, we chose a story context, by searching the web and downloading a background image. This supported discussion about who the stick character might be, what they might do, how they might do it and so on. Perhaps what was most interesting and powerful for me, as I observed the process as a whole however was the iterative nature of the narratives that unfolded throughout the task and between and across sessions. As the children began to play and review their "drafts" watching their current story unfold, new narrative possibilities began to emerge and would be introduced into discussion, students drawing on the story so far to project and plan possible next steps in the action. Working in pairs they made decisions about what path the story would take by agreement. "it would be really fun if..." Shall we make him dance here..? "I think he should.... next." Central to this activity is a view of authorship beyond penmanship and one that sees story creation as an ongoing process of design and redesign, something that can be difficult to model in the more traditional writing session. The power to support visualisation and engagment with muliple narrative through talk, while evaluating "potential" outcomes, predicting plausible or possible next steps in the action, is an important part of the process that writers go through in bringing their imaginings to the minds eye and ear of their audience . And is something that as a person plus,this tool seems to offer in abundance. To close my ramblings for today, I leave you with an animated short of my own. with the olympics around the corner, I introduce you to the weightlifter.


Got a few minutes to spare, why not download a copy yourself for a play from snapfiles.

30.7.08

Saltford Lock: 1st Play with Disgo Camcorder

It has been a beautiful evening and visiting a friend we decided to have a drink at one of our favourite watering holes. The Jolly Sailor, is on the bank of the River Avon, next to Saltford Lock, between Bristol and Bath. The activity around the lock and weir became the focus for this very short movie and first try out of the Disgo Camcorder I bought the other day.


This very short movie was compiled from 5 x 10 second video clips I shot, and then put together using Microsoft Movie Maker. The sound is actual footage, recorded by the camera. The clips were imported directly to Movie maker from the camera's SD card using a USB card reader. Some of the clips were trimmed, before adding clip transitions, a title and short credits. As an experiment, to explore the ease of use, quality of video and sound this has proven a really useful activity. I am really impressed with the outcome considering the relatively cheap cost of the camera. Fancy a class set of these to supplement other digital capture devices, really got the creative juices flowing. What to do next? Are you ready for your closeup ...?

29.7.08

Disgo Video

At £24.99 the disgo Video camcorder, I found in PC World this afternoon seemed too big a bargain to miss. A pocket sized camcorder with built in Microphone the unit is powered by two AA bateries and comes with a 1 GB SD Card, that holds approximately 1 hour's video stored in avi format. The card is upgradable to a maximum of 2GB. A 2.0 inch tft screen acts as a viewfinder and playback space, and an internal speaker allows for audio playback and review.

I am pondering just how useful this tool might be as part of a "collect, store, prepare and share" toolkit. Granted it does not take stills, but these can be captured from video using the provided editing software and also through MovieMaker. I wonder also how useful the tool might be as an audio capture device. There seems to be quite a lot of space to play, and explore. A little something else to delve into over the break.

27.7.08

To Type or Not to Type 5: So Many Fish, So Little Time!

The Open Source Tool "Tux Typing" comes preinstalled with the Asus Ee's Linux Distribution, and I and the students have had lots of fun zapping fish and the like while practicing our keyboarding skills over the last couple of weeks, heaven knows I need it. On my web wanders today I noticed that this software is also available for download and use with the Mac and Windows. You can download Tux Typing here from sourceforge.net.

Lookybook take a look see.

Thanks to Angela Maiers for the heads up on Lookybook, a lovely site that enables browsing and sharing of picture books through an online viewer. As a pedagogical tool it has enormous potential, several of which are highlighted in Angela's post.

For those of us thinking about how web 2.0 tools such as blogs might be used as content management and learning spaces, or engaged in longer term projects involving the use of virtual learning environments, and looking for online content to support population of these spaces, resource banks such as this have enormous potential. The site allows sample texts to be embedded to other web based resources through the copying and pasting of html, allowing for the addition and publication of extension activities. Check it out.


This Morning I Have Been Mostly Playing With Joomla 1

Joomla looks like being the tool of choice to manage our Web Site and its Content as we become part of the Bridge Learning Campus. I downloaded a copy a few months ago to play with, having read an article in a magazine, but I haven't done much with it other than exploring online live demos until this morning. Watching Video demos it seemed pretty straightforward, but as with many best laid plans, this morning my inexperience would come back to haunt me.

Following online tutorials I got off to a flyer
Step 1, download xampp from Apache Friends
Step 2, download The Most Recent version of Joomla
Step 3, Set up a localhost Server on old laptop, by installing xampp
Step 4, unzip and copy Joomla Files to new folder called Joomla in xampp/htdocs

But then my inexperience hit in with
Step 5. open localhost/joomla and install

When inputting http://localhost/ didn't find the xampp server space on my c:\ drive. Referring to the xampp read me I found an alternative ip address and used this instead allowing me to move on.

Now I could install the instance of Joomla before
Step 6. deleting temporary installation files and
Step 7 running localhost(or ip address)/joomla and login

If I am honest I am now feeling really pleased with myself as I now have a space where I can practice the skills and processes I need to learn in thinking about how to transfer useful content from our existing website to form the beginnings of the Primary Pages in The BLCs Web Site.

26.7.08

Summertime Has Come

Well the summer break is here, we had our introductory workshop and the new year 6 students have scurried home excitedly with our new 1:1 machines, to play and explore. I have set a diary project, and pages have been uploaded to think.com to support this, with accompanying bulletin boards, for suggested ideas and to share communaly and direct each other to the things we have uploaded. I guess all I can do now is sit back and wait or watch with baited breath to see how the projects themselves emerge and develop.

On a personal front. I have to complete and submit my dissertation, but amid this I have a couple of additional missions. I want to make space to play with greenfoot, and also explore mobile web access that students can tap into in the wider city, linking this to the project I have set for them, while I explore a spot of moblogging, something I got excited about while at HHL07. This hopefully will be easy enough to fit in among other things. I am pondering a change broadband provider and considering whether to supplement this with a mobile broadband account, or whether choosing a provider that offers wireless time might be a better option. I would value any thoughts on this. In the mean time a spot of lunch and a potter in the garden seems appealing right now.

22.7.08

Greenfoot: A Summer Project

Came across Greenfoot, while I was floating around the web the other day, thinking about a control environment or microworld creation tool that we could perhaps make available on our Asus Toolkit for students. I was really looking for a version of LOGO or pondering Scratch, but what interested me about this environment was its use of Java as a development framework, with its ability to compile executable programmes to control elements introduced into the space. Even if we can't use the environment with the Asus platforms, the possibility of involving students in building interactive object oriented games, seems really appealing right now, though whether it will later or not I'm unsure. As an absolute novice programmer this tool looks really interesting as a personal in, so have downloaded to play over the holiday, and explore the possibilities. The video tutorials look really useful. If all works out perhaps this could be another tool to add to our simulation and control tool box for older students, its certainly a recommend and look see for secondary colleagues.

21.7.08

Joining the Asus Club

I have spent the last couple of weeks playing with my own Asus Ee, and preparing for this evening. I have just arrived home enthused from the launch event with parents of our current Y5 Students, where we introduced our new e learning scheme, based on the platform as a "collect, store, prepare and share" device.

I am now looking forward to introducing the devices formally to the students themselves later this week, sharing guidelines for their use and maybe setting some short summer playtime projects for them. We use think.com as a collaborative learning space, and am wondering if perhaps they could use this as a temporary blog type space, though I am also tempted by using the web cam to keep a short video diary or the use of the sound recorder to capture audio soundbites that could form the basis of a podcast on return to school, perhaps around places they have visited or things they have done supported by web images.

The project overall is an exciting development. Perhaps what I am most excited about is the prospect of putting into the hands our students a standardised toolbox and the prospect through 1:1 access of opening opportunities for all students to access the online tools and resources we began to use last year. It will also be interesting to work with my year 6 colleagues, to see how having access to 1:1 tools impacts on subject design initiatives and student engagement. Hopefully there will be much to share as the project develops and emerges over the coming year.

16.7.08

Year 3 Have Fun With Pivot Stick Figure Animator

Last week I began exploring Pivot Stick Figure Animator with my class, they spent their first session playing with and exploring the environment, sharing with each other how various tools worked and what they did. Today we discussed how we might use background images downloaded from the web to help us tell simple stories. I am so pleased with the outcomes and how hard they worked I thought I would share a couple of todays outcomes here.


Our Swimming Movie By T and P (2008)


Our Mad Movie By W and T (2008)