In class a couple of weeks back, my Y3 students mapped a "landscape walk" locating images collected by "tagging" them on a table top map. This map used an aerial photograph I had previously made and then screen captured from quickmaps. To capture the map, for use in the classroom, I used the "printscreen" button on the keyboard, copying the screen image to the computer's clipboard, and then pasting the map to a graphics package where it was cropped and resized, before printing out for use in their table top task. The outcome of the activity, mediated by small group discussion, was to create a poster/map, where the route for our walk and staging points on our journey were marked, with labels and arrows placed to show the locations where our photographs had been taken.
This activity was in part inspired by tagged mapping activities I had spotted in the blogosphere, through the work of John Johnston and Anthony Evans, and show how, even without the "tech know how" it is possible in looking beyond the technology, to develop similar processes for use in the classroom. Thanks to input and encouragement by Tom and his blog, I have decided to have a go at transferring the table top task into the Web 2.0 world, and the remainder of this post is me thinking through how how I did this and how I might develop the activities worked on with my students.
In his post Adding Image and Videos to Quikmaps Tom Barrett explains the "how" process, of associating images with placemarks in Quikmaps, but before this can be done any images you wish to use must be collected and uploaded to a web space or host. A number of free sites enable this, among which are Flickr and Picasa. We have a school website, and each year group has it's own community and gallery spaces, where images and files can be stored, so it is here for my first go I have uploaded the images I intend to use in making my map.
Making The Map

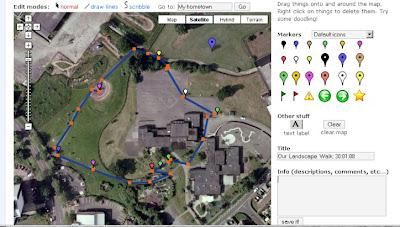
I created a quikmaps account a while back to play with, and for my previous post I had a prepared map. Having logged in and loaded this map the screen shot above shows this and the interface for the Quikmaps environment.
To create my map from scratch
- I used the search tool to navigate to the approximate location I wanted to create a map for.
- Using the zoom tools I refined my location,
- I centred my map by using the hand grab tool to move it until the location I wanted appeared in the middle of my map window.
With the map in the window, the tools above the map were used to draw, "doodle," on it, enabling me to mark and trace the route of our walk. Within the map window itself there are also tools to change the map type or view. The map can be viewed as a map, aerial photograph or hybrid, and to the left are a collection of zoom and navigation buttons.
In the space to the right of the map, are the place mark pins. These are added to locations on the map,
- By picking them up with the hand grab tool
- dragging them to the place you want them on the map
- Dropping them in place.
- Once on the map they can be picked up again to refine our location
John Johnston has extended this to map wildlife images, captured on walks, while Tom has used histori
 cal images with students to develop inferential activities around locations as they appeared in the past. Anthony used his quikmap to locate photographs of images he had taken of BeeBots, as he explored the ideas around a where in the world is... type project.
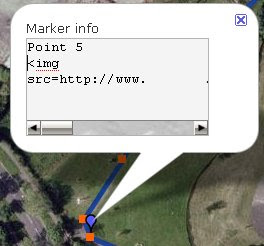
Here you can see an Information Bubble from my Quikmap, with the opening section of code, suggested in Tom's guide to embed a photograph.
On my map you can see that I included the route we took, using the line drawing tool, as well as the pins for each staging point on the way.
Preparing my Images
Having created my map, I now need to prepare my images. I don't want to use vast pickies, in any of my pages, as big images mean particularly on a page with multiple images slower download speeds. A while back I decided that I would use standard sized smaller graphics on my pages, in school and at home. In sessions with students and colleagues I also taught them how and why this was necessary, and have downloaded the MS Powertool "image resizer," a simple to use batch conversion tool, installing this on the school network to help me and the students with this process.
Once installed, using this Windows XP extension, is really straightforward.
- Copy all of the images you wish to use to a folder
- Select the images you want to resize
- Right click to open the file context menu
- From the menu click resize pictures
- In the dialogue box that appears select the image size you require.
For my web graphics I usually opt for the "Win CE" option. Since I am going to upload these to my school web space and I may decide to put multiple images in a bubble this is the size I will use today.
I author, edit and publish our school website using MS Frontpage, so I guess the next step is to copy my resized images to the gallery folder of the website and upload them... Working with the students at school, I could also open the site as a web folder, log in and then copy the images to the site.
Using Flikr or Picassa this is the point at which I would log onto the site and upload my images to a gallery here.
In for a Penny In For A Pound
Ok I have my images uploaded to my webspace, I have made my map, now for the moment of truth. Adding the image source tag to the bubble the web address (url) of the image, then closing the tag... Yay! it works!
Now I will select the tag code by clicking and dragging
- right click the code
- Select copy from the menu
- Open the new placemarker bubble
- right click and paste this tag,
- and edit the image file name (.jpg) to enable the code to locate these new images.
Adding A quikmaps widget to the blog
Now I have finished my map, tested it and know that it works, I have decided to include it in my blog using a widget from widget box. Having ssaved my map, and then selected to add "this map in your site"
I clicked the add widget button
clicked the embed source code button
clicked the copy code to clipboard button
and in blogger, pasted the code to the page here in html view.
This process has been a really exciting development for me, a new tool to add to my Humanities and Data Logging toolbox, and to develop for use with Tizz our traveling bear.
However for anyone, who like myself, is also thinking about mobile technologies right now, this seems to me to be one further exemplification of a context where the "collect, store and share" affordance of these tools, discussed in previous posts, would be really useful. Students on a school visits, capturing images, making notes, perhaps even recording sounds or short video clips that on return to school, could be tagged and linked to create quikmaps of the locations they have visited. Even more powerful would be the addition of the resources being captured in real time. Use of 3g tools and moblogging in the field; using prepared maps of visit locations and place markers or GPS, students could potentially use prepared maps, and add resources, tag locations as they work, making this resource an additional tool in the "collect, store and share" process.
Back on the ground for a moment, and back with my own students, this tool will be extremely helpful in consolidating their understanding of spatial relationships. particularly their place in space, as we are able to dynamically zoom in and out of the locality they live.
My next step, is to use this tool with them to explore food journeys. Next term I want to use a visit a local Supermarket, to look at the journey of some of their favourite foods, or their five a day. Using a walk around the supermarket as a starting point to identify where in the world their food comes from, it will be interesting to tag these locations on a quikmap, and to begin not only considering where they are grown, but how they get to us. In terms of the National Curriculum for Geography the tool will take on two roles
1) as a data logger, the site and map created will facilitate the storage of data, and marking of the relative locations of each source to our home locality.
2) As a dynamic environment, we will also be able to begin considering the wider connections between ourselves and other locations.
It might be interesting for the students to begin linking our web based resources to the personal atlases they have been making, and in terms of Geographical concepts already developed in the process, to discuss with them and other colleagues how this "dynamic personal mapping" type approach, might be developed to create an ongoing resource, that students can develop and expand as they move through school. But this will no doubt be another story.
Note to self: Consider with colleagues how this tool might be used to modify and innovate QCA Geography Units
3 comments:
An excellent post Simon with some great explanations of the processes you have gone through to enhance your work. I was glad that I was able to help. I would hazard a guess that pretty much anything that you can grab some embed code from, you will be able to put into a Quikmap placemark bubble.
I look forward to reading more about your explorations, and let me know if you would like to collaborate on how new mapping technologies could enhance current curriculum units.
Super stuff, thanks.
Simon,
Just what we needed! Here's our map, first effort, around our school in Vancouver, Canada. Thanks! Paul
http://grade2web.collingwood.org/
Post a Comment