The developers at Zondle have been fantastic responding quickly and enthusiastically to a query/request I had about the ability to provide readthroughs to followand support sounding out in the Phonics games I had begun to make at the beginning of the holidays.
Thanks to the Zondle team I have been able to update these games by uploading additional soundfiles I have created that correspond to each of the words used in the quiz behind them. This may be a new notion to some readers, recording sound using the computer, so I have chalked this on my to do list, a post to explain how to do this and some of the options available. Recording on the computer is not as complex a process as it may seem, in fact being away from my desk as it were for month or so I was forced to improvise and experiment with the equipment I had to hand. My Microphone and recording software tools were in Bristol and I was in the North East. The result was that the recordings for these games were made not on the computr at all but on my mobile phone. (I am accompanied for short bursts on one or two of the clips by my nephew who was "helping" me and playing the games as we went, so please excuse the far from studio quality sound).
The Phone in question was an HTC windows phone, and I used the Audio Recorder to create each short sound clip. For each of the words in my quiz I made separate sound clips by pressing the record button, speaking as clearly as possible the word into my handset before pressing the stop button. As I finished each sound clip, it was renamed from the default filke name with the word it held.
I used my USB cable to connect the phone to my Netbook, though I could have removed the Micro SD card from the phone and used a card reader to access the files I had made. Navigating to the "My Voices" Folder I located the sound clips and copied them to my Netbook for editing. Unfortunately the AMR format files on my phone were not compatable with the games platform at Zondle, which required MP3 files.
Not to be discouraged I searched for a tool that would convert my AMR files to the correct format and found a piece of freeware called AMR to MP3 Converter. I downloaded and installed this before following instructions on the website to convert the soundfiles. Once converted to MP3 format I logged into zondle, navigated to my quize, chose to edit my quiz and thn added each of the sound files to the appropriate word in my quiz.
Now I have done this with my phone and netbook once I have a clear path/process to follow.
1. Create my word list or quiz in Zondle.
2. Using my audio recorder on the phone, create my sound files.
3. Import my sound files from the phone to my PC
4.Using AMR toMP3 converter, change my sound fle to the MP3 format.
5. Upload my soundfiles to my quiz at Zondle
6. Publish my chosen games to an online space for the students to access.
You can try out the updated games that use these files on my previous post Phonic Games and Zondle.
Wondering now whether I could use this or a similar process with my Key Stage 3 and 4 students to create podcasts and talking heads activities thruogh their mobiles.... Hmmmm.... ;0) We have Blackberries and iPhones, I have micro SD card readers... what do you reckon!
30.8.11


27.7.11
E Safety: How to choose a strong password
Great video from Sophos Labs and a very Enthusiastic sounding fella Graham Clulely. How to choose a strong Password. Thinking this might be a nice tool to support discussion during our introductory Phase Three sessions.
Phonic Games and Zondle
 |
| From Zondle Newbie, to.. Big Smiles! |
I am going to spend most of this post making a topic using Phase 1 and 2 phoneme/grapheme groups. I have made a number of resources already to support work with this cluster, both with students and as support material and template files to share with colleagues. So forgive me as I play, think through a few aspects I want to share back at school and a few thoughts around CPD that might be needed to utilise this tool set or how they might be embedded not just as web based resources but also within classroom and IWB supported sessions.
Delving into the Quiz Builder
This morning I decided to investigate the more tab in the quiz builder tool, having watched some of the excellent video tutorials recommended by @ wayneholmes. Amid the tools mentioned in the videos was "Zondle Builder," a tool that I thought Foundation and KS1 colleagues might find particularly exciting. Zondle Builder currently in Beta, is a filtering tool to help quickly build phonic games and resources from an already populated database. In the Builder, wordlists are organised initially, under these scheme headings as the first filter option, Jolly Phonics, Letters and Sounds, and High Frequency Words (Dear Zondle would it be possible to include a filter for the so called "tricky words?"). This is the first time saver being able to identify with existing phonic programs in common use. Items can be further filtered within each scheme by Phase (letters and Sounds), Word Set (High Frequency Words and Jolly Phonics). So in two clicks I have been able to refine items very quickly,with further focus possible by refining word sets through other more specific filters, eg consonant and vowel sequencing. Once filtered down to the specific word groups required, further tightening of the selection is possible by deselecting words from presented lists that I can exclude from my final quiz list.
On Getting Lost, and Learning from my Mistakes
I have to admit to getting a bit lost while trying to find the "Zondle Builder," but this was more to do with my "IKEA Man overzealousness" than Zondle itself... Yet another if only... indeed if only I had rewatched the video, or waited another 30 seconds, the mist would have been cleared away. Anyway, time wasn't wasted indeed I spent time exploring the contents of the more tab and created my first phonics quiz and games, in the process identifying a developmental task and key process I will need to revisit with colleagues, namely recording and saving audio for upload. Anyway on with the post.
Here is my first game Phonic game SATPIN Quick Sand Bunny.
This was created using an item from the more tab, the "Phonics- drag the letters to create graphemes that make up a word" question type

Entering each word was achieved a phoneme at a time, selecting and clicking the phoneme keyboard (1), dragging the grapheme I needed from those listed in blue (2), before sequencing these on the "hangman type" space (3) by drag and drop. On completing each word pressing the save question link added it to the quiz. By repeating this process I created the word list for my quiz in between 10 and 15 minutes. On returning to my topics, I was able to click on my quiz and select the game I wanted to use.
Sharing My Game
To share my game here I clicked the "embed this game in your site" link in the top right of the game window. There is a great video from Zondle explaining the process here. However for class/school bloggers or VLE users rather than creating a web page, you will need to create the post or add a page element to house your game first. After copying the code from the site as in the video, returning to your blog space or page element, you will need to view the page's HTML source. Tools to do this are usually provided as a button option on the tool bar or as in blogger a tab. With the HTML source/editor visible click into the text box, right click and select paste or holding down the control key and pressing the V key should paste the code where you chose to put it.
All VLEs and Blogging platforms are slightly different, so explanations here as within the video beyond the generic is difficult. A little playing and mouse hovering will be necessary, perhaps even a delve into the help files might be useful in enabling you to find the tools you need.
Zondle Builder a Real Jewel
 Moving on then it transpires that what I missed earlier was the floating "Zondle Builder" Button that appeared after I had clicked the More Tab.
Not quite as observant or sharp as I used to be maybe!
Anyway clicking the Zondle Builder opens a page offering a 3 step process to making your phnonic or spelling game question.
In Step 1: Select your quiestion type (how you would like the students to engage with your words.)
In Step 2: Use the filters to find and narrow down the word groups you would like to use and generate your word list.

Having explored the interface and with familiarity this was really quick to achieve. From this again a number of games are now available to be played and shared. As a treat for following my wittering this far, here is one of the game generated from the list above.
Variety is the Spice of Life
Thinking about using these activities, I can't see myself simply wanting to embed these phonic zondles in a web page, blog post or VLE and hoping the students will want to visit them. As games they will stand alone for consolidation and practice, but would be even even more effective used as integral parts of Phonic sessions.
I had my word list prepared and in class will no doubt have a range of activities and tasks to use with the students. Some of these will be whole class, small group or individual tasks. Some will be practial, physical and because we are talking about sounds... heavily based in speaking and listening. The tasks could involve physical objects, use of worksheets, the use of look and say with flash cards but having a particular personal vent towards embedding and using ICTs, I would also include the use of "multimodal" tasks, using dry wipe whiteboards as we work as a class around our IWB. These activities would include
- Phonic photosets and slideshows using images from the web, to represent words and phonemes.
- Odd one out shows using powerpoint slides and photograph, or present my phonemes in a variety of font styles to encourage recognition of the letter shape in a variety of forms.
- Rub and reveal and white on white activities having students predict which of our words letters will appear. How do we know?
- Using a set of "flash based" editable dice set up in my Notebook, to randomly generate graphemes, challenging students to spell words using them before collecting ideas sounding them out and reading these through using sound buttons.
25.7.11
Create Your Own embeddable Games and Interactivities Support and Consolidate Learning
Well half an hour has passed and I have made a start on my first 100 and odd games to use in the DTP Unit next term. Well, I haven't personally made a ton of games but I have finally logged into my Zondle account for a play, and yes in less than 30 minutes input a few trial questions, before the site using my quiz created a selection of games that I can embed into or link to from my VLE.
These games are based on use of Microsoft Publisher, the tool we will be using but could be edited to make them more generic, or developed around any topic or theme I am working on from across the subject base of the curriculum. I do need to give some more thought to the questions I have created as they were quite rushed, but I am able because I own the underlying quiz to go back and edit these. Once I am happy with the quiz I am able to share my games with others in the Zondle Community too, so if you register and log in, there are a growing number of games already in existence.
The First Game here Zondles R Us presents my topic quesions in a straight forward quiz format.
... while this game Fish Nosh, challenges the students to engage with the quiz while being rewarded with the opportunity to earn extra points within a platform game type environment.
I still need to work on my quiz, and will probably add a few more questions to challenge my players as my planning progresses allowing more opportunities for game play. What is great however is the possibility down the road to use these activities alongside other embeddables as plenary and homework follow ups to help develop and consolidate of vocabulary, key concepts and ideas from within the units of work my students engage with.
Additionally, two other tools I have used alot are jigsaw puzzles created at Jigsaw Planet and Wordsearches made at The Ultimate Wordsearch Maker. The students have not only enjoyed using the embedables I have created at these sites, but also creating their own topic based versions, which we have shared by email, and through shared spaces within the VLE. Here are two examples I created and also on a DTP theme.
Jigsaw: Click to open jigsaw in same window.
 48
48 
Wordsearch: Click on the first and last letter in each word you find.
I am looking forward to sharing Zondle with colleagues at school and exploring the how or wheher we can use it aongside I Am Learning a games based learning platform we have subscribed to use next year to support homework. I have already shared wordsearch maker and jigsaw planet with a number of colleagues who have enjoyed using these to create material for use with their students.
Note To Self
Wonder if Zondle could be used with students to help support and develop validation processes during research and Independent Enquiry. Having worked with exemplar Zondles, students could be challenged individually or in pairs to research and create quizes around particular topics or themes using the multiple choice, true false or free text formats. They would need to validate and check the accuracy of their answers before these could be used.. Something to ponder... A pebble in the pond.
These games are based on use of Microsoft Publisher, the tool we will be using but could be edited to make them more generic, or developed around any topic or theme I am working on from across the subject base of the curriculum. I do need to give some more thought to the questions I have created as they were quite rushed, but I am able because I own the underlying quiz to go back and edit these. Once I am happy with the quiz I am able to share my games with others in the Zondle Community too, so if you register and log in, there are a growing number of games already in existence.
The First Game here Zondles R Us presents my topic quesions in a straight forward quiz format.
... while this game Fish Nosh, challenges the students to engage with the quiz while being rewarded with the opportunity to earn extra points within a platform game type environment.
I still need to work on my quiz, and will probably add a few more questions to challenge my players as my planning progresses allowing more opportunities for game play. What is great however is the possibility down the road to use these activities alongside other embeddables as plenary and homework follow ups to help develop and consolidate of vocabulary, key concepts and ideas from within the units of work my students engage with.
Additionally, two other tools I have used alot are jigsaw puzzles created at Jigsaw Planet and Wordsearches made at The Ultimate Wordsearch Maker. The students have not only enjoyed using the embedables I have created at these sites, but also creating their own topic based versions, which we have shared by email, and through shared spaces within the VLE. Here are two examples I created and also on a DTP theme.
Jigsaw: Click to open jigsaw in same window.
48 Wordsearch: Click on the first and last letter in each word you find.
I am looking forward to sharing Zondle with colleagues at school and exploring the how or wheher we can use it aongside I Am Learning a games based learning platform we have subscribed to use next year to support homework. I have already shared wordsearch maker and jigsaw planet with a number of colleagues who have enjoyed using these to create material for use with their students.
Note To Self
Wonder if Zondle could be used with students to help support and develop validation processes during research and Independent Enquiry. Having worked with exemplar Zondles, students could be challenged individually or in pairs to research and create quizes around particular topics or themes using the multiple choice, true false or free text formats. They would need to validate and check the accuracy of their answers before these could be used.. Something to ponder... A pebble in the pond.
24.7.11
Google Forms, Calc, Bar Charts and Excel: Data Handling Gets Creative
In the process of doing housekeeping on the PC and at my blog, I have come across a number of partially completed posts waiting for an audience. So to work, this post outlines a series of activities I used with students in Phase 2 while introducing Spreadsheets for data handling last April.
Communal Data Collection Using Google Docs
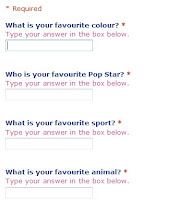 The unit began in class using our Asus netbooks and a Google form I had prepared entitled " A Few of Our Favourite Things." The form was set up as an online questionaire, with free entry text boxes. The students accessed the web and followed a prepared link from the VLE to the data entry form. In pairs the students were encouraged to talk about and then respond individually to a collection of questions around the subject of our favourite things, such as what is your favourite colour/song/football team/subject at school? Completing the form and pressing submit, automatically updated a Google spreadsheet, that was displayed on screen. The live data collection was a real draw, as they watched each other's data arrive and the spreadsheet update in real time. Pace in this part of the session was generated by the sense of urgency to submit their information and see it appear before others. We knew how many students were in class, and so the size of the sample we expected to see. We could check quickly that everyone had submitted their data by counting the number of rows completed, before closing the "poll" and exporting the data sheets for use table top based activities. When all the data was in the spreadsheet was exported and saved as a pdf file, this was then printed and distributed to groups of students to use as the basis for tallying and data entry.
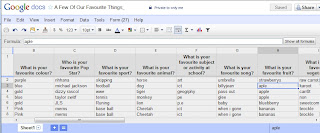 As a primary teacher, I am familiar with the amount of time that can be taken up with student data collection, as individual students navigate the room, collecting responses by tally. I like the idea that using this method a range of data was collected relatively quickly, and as a communal act was then available to all following submission. One of our key questions before engaging with our data sets, must be has everyone responded. Placing the google spreadsheet centrally to the IWB, the students could see the sheet being updated as data came in, since the form had been set up so all fields were compulsory, no one could submit until they had completed each field, and then simply counting or tallying the number of respondants visible we could identify who we were waiting for. Having a range of data available allowed us to use real information in our initial skills teaching activities, and then for students themselves to select from data sets they were interested in to develop their own individual data sets for further exploration.
Rerepresenting our Samples as Frequency Tables
With the downloaded "spreadsheets" distributed to pairs of students, we worked together on our Netbooks as I modelled, using a projected image of the screen how to create a frequence table using Open Office's Calc spreadsheet. We did this using the same data set.... Our Favourite colours. The students were shown how to enter text labels in one column, elimnating duplicates as they went, before in the parallel column counting/tallying and recording the frequency of voters for each colour. These tables were then given a group constructed title, and the cells into which data had been entered were adjsuted for fit, and then formatted with borders. Each student pair then saved their file.
Next the students were asked to choose two data sets from those on the spreadsheet printout and to create frequency tables for these independently, saving their work periodically so the data would not be lost.
From Frequency Tables to Pictorial Representation
With our data enterd to the Spreadsheet and the tables formatted, we moved on together using the data set we had set up together as our starting point. Using the chart wizard students were guided through the creation of a bar chart. As we worked students discussed and were encouraged to add appropriate chart titles, and also axis labels. We identified which axis was the x and which the y, we discussed what was special about the data represented on these, and appropriate titles and labels for them. The students were also, shown how to change formatting and how to recolour the columns and bars in the chart.
Students were then left to practice this process creating a set of bar charts for each of the three other data sets they had created.
This process took approximately 3 sessions of an hour each. Once completed files and charts were upoaded to the VLE, from where they could be accessed for printing out and display.
Moving On: Presenting Pictograms in a Garden
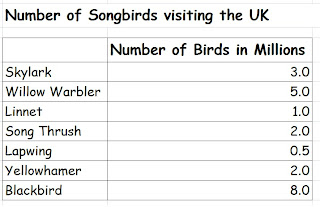 In class the students had been introduced to Calc and Google Spreadsheets, and they had experienced using these tools as part of a collaborative task, to input and collect data remotely and to tally, enter, present and rerepresent data locally. In the final stage of this project however I wanted the students to get creative, considering other elements in chart creation with a spreadsheet environment, that might make our maths more appealing interesting and accessible to a reader. To do this I used another prepared data set, but this time based on a set of survey data I had available to me around songbird populations in the UK. For this series of activities the students were given access to Excel, rather than calc which they had been using on the netbook. We began the session by discussing Excel and comparing it to the other tools they had used. What did they notice about the environment? What was the same about it and what was different? For all intents and purposes the tools were largely the same, they were visually a grid, made up of cells arranged in rows and columns. We formatted the cells, rows and columns in a very similar way. With these identified, the students were then provided with data sets to enter, and format as before. We identified the chart wizard tool, and then set to work creating charts based on the data, adding appropriate axis labels and a clear title, with the students recolouring and reformatting the chart.
The students were then asked about the data itself. How many of these birds had they ever seen? Where would they expect to see them? Did the students think it would be possible to create a bar chart that would really draw in their audience, or even wow passers by as they were working? Could we create a chart that included images of the birds, and set the birds in their natural habitats. Viewing charts as part of the Multimodal world this would add an additional layer of meaning making to the outcomes.
The students were now engaged in a collect and store task, using an image search to locate individual images of each of the birds in question and one final image of a garden.... A bar chart in a garden...
The students were then encouraged to further explore the formatting tools for their charts, and to apply the skills tha already had from work with Calc. We made a second version and this time instead of colour formatting bars, used the fill effects button and picture tab to insert individual bird images to our chart columns. These were then scaled by 1, to create a pictogram type effect. Highlighting the chart area the garden image they had found was then applied as a background to the chart plot area itself. Very pretty. However with the images inserted the axis labels and values as well as the chart title were less readable, requiring some further formatting effects to be applied, changing font colours and backrounds became a necessity to make them readable.
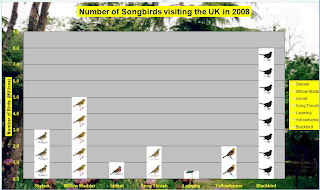 The outcomes are very attractive, as well as introducing for me a key aspect to the purpose of data handling the idea that we produce charts and graphs to be read and interpretted. Like other visual text sources, they are created to help an audience access and interpret them, the more relavant our content to context the more likely we are to portray the meaning we set out to share. Persuading students to use formatting devices for other reasons than because we can, is a key aspect to helping them understand the roll of such devices, and ICTs offer incredibly powerful and creative ways to do this. In this unit I wanted students to engage with Spreadsheets as a mathematical tool, not only for its pace and dynamic nature in presenting and representing information, but also as a way of managing the process and engaging with charts and graphs as a form of visual literacy.
Communal Data Collection Using Google Docs
 The unit began in class using our Asus netbooks and a Google form I had prepared entitled " A Few of Our Favourite Things." The form was set up as an online questionaire, with free entry text boxes. The students accessed the web and followed a prepared link from the VLE to the data entry form. In pairs the students were encouraged to talk about and then respond individually to a collection of questions around the subject of our favourite things, such as what is your favourite colour/song/football team/subject at school? Completing the form and pressing submit, automatically updated a Google spreadsheet, that was displayed on screen. The live data collection was a real draw, as they watched each other's data arrive and the spreadsheet update in real time. Pace in this part of the session was generated by the sense of urgency to submit their information and see it appear before others. We knew how many students were in class, and so the size of the sample we expected to see. We could check quickly that everyone had submitted their data by counting the number of rows completed, before closing the "poll" and exporting the data sheets for use table top based activities. When all the data was in the spreadsheet was exported and saved as a pdf file, this was then printed and distributed to groups of students to use as the basis for tallying and data entry.
 As a primary teacher, I am familiar with the amount of time that can be taken up with student data collection, as individual students navigate the room, collecting responses by tally. I like the idea that using this method a range of data was collected relatively quickly, and as a communal act was then available to all following submission. One of our key questions before engaging with our data sets, must be has everyone responded. Placing the google spreadsheet centrally to the IWB, the students could see the sheet being updated as data came in, since the form had been set up so all fields were compulsory, no one could submit until they had completed each field, and then simply counting or tallying the number of respondants visible we could identify who we were waiting for. Having a range of data available allowed us to use real information in our initial skills teaching activities, and then for students themselves to select from data sets they were interested in to develop their own individual data sets for further exploration.
Rerepresenting our Samples as Frequency Tables
With the downloaded "spreadsheets" distributed to pairs of students, we worked together on our Netbooks as I modelled, using a projected image of the screen how to create a frequence table using Open Office's Calc spreadsheet. We did this using the same data set.... Our Favourite colours. The students were shown how to enter text labels in one column, elimnating duplicates as they went, before in the parallel column counting/tallying and recording the frequency of voters for each colour. These tables were then given a group constructed title, and the cells into which data had been entered were adjsuted for fit, and then formatted with borders. Each student pair then saved their file.
Next the students were asked to choose two data sets from those on the spreadsheet printout and to create frequency tables for these independently, saving their work periodically so the data would not be lost.
From Frequency Tables to Pictorial Representation
With our data enterd to the Spreadsheet and the tables formatted, we moved on together using the data set we had set up together as our starting point. Using the chart wizard students were guided through the creation of a bar chart. As we worked students discussed and were encouraged to add appropriate chart titles, and also axis labels. We identified which axis was the x and which the y, we discussed what was special about the data represented on these, and appropriate titles and labels for them. The students were also, shown how to change formatting and how to recolour the columns and bars in the chart.
Students were then left to practice this process creating a set of bar charts for each of the three other data sets they had created.
- Applying really clear and thorough titles for their charts that would help their readers.
- Producing Axis Labels that would inform their readers of exactly what was shown there
- Recolouring the data plots and bars, choosing appropriate colour fills and effects to match the data.
This process took approximately 3 sessions of an hour each. Once completed files and charts were upoaded to the VLE, from where they could be accessed for printing out and display.
Moving On: Presenting Pictograms in a Garden
 In class the students had been introduced to Calc and Google Spreadsheets, and they had experienced using these tools as part of a collaborative task, to input and collect data remotely and to tally, enter, present and rerepresent data locally. In the final stage of this project however I wanted the students to get creative, considering other elements in chart creation with a spreadsheet environment, that might make our maths more appealing interesting and accessible to a reader. To do this I used another prepared data set, but this time based on a set of survey data I had available to me around songbird populations in the UK. For this series of activities the students were given access to Excel, rather than calc which they had been using on the netbook. We began the session by discussing Excel and comparing it to the other tools they had used. What did they notice about the environment? What was the same about it and what was different? For all intents and purposes the tools were largely the same, they were visually a grid, made up of cells arranged in rows and columns. We formatted the cells, rows and columns in a very similar way. With these identified, the students were then provided with data sets to enter, and format as before. We identified the chart wizard tool, and then set to work creating charts based on the data, adding appropriate axis labels and a clear title, with the students recolouring and reformatting the chart.
The students were then asked about the data itself. How many of these birds had they ever seen? Where would they expect to see them? Did the students think it would be possible to create a bar chart that would really draw in their audience, or even wow passers by as they were working? Could we create a chart that included images of the birds, and set the birds in their natural habitats. Viewing charts as part of the Multimodal world this would add an additional layer of meaning making to the outcomes.
The students were now engaged in a collect and store task, using an image search to locate individual images of each of the birds in question and one final image of a garden.... A bar chart in a garden...
The students were then encouraged to further explore the formatting tools for their charts, and to apply the skills tha already had from work with Calc. We made a second version and this time instead of colour formatting bars, used the fill effects button and picture tab to insert individual bird images to our chart columns. These were then scaled by 1, to create a pictogram type effect. Highlighting the chart area the garden image they had found was then applied as a background to the chart plot area itself. Very pretty. However with the images inserted the axis labels and values as well as the chart title were less readable, requiring some further formatting effects to be applied, changing font colours and backrounds became a necessity to make them readable.
 The outcomes are very attractive, as well as introducing for me a key aspect to the purpose of data handling the idea that we produce charts and graphs to be read and interpretted. Like other visual text sources, they are created to help an audience access and interpret them, the more relavant our content to context the more likely we are to portray the meaning we set out to share. Persuading students to use formatting devices for other reasons than because we can, is a key aspect to helping them understand the roll of such devices, and ICTs offer incredibly powerful and creative ways to do this. In this unit I wanted students to engage with Spreadsheets as a mathematical tool, not only for its pace and dynamic nature in presenting and representing information, but also as a way of managing the process and engaging with charts and graphs as a form of visual literacy.
Game Maker: A Summer Time Project 1
In September I have decided to run game making workshops as after school enrichment sessions for Phase 3 and 4 students. My absolute first choice for this would have been Kodu (site currently offline),as inschool sessions could have been extended if students chose to develop their games for use on xboxes (check out part one of this video tutorial by Stuart Ridout for a flavour). After some pondering background checks and discussion with our network manager we realised that in order to run the platform we would also need to upgrade our DirectX and .Net Framework installations before deployment, so Kodu sadly was placed on hold, at least for the time being anyway.
Having played around ocassionally withYoYo Games's Gamemaker Lite and built one or two simple multi level platform games quite painlessly, this is now the tool of choice for the two term project based sessions. The lite version is a free download, and allows games made to be exported as .exe files. My target over the next few weeks is to improve my familiarity with the tool and generate some support materials that will help students use the tool to clone some familiar games. I have identified one or two great places to start
Having played around ocassionally withYoYo Games's Gamemaker Lite and built one or two simple multi level platform games quite painlessly, this is now the tool of choice for the two term project based sessions. The lite version is a free download, and allows games made to be exported as .exe files. My target over the next few weeks is to improve my familiarity with the tool and generate some support materials that will help students use the tool to clone some familiar games. I have identified one or two great places to start
- Firstly the tutorials on Margaret Meijers fabulous website ICT Mindtools, This space is well worth a visit, if you haven't already I would highly recommend you do.
- Secondly I have bought a copy of David Waller's Basic Projects:Gamemaker
- And of course the introductory tutorial included with the software itself.
23.7.11
Digital Music Boxes: Random Music Or Simple Synthesizers Using Scratch
Last term we worked with our phase three students to Design and Make computer games using Scratch. One of the Focussed Practical tasks I used emerged from a music session I taught with some of our younger students exploring pitch and composing musical phrases using the pentatonic scale.
I knew that Scratch could be used to create music, and had used the pentatonic scale during impovisation and composition activities with students in my primary classes to great effect. I wondered how it would pan out if I involved my Phase 3 students in programming a simple random music generator.
To begin two sprites were created.
The Musical Note.
This was created using the paint a new sprite tool, and in my case looked like this.

Behind the musical note sprite I added the following pair of scripts.

When we set up the task the "when green flag is clicked" header block was was added from the control block to both scripts. However before running the program the header block from one of the scripts was removed.
The first script, Script one in the image, allows some user control, with the musical note following the mouse pointer, in effect allowing the user to play notes in the order they choose. A simple musical instrument or synthesiser.
The second script in the image. Script two has a very different effect setting the note moving under its own steam, when the gren flag is clicked, playing any note it comes into contact with in the order it meets it... But not quite yet, as we don't have any musician sprites.
Musician Sprites
The first musician sprite and its scripts were created by choosing a character through the "insert sprite from file" option. and then adding the following script. The musical elements of this coming in the form of elements from the "sound" blocks.

Completing My Digital Musical Box
So far I have one musical note and one musician. I need 5 musicians and each need to be tuned to play one note from the pentatonic scale. To achieve this I created 4 duplicates of my first musician sprite, by right clicking and selecting duplicate from the menu.
Next I changed the Sound script elements of each sprite. I kept the instrument and duration or beat the same in each case but changed the note value, and renamed the sprite accordingly so
Musician Sprite 1 was renamed playc Plays note number 60
Musician Sprite 2 was renamed playd Plays note number 62
Musician Sprite 3 was renamed playe Plays note number 64
Musician Sprite 4 was renamed playg Plays note number 67
Musician Sprite 5 was renamed playa Plays note number 69
Each Musician Sprite was also given a change of costume to uniquely identify them onscreen
Now on pressing the green flag each of the musician sprites begin moving randomlyish around the screen, as does the musical note. Each time a musician meets the note it contributes its sound to the tune.
I have to say at this point each individual student loved this a lot more than those around them. With the programming in place, I found now that the learning began through play and creativity. The students extended this task for themselves, experimenting and asking what would happen if they
I knew that Scratch could be used to create music, and had used the pentatonic scale during impovisation and composition activities with students in my primary classes to great effect. I wondered how it would pan out if I involved my Phase 3 students in programming a simple random music generator.
To begin two sprites were created.
- A Musical Note: that was programmed to bounce around the screen randomlyish!
- The second a musician sprite programmed as above but also to play a single musical note from the chosen scale, when it touched the note.
The Musical Note.
This was created using the paint a new sprite tool, and in my case looked like this.

Behind the musical note sprite I added the following pair of scripts.

When we set up the task the "when green flag is clicked" header block was was added from the control block to both scripts. However before running the program the header block from one of the scripts was removed.
The first script, Script one in the image, allows some user control, with the musical note following the mouse pointer, in effect allowing the user to play notes in the order they choose. A simple musical instrument or synthesiser.
The second script in the image. Script two has a very different effect setting the note moving under its own steam, when the gren flag is clicked, playing any note it comes into contact with in the order it meets it... But not quite yet, as we don't have any musician sprites.
Musician Sprites
The first musician sprite and its scripts were created by choosing a character through the "insert sprite from file" option. and then adding the following script. The musical elements of this coming in the form of elements from the "sound" blocks.

Completing My Digital Musical Box
So far I have one musical note and one musician. I need 5 musicians and each need to be tuned to play one note from the pentatonic scale. To achieve this I created 4 duplicates of my first musician sprite, by right clicking and selecting duplicate from the menu.
Next I changed the Sound script elements of each sprite. I kept the instrument and duration or beat the same in each case but changed the note value, and renamed the sprite accordingly so
Musician Sprite 1 was renamed playc Plays note number 60
Musician Sprite 2 was renamed playd Plays note number 62
Musician Sprite 3 was renamed playe Plays note number 64
Musician Sprite 4 was renamed playg Plays note number 67
Musician Sprite 5 was renamed playa Plays note number 69
Each Musician Sprite was also given a change of costume to uniquely identify them onscreen
Now on pressing the green flag each of the musician sprites begin moving randomlyish around the screen, as does the musical note. Each time a musician meets the note it contributes its sound to the tune.
I have to say at this point each individual student loved this a lot more than those around them. With the programming in place, I found now that the learning began through play and creativity. The students extended this task for themselves, experimenting and asking what would happen if they
- added more musical notes?
- changed the speed of the sprites?
- Altered the instruments being played?
- The random music generator
- A very simple synthesiser
PLTS Wall Posters Draft Version 1
Have spent this morning compiling these draft A3 versions of student speak generic PLTS posters. Wondering if anyone has any thoughts.


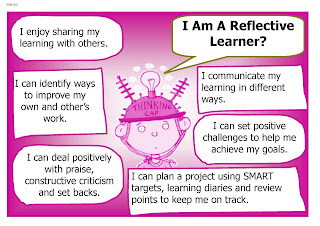


 Thanks in advance :0)


21.7.11
Pondering Bird Boxes and monitoring

The Summer is here, and its time to unwind, reflect, review, refocus and reconnect.
To start the ball rolling I thought I'd share the Bird Box design created by a group of Phase 3 students for me during STEM Week. As members of a small company know only to us as "Avian Abodes" quality "Builders of Bespoke Billets for Birds," the students were challenged to research available bird box designs, identify and discuss the pros and cons of particular features of bird boxes, construct birdbox kits, identify the types of creatures that might be atrracted to or use their paricular kit, and to present ideas using their prototypes about how the kit might be customised using materials avalable around the home of a prospective customer.
Using ICTs to research and present our ideas and briefs, lead to discussions around how ICT might be included in the design, since several students had encountered camera kits. They were stunned by the cost, especially when we discovered the cost of building our box was around £3. One kit the students found including camera, and not disimilar to our own came to around £180, "thats way too dear," came one chirpy response. "What does it cost without the camera?" I asked. Around £60 was the reply. We couldn't identify how the box differed so enormously as to warrant this, and began wondering whether we could adapt our boxes, to use cheaper WebCams? How would we install them so that we wouldn't disturb the nesting birds and how would/could we establish a link between the box and a computer? Where would we need to site the box? How could we site the box to enable this? I really enjoyed the conversation, largely because it began engaging the students naturally with functional skills, as they created a possible new purpose for the kit, identified by them the audience. No conclusions were drawn from this but it was exciting to hear discussions as they began thinking outside of the box. The idea didn't fade, like so many often do, and periodically raised its head thoroughout the day. The opportunity to talk about monitoring systems, came and went, though I thought about a call out on Twitter. This is blocked in school, mentioning this as a shame, we again wended off the track, puns were raised about broadband links and how our feathered friends might atually like the opportunity to tweat with their mates... A half hour or so later and this bespoke billet of a slightly different kind appeared from beneath the pen of a group of Y7s, A bespoke twitter box for tweat clients of a different kind, and especially presented for a Geaky Teach to surf among his feathered friends.
Just pondering the possible mileage in considering how this discussion might be extended into a control and monitoring project for phase 3 any thoughts gratefully received :o)
21.3.11
Thank You South 4
This post is by way of a thank you to the colleagues who attended my workshops at the South 4 Shared INSET Day at Bridge Learning Campus last Friday. The blog set up for these session is available at http://multimodallit.blogspot.com/ where you can access the starting points and template files shared at the session.
5.3.11
Comic Strip Creator Applet
I have been preparing steadily for a workshop on using Video and Comic Strips as storytelling tools and devices. Although I had intended to focus on using a range of familiar tools such as Publisher and Powerpoint as the vehicles for this I recently encountered a really useful little tool created by comicstripcreator.org.
Comic Strip Creator is simple to use and does exactly what it says on the tin, but as with so many tools of its type, its apparent simplicity hides beneath some quite powerful possibilities for cross curricular use. To download the application you first of all must register, but then you are a click or two away from a handy little piece of freeware.
Once downloaded and installed clicking the shortcut leads to your first choice whether to create a 1 or 2 row comic strip. The interface has a tabbed panel to the left, from where
It could also support assessment for learning activities, planning tasks in support of talking for writing and enable differentiation through the use of images captured during sessions, or prepared in advance to support digital literacy outcomes. These images could be shared through network and online spaces for inclusion in comic strips to support and enhance this work.
I'm sure that a few minutes play with the tool will open up a host of other posibilities to you. I hope to come back to again sometime in the near future, with more time to assimilate it for myself, but also I hope with some insight from the colleagues I share it with. Any suggestions or ideas that spring to mind, please feel free to share through commenting here.
Comic Strip Creator is simple to use and does exactly what it says on the tin, but as with so many tools of its type, its apparent simplicity hides beneath some quite powerful possibilities for cross curricular use. To download the application you first of all must register, but then you are a click or two away from a handy little piece of freeware.
Once downloaded and installed clicking the shortcut leads to your first choice whether to create a 1 or 2 row comic strip. The interface has a tabbed panel to the left, from where
- You can choose to add or remove frames
- Import and insert images as backgrounds
- Import clipart (some can be downloaded from the site, while others may need to be prepared or sought from other sources)
- Add balloons (speech and thought bubbles are available but not captions, though this could be solve in later uses of the images created)
It could also support assessment for learning activities, planning tasks in support of talking for writing and enable differentiation through the use of images captured during sessions, or prepared in advance to support digital literacy outcomes. These images could be shared through network and online spaces for inclusion in comic strips to support and enhance this work.
I'm sure that a few minutes play with the tool will open up a host of other posibilities to you. I hope to come back to again sometime in the near future, with more time to assimilate it for myself, but also I hope with some insight from the colleagues I share it with. Any suggestions or ideas that spring to mind, please feel free to share through commenting here.
26.1.11
Animals Save The Planet
 Loving these animated shorts from Discovery's Animal Planet. Each clip depicts a diferent aspect of how we can engage with the three R's
- Reduce
- Reuse
- Recycle
20.11.10
Seeking To Inspire: Draft Enrichment Projects for Phase 3 and 4
This week I have been working on a first set of project outlines for ourPhase3/4 ICT Enrichment sessions. They are intended to run for two terms, at an hour per week, to sit outside of the formal ICT curriculum, but to enable students to develop and extend their skill base through creative cross curricular activity. I would value any thoughts or feedback especially though not exclusively from colleagues working with students in Key Stages 3 and 4. Thanks in advance:0)
Project 1 Digital Storytelling: Comic Strips and Basic Animation: In these sessions we will use a range of software tools to help us tell onscreen stories. Pivot Stick Animator, graphic tools and movie making software will be used to create simple animated stories, and later Microsoft Publisher, online comic strip makers and video stories will be used to help us learn how comic strips work to tell stories. Working on these projects will help you learn how
Project 2: Podcasting, Vlogging and Interactive Presentations: This will be your chance to use multimedia to explore, share and celebrate with others some of the things that interest us. We will use Audacity, Photoshop, Soundation, Moviemaker and Mediator to create and share our own multimedia content to celebrate and share individual areas of interest or expertise. The content you create will either be presented through a web page style presentation created in Mediator, or depending on how things go perhaps even through use of class Wiki Spaces that will allow a wider world audience to get a glimpse. Key messages and areas of learning to be addressed throughout our work will be e safety and decision we should make around the information we choose to share with others and how we can share it safely.
Project 3 Designing and Creating simple computer games. During these session we will be exploring and thinking about computer games and how they work. We will create a small group company, who will use a tool called GameMaker to design, program and create maze or paddle type games that we can share with friends and play on our computers. There will also be opportunities to use graphic tools to create our own game characters, backgrounds and objects. Because these games will be your own creations, we can’t be sure exactly what they will be like. One thing is for sure though we are bound to have fun, playing with our ideas, and hopefully each other’s completed games online. To complete the project we will develop an advertising campaign for our new Best Seller, this may mean drawing on skills from earlier projects.
Project 1 Digital Storytelling: Comic Strips and Basic Animation: In these sessions we will use a range of software tools to help us tell onscreen stories. Pivot Stick Animator, graphic tools and movie making software will be used to create simple animated stories, and later Microsoft Publisher, online comic strip makers and video stories will be used to help us learn how comic strips work to tell stories. Working on these projects will help you learn how
- to use digital tools to plan sequence and tell stories.
- talk can be useful in rehearsing, drafting and writing stories,
- Appropriately chosen images can add new depths to the things you want to say,
- to add callouts and captions to engage our readers with the stories we want to tell.
Project 2: Podcasting, Vlogging and Interactive Presentations: This will be your chance to use multimedia to explore, share and celebrate with others some of the things that interest us. We will use Audacity, Photoshop, Soundation, Moviemaker and Mediator to create and share our own multimedia content to celebrate and share individual areas of interest or expertise. The content you create will either be presented through a web page style presentation created in Mediator, or depending on how things go perhaps even through use of class Wiki Spaces that will allow a wider world audience to get a glimpse. Key messages and areas of learning to be addressed throughout our work will be e safety and decision we should make around the information we choose to share with others and how we can share it safely.
Project 3 Designing and Creating simple computer games. During these session we will be exploring and thinking about computer games and how they work. We will create a small group company, who will use a tool called GameMaker to design, program and create maze or paddle type games that we can share with friends and play on our computers. There will also be opportunities to use graphic tools to create our own game characters, backgrounds and objects. Because these games will be your own creations, we can’t be sure exactly what they will be like. One thing is for sure though we are bound to have fun, playing with our ideas, and hopefully each other’s completed games online. To complete the project we will develop an advertising campaign for our new Best Seller, this may mean drawing on skills from earlier projects.
18.11.10
Man of Iron: Silent Movie Presentations From Phase 3
Last term I began working with colleagues and students in phase three, as a member of the Integrated Curriculum Team. The young people in phase three are vertically grouped 11-13 years old (y6 to 8) students, and Integrated Curriculum Sessions involve them in engaging with cross curricular themed activities, developed around the focussed teaching of Personal Learning and Thinking Skills.
During term 1 we worked primarily on a project based on The Man of Iron, Isambard Kingdom Brunel and his legacy in the Bristol Area. The Key focus areas were rooted in developing key skills for Independent Learning and Research as well as facilitating situations to promote Team Work and collaboration. Throughout the term, students explored a number of aspects of Brunel, his life and his legacy, using material from Primary and Secondary sources. The following are a pair of video outcomes created using Internet based collect and store processes, and our first attempts at using MovieMaker to prepare and share the outcomes of our work digitally.
In class a number of table top activities were used to prepare and plan the presentations, before using ICTs.
As the video creation process evolved we began to think about how we could create video presentations in a "victorian style." Silent movies/Newsreel arose as a possible idea, and in MovieMaker the credit tools were used to add captioned splash screens between clips. To give the clips that "olde worlde" feel an aged film effect was applied to many of the individual clips, and music added as a soundtrack. The students had a great time, and these are just two from our collection. Hope they provide a little inspiration :o)
Video Attribution: Thanks to George, Maisie, Oliver and Katie
During term 1 we worked primarily on a project based on The Man of Iron, Isambard Kingdom Brunel and his legacy in the Bristol Area. The Key focus areas were rooted in developing key skills for Independent Learning and Research as well as facilitating situations to promote Team Work and collaboration. Throughout the term, students explored a number of aspects of Brunel, his life and his legacy, using material from Primary and Secondary sources. The following are a pair of video outcomes created using Internet based collect and store processes, and our first attempts at using MovieMaker to prepare and share the outcomes of our work digitally.
In class a number of table top activities were used to prepare and plan the presentations, before using ICTs.
- Inference squares were used to facilitate and support image based reading activities, and ground the raising of questions as starting points for research.
- Mindmapping was used to record and help link and group key ideas collected from a range of text sources, including books, internet based texts, images and the reading of videos.
- Timelines were used to chronologically order and sequence the major events in Brunel's life.
- Desk Top Timelines then formed the planning frame that supported image searches and helped sequence the basic story we wanted to tell using Movie Maker
- Images collected from the web were imported to MovieMaker and sequenced/ chronologically or grouped according to the preferred method of presentation.
- The original intention was to have students record a voice over, so our paper based timelines were developed to become "storyboards" with simple scripts to support this.
As the video creation process evolved we began to think about how we could create video presentations in a "victorian style." Silent movies/Newsreel arose as a possible idea, and in MovieMaker the credit tools were used to add captioned splash screens between clips. To give the clips that "olde worlde" feel an aged film effect was applied to many of the individual clips, and music added as a soundtrack. The students had a great time, and these are just two from our collection. Hope they provide a little inspiration :o)
Video Attribution: Thanks to George, Maisie, Oliver and Katie
11.11.10
Bristol.... The Edam Is Stranded: Comic Strips, You Tube, Print Screen and Publisher
This term during ICT enrichment sessions, a colleague and I have begun to develop a sequence of activities working towards the creation of comic strips.
 Comic Strips are complex text forms that I have explored a number of times through posts in my blog, but they are also great fun. In introducing comic strips, how they are constructed and the features of the text type, we wanted to provide space for the students simpy to play and explore. This resulted in our initial session using an online comic strip generator. Our choice for this was Make Beliefs Comix a site providing 3 frame strips, drag and drop characters and tools, and point and click editing. This allowed the students space to simply play and create in the style and genre while becoming familiar with some of the features we might expect to see supporting text development in a comic strip eg captions, speech and thought bubbles etc. A key skill we also expect is the student's capability to take screen shots of their work, to support our APP process, so completed strips were copied, using the prtscr before being pasted to a local application (MS Publisher) for cropping and resizing, the latter part of this process being a useful one for the students to use later as they create their own comic strips.
As teachers in our school have access to You Tube, I decided to develop the sessions around creating new stories and narratives from familiar starting points. To introduce the sessions we began watching a couple of movie shorts from the Aardman YouTube Channel, and the Cracking Contraptions series. I chose the Snoozatron and Shopper 13, for my sessions partly because I love the sixties seventies space race puns in the latter, but also because Gromit's facial expressions throughout the snoozatron, just beg for and invite the use of visual cues to infer possible content for thought bubbles.
 You Tube uses flash movies, which gives another advantage, in that they can be used. unlike many other online video formats, for direct screen capture from the web browser. Prior to the session I previewed each movie and at significant or interesting points in the story, used the print screen key to capture these scenes. Paused the movie, centreing the movie viewer in the window, I pressed the print screen key to capture scenes. Using Microsoft Paint, the resulting images were then pasted individually into software, cropped and then saved to a folder as JPEG images. In school the images collected from each movie were copied into the shared storage space for access during sessions by students.
Having watched the movies, I shared a prepared model for a publisher based comic strip with the students, (an available design) and modelled how to
 Before encouraging the students to begin creating their own visual version of the story of their choice, the first steps in developing their creative recount.
Publisher being an object based package, is a really intersting way to allow students the facilty to draft and redraft visual story structures on the go. Once images have been added the students can then begin manipulating their story, dragging and reorgnising images to develop and resequence their visual narrative.
During this process a number of fundamental DTP and graphic handling concepts become increasingly important to developing a quality outcome from the draft, and identified themselves as incidental teaching points.
The Soccamatic
The Snoozatron
Shopper 13
or composite images created using MS Publisher by the author from images captured from these.
Wallace and Gromit are Nick Park Creations

As teachers in our school have access to You Tube, I decided to develop the sessions around creating new stories and narratives from familiar starting points. To introduce the sessions we began watching a couple of movie shorts from the Aardman YouTube Channel, and the Cracking Contraptions series. I chose the Snoozatron and Shopper 13, for my sessions partly because I love the sixties seventies space race puns in the latter, but also because Gromit's facial expressions throughout the snoozatron, just beg for and invite the use of visual cues to infer possible content for thought bubbles.

Having watched the movies, I shared a prepared model for a publisher based comic strip with the students, (an available design) and modelled how to
- Open Microsoft Publisher
- Change the page orientation
- Insert images from file and where the prepared files could be found
- Change file view so they could browse image thumbnails to aid their image selection
 Before encouraging the students to begin creating their own visual version of the story of their choice, the first steps in developing their creative recount.
 Publisher being an object based package, is a really intersting way to allow students the facilty to draft and redraft visual story structures on the go. Once images have been added the students can then begin manipulating their story, dragging and reorgnising images to develop and resequence their visual narrative.
During this process a number of fundamental DTP and graphic handling concepts become increasingly important to developing a quality outcome from the draft, and identified themselves as incidental teaching points.
- Layering and ordering. When using object based packages latter images added will tend to overlap and cover pieces of earlier images when moved and placed. By using the order tool, images can be moved forward and backward on the page to overcome this.
- In Publisher clicking the view menu and then tools allows opening of a "context menu/tool bar" that appears when an image is clicked, that allows insitu editing of images from this "picture bar." This tool bar allows images to cropped, colour effects to be applied, brightness and contrast adjustments to made and transparency effects to be applied to areas of an image.
- Clicking on the image also reveals resize handles enabling drag and drop resizing of the images and use of the rotation tools on the tool bar also enable free rotation of images, or the possibility to change image orientation by flipping them, giving yet more visual dimensions to image handling.
- Further play with these tools enabling consolidation through talk of the narrative structure to be developed by the students.
- Development of the use of callouts, stars and captioning to add oral text elements to the story.
- Use of peer assesment and review to identify HTIs before editing, revision and publication.
The Soccamatic
The Snoozatron
Shopper 13
or composite images created using MS Publisher by the author from images captured from these.
Wallace and Gromit are Nick Park Creations
28.5.10
Patterning With LOGO


In previous posts I have explored the use of MSWLOGO a freeware tool and MS Paint within the context of the Mathematics classroom, developing ideas around the properties of shape, rotational symmetry and patterning, but using this image as a starting point and available design for the journey, what would happen if... this was extended to explore tessellation and repeated patterning, using copy and paste processes?
Image Credit: Hazrat Ali Mosque, Afghanistan National Geographic Photo of the Day 06/05/10
23.5.10
Making and Playing Computer Games With Scratch: Episode 2 A keepy Uppy Paddle and Ball Game

This week we began again with an empty stage, and a session outcome to develop or create a small scale project where one object (or Sprite) within the environment would be programmed to interact with others. Building on student queries, I thought it would be a nice idea to build a simple game. I decided to borrow from a Phase 3 task and to build a version of the arcade game "breakout," but that I would limit the outcome to using only the paddle and ball sections of the game building a "keepy uppy game." Keeping the idea as simple as possible I hoped would allow me to build on student excitement from the previous session, and allow discussion of events and outcomes as procedures were added to the game.
With the world cup coming up there may be some interest in this fairly straight forward set of scripts, and the editing and extension possibilities they afford for adaptation of the initial idea. Theming the game from its origins into something soccer like, using existing scripts as the basis, and including a spoonful or two of creative playfulness by the students could make for some wonderful ideas. This however is an extension idea to come back to at the end of this post. Needless to say the game of "keepy uppy" is one of those things we probably use as teachers a lot in skills practice during PE, or have played as children ourselves in the garden, with a tennis racket and ball or a football. What I think students will enjoy about this as a creative starting point is that essentially it uses two sprites and a background. Both sprites are fairly simple in their purpose, while changes and careful choice of background gives us a visual backstory or context for our game.
To introduce the session I began at the end... modelling through a prepared design what we would be looking for if we were successful in making our game. The students were asked if their game needed to look like this in order for it to be a successful design? There are many games that work in similar ways but that look very different. What could we change before we begin creating and building the code?
The stage I used contained a star field, a rectangular space ship for a bat and an asteroidish type ball. Pressing the green flag set the asteroid in motion, while moving the mouse dragged the bat back and forth across the bottom of the stage (the x axis of movement). When the asteroid hit the bat it bounced off until it hit the upper sides or top edge of the stage when it bounced and changed direction. If we missed the asteroid and it made contact with the bottom of the screen then the game stopped running and was over. This process was described to the students in pretty much this way as the model was demonstrated. Why? As well as following instructions I want the students to be able to see and begin evaluating step by step what was intended to happen as the program runs. Describing the intended actions in this way, I hoped would encourage the students to begin reasoning aloud and visualising what the code blocks they would later be building were intended to do. In turn helping us to focus on particular blocks and what might be happening if the project did not work as expected.
The students were asked where else the game could take place?
- In a cave
- in the snow
- on the moon
- outer space
- under the sea
- in the kitchen
- In the classroom
What might be falling/moving or flying in these spaces?
- fish
- meteorites
- planets
- bowls or cups
- food
- snowballs
What might be used to hit, catch, bounce or keep up these objects
- pans
- polar bears
- spaceships
- hands
The students had some really interesting ideas, many possible "right" answers, but to begin the activity, and inorder to ensure our code blocks did as intended I added the initial design stage proviso, that the part of the bat that meets the ball must be flat. The reason for this being that during the opening part of the software based activity I wanted the students to edit and alter the sprites that they chose to use.
The students began with their stage and the game background,
- either importing a background from collection that matched the idea they had
- searching for a background on the web they could download, import and use to set the scene for the game.
- or creating a background of their own
The students then deleted the default sprite to create their "ball." This was imported from the collection and edited to work with and be in keeping with their background and so the game's backstory
Finally the students created or added a new sprite that would be their bat. This was
- either a sprite from collection edited to include a flat surface
- or a new sprite painted from scratch and designed to fit with the backstory.

The students were then encouraged to test the procedure, clicking the green flag header block, and observing the onscreen effect, and sharing their ideas about what was happening with each other.
With the bat/paddle/ working correctly we moved on to add scripts to the "ball" sprite, using the following script blocks.

I have included comments in this image, the yellow caption blocks, to demonstrate a feature of Scratch shown to me by one of the students this week. I didn't realise this function was available, but right clicking in the script area reveals a context menu, from which a comment block can be added, and descriptions of a code block or procedure and its function added. Dragging the comment to a particular section of the code visually links it. Thanks to J, this tool has now been added to my session plans for phase 3 next week, when students will be asked to create screen shots of their game projects and to annotate them to support our APP process. Loving this...never too old to learn something new.
The challenge in creating these procedures lies in the fact that some code blocks, require combining blocks from different areas eg using a control block with a sensing block, to create the forever if touching shuttle command, or combining a motion block with an operator to construct the point in direction or turn clockwise something degrees command.
The students were really excited about the outcomes, and enjoyed playing each other's games and adding the score variable made a real difference to the feel of what they had created.
The possible extension I mentioned earlier relates to the Soccer World Cup coming up in South Africa. It could be fun with the scripting now done to import photographs of players to scratch and then edit these to include as the "bat" sprite. How many times can "Rooney" keep up the ball. Perhaps the head only of the character could be added to a painted sprite with feet and head, allowing use of both to be used in the game? What might a keepy up game look like if it were an animal or intergalactic cup? What might be used for a ball? What if our favourite players were practicing in the kitchen or our school classroom before a match? What might they use to play keepy uppy with.
Hope this is useful. Have fun. If you use this with your students or any other creative ideas inspire you around this post please share these through comments. Thank you for reading.
Riddle Me Ree! What a Difference a Name Makes.

I 've been working on an iterative unit of learning with some of our Lower Phase 2 students this term, that seeks to build on their previous work using Beebots. The unit has focussed on
- routes
- giving and following instructions
- developing procedures
- and prediction and reasoning about shape, space and measure
There is enormous potential for cross curricular activity using control based activity within the primary curriculum to engage with the concept of routes and navigation. Younger students have enjoyed creating games based on programming the Beebot to navigate mazes, collect and sequence objects, moving the floor turtle from point a to point b with as few breaks in the programming structure as possible. Moving to the Probot should not be that different it seems to me. The process of inputting procedures may be new with the addition of a numerical keypad, but the type of game or activity can remain quite similar.
The students are currently engaged with a theme about Pirates... They are excited and stimulated by treasure maps (several making, designing and then aging these at home with their parents), huge wooden sailing ships, and the writing and using of riddles and clues, but one key tool was missing two weeks ago that would truly aid a successful pirate in navigating his/her ship, and unravelling and following the clues left for them.

- modelling how to use the Probot
- inputting instructions with the keypad
- how to clear memory when we had finished
- use of the pen holder as a means to record outputs from the probot
- observing input and output in action.
- What shapes could they see?
- How many of each shape (triangles and quadrilaterals) could they find?
- What was special about the shapes that touched?
- Could they see any lines of symmetry within the shape?
- Could they label the cardinal points of the compass?
- What might be the names of the points in between?

- to practice input independently,
- and to observe output.
- Taking Turns to enter inputs
- Checking that inputs were accurate,
- Correct where mistakes had been made, sometimes this involved deleting the whole procedure and beginning again, and for some groups who had spotted you could navigate the menu, only removing parts that were incorrect and correcting them.
eg You had four sets of fd 10 rt 90 this had produced a square.
You had three sets of fd 10 rt 120 this produced a ?
What might 6 sets of fd 10 rt 60 make?
The final riddles included repeat procedures, and the students had not had these explained to them, either what they were, or how to input these to the keypad. This challenge was theirs, could they figure this out for themselves. Several of the groups had few problems, but I have to admit to not actually explaining the how to any of the groups I worked with, yet they all managed to find out how for themselves, seeking help from others when they got stuck, another winner in this session.
To complete the challenge the students had to label the shapes with their names and add the riddle that had lead to the creation of the shape. These too are ready for display, perhaps in the ICT space. I realy like this activity and intend to adapt it when I begin using LOGO next term with Years 4 and 5.
This week the students began creating treasure island maps on large sheets of paper. On these the students have again been encouraged to draw on their classroom work, to add mysterious and hazardous places with strange and spooky names. I really want the students to add 10cm x 10 cm grids to these maps, though they may need some help with this reflecting on experiences with the floor compass, before using their floor compasses, their developing knowledge of input and output with the probot, their experiences of writing riddles and using my clues to create written directions to the mystery location of the treasure. These will then be tested and evaluated by other students who will be challenged to use these clues to find where an imaginary X marks the spot. Hopefully the students will be as excited and motivated by this challenge as they have been by the others.
22.5.10
Making and playing Computer Games With Scratch: Embedding Games to Share
This post is jumping ahead slightly, since most of my students are still involved in the design and make stages of the process, however one or two have begun to ask, how they can share their games when finished.
After a search around I came across this solution in the Scratch Forums, and as I talk my way through the process for myself I hope that the content here will be useful for others. One of my main reasons for looking into this was the evaluation process, within AF1 of phase 3 units of work, and wanting to make available outcomes created by students for peer assessment and review. The obvious thing to do was to place finished games on the VLE or to encourage students to upload content to a wiki, and use commenting as a way of feeding back.
The VLE with the above solution has been a no go, even with absolute link locations copied and pasted to seperately uploaded html pages, the VLE (Fronter) seems unable to deliver the content. Perhaps this ia an issue with the way files are stored or access rights managed within the platform, either way the html pages will open, but the same error message appears afterward, about being unable to locate the file, regardless of attempts to redirect file locations and so on. I'm sure someone will be able to help, and I would be grateful for any comments that lead me toward resolving this. I guess I also need to contact my colleagues at Fronter, to get their take on this, and to discuss this with our Primary VLE colleagues at ITs Learning, when we meet this week.
SO! to the work around!
For the time being I have opted instead to create a web folder on our web server, to add the game files and applets to this space and then to use hyperlinks from within the VLE or from the school website to enable access to and sharing of these outcomes of learning. So how did this work?
First of all on my local machine/school laptop I created a folder called "scratch_games" and into this have copied completed student game (scratch) files. These have been renamed to exclude capital letters, extraneous characters - the students for some reason insist on adding - and spaces. They have been reduced to a common format eg si_pacman.sb
The html files were created using this file template using code copied from the above site to a notepad document, that was then edited as follows.

Using save as, selecting all files from the file type drop down, these were then saved in the file convention outlined above eg si_gamename.htm
A home page or index file is the next step, created within the Pacman Project folder with individual hyperlinks to each game. Though I will probably play with this idea a little if the embed code works here so that each game is accessible within a single project page.
The "Pacman" folder containing all scratch files, java applets and html files were then uploaded to the school's web server clicking the following hyperlinks will allow you to see examples of how the games currently appear in individual html files. Clcikcing the green flag will start the games, and use of the arrow keys will allow the games to be played.
Unfortunately, for the time being at least, I am unable to embed the applet to run directly in my blog, but this is my next challenge. I am sure there is tweak out there somewhere, something I am missing, and am hopeful that either another "blogger" user can help and leap to my rescue with this particular platform, or that some of my other more experienced visitors can help overcome the wider issue. I hope this makes sense is useful. I look forward to any comments, and thoughts from visitors. Thank you in advance. :o)
An Additional line of thought from a colleague
After Posting at the weekend, I was contacted through comments about an additional means I could try to run the student's scratch games. The above process still applies and is required for this idea and tool to work. Having created the folder, added the scratch files themselves and created an html page for each file using the code above, these are then uploaded to the host web space as outlined above. Next an iframe within the new page. Here is the code that I used in blogger...

The file linked to above should be saved as is, and maintained as a text file, however changing the url and then saving the file makes it a template to be copied and pasted with minor editing needed to point the frame at what you want inside it. Eg in the case of my iframe above the individual student games and so, all I needed to edit after copying and pasting was the html file name, in blue above.
As of yet I have not tried this out in the VLE, but this is something to move onto next. Have a play and see how you get on.
After a search around I came across this solution in the Scratch Forums, and as I talk my way through the process for myself I hope that the content here will be useful for others. One of my main reasons for looking into this was the evaluation process, within AF1 of phase 3 units of work, and wanting to make available outcomes created by students for peer assessment and review. The obvious thing to do was to place finished games on the VLE or to encourage students to upload content to a wiki, and use commenting as a way of feeding back.
The VLE with the above solution has been a no go, even with absolute link locations copied and pasted to seperately uploaded html pages, the VLE (Fronter) seems unable to deliver the content. Perhaps this ia an issue with the way files are stored or access rights managed within the platform, either way the html pages will open, but the same error message appears afterward, about being unable to locate the file, regardless of attempts to redirect file locations and so on. I'm sure someone will be able to help, and I would be grateful for any comments that lead me toward resolving this. I guess I also need to contact my colleagues at Fronter, to get their take on this, and to discuss this with our Primary VLE colleagues at ITs Learning, when we meet this week.
SO! to the work around!
For the time being I have opted instead to create a web folder on our web server, to add the game files and applets to this space and then to use hyperlinks from within the VLE or from the school website to enable access to and sharing of these outcomes of learning. So how did this work?
First of all on my local machine/school laptop I created a folder called "scratch_games" and into this have copied completed student game (scratch) files. These have been renamed to exclude capital letters, extraneous characters - the students for some reason insist on adding - and spaces. They have been reduced to a common format eg si_pacman.sb
- where si is the student's name
- pacman is the game
- .sb is the scratch file extension.
- ScratchApplet.jar
- soundbank.gm
The html files were created using this file template using code copied from the above site to a notepad document, that was then edited as follows.

Using save as, selecting all files from the file type drop down, these were then saved in the file convention outlined above eg si_gamename.htm
A home page or index file is the next step, created within the Pacman Project folder with individual hyperlinks to each game. Though I will probably play with this idea a little if the embed code works here so that each game is accessible within a single project page.
The "Pacman" folder containing all scratch files, java applets and html files were then uploaded to the school's web server clicking the following hyperlinks will allow you to see examples of how the games currently appear in individual html files. Clcikcing the green flag will start the games, and use of the arrow keys will allow the games to be played.
Unfortunately, for the time being at least, I am unable to embed the applet to run directly in my blog, but this is my next challenge. I am sure there is tweak out there somewhere, something I am missing, and am hopeful that either another "blogger" user can help and leap to my rescue with this particular platform, or that some of my other more experienced visitors can help overcome the wider issue. I hope this makes sense is useful. I look forward to any comments, and thoughts from visitors. Thank you in advance. :o)
An Additional line of thought from a colleague
After Posting at the weekend, I was contacted through comments about an additional means I could try to run the student's scratch games. The above process still applies and is required for this idea and tool to work. Having created the folder, added the scratch files themselves and created an html page for each file using the code above, these are then uploaded to the host web space as outlined above. Next an iframe within the new page. Here is the code that I used in blogger...

The file linked to above should be saved as is, and maintained as a text file, however changing the url and then saving the file makes it a template to be copied and pasted with minor editing needed to point the frame at what you want inside it. Eg in the case of my iframe above the individual student games and so, all I needed to edit after copying and pasting was the html file name, in blue above.
As of yet I have not tried this out in the VLE, but this is something to move onto next. Have a play and see how you get on.
Subscribe to:
Posts (Atom)